background image

12

Form No. F2GM-0620

English

OPERATION

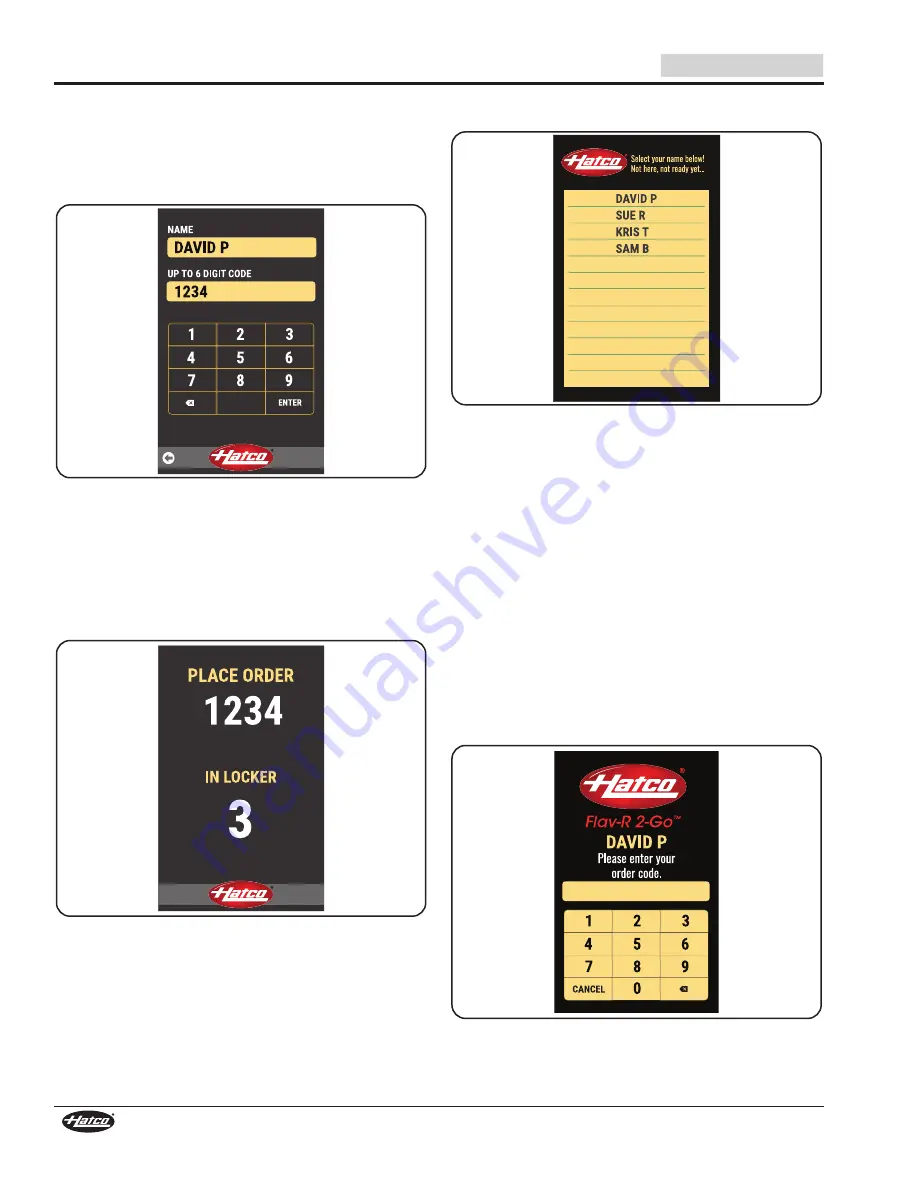
  4.  Type the order code and touch ENTER. 
 

•  The order code can be up to 6 digits.


•  The name will appear on the customer-side screen to 

identify their order. 


•  The order code will be used by the customer to unlock 

their locker(s).

0

Enter Code Screen

NOTE: If the order code is currently in use, the unit will not 

accept it. The unit will notify the operator to “Please 

enter a new order code.”

  5.  When the Place Order screen is displayed, place the food 

order into the locker(s) shown on screen.


•  The timer will begin to count up on the Select Lockers 

screen. The maximum order time is factory set to 45 

minutes.

Place Order Screen

NOTE: Refer to the “Overtime Order” procedure for more 

information about orders that stay in a locker past the 

maximum order time.

Picking up an Order (Customer Side)

Use the following procedure to unlock and remove food from a 

locker on the customer side. A general outline of this procedure 

should be provided to the customer.
  1.  On the Orders Ready screen, touch the name the order 

was placed under.


•  If the customer’s name is not shown on the list, their 

order is not ready.

Orders Ready Screen

  2.  Enter the order code.
 

•  If the order code is entered correctly, the screen will 

notify the customer to: “Please remove your items from 

your lighted locker!”


-  The LED lights for the corresponding locker will flash 

three times, then stay illuminated while the locker 

remains unlocked.


-  The locker(s) will remain unlocked for 20 seconds.

NOTE: If the customer does not remove the food order within 

20 seconds, the customer’s name will disappear from 

the list, and an operator will need to remove the order 

manually. For single-sided models, refer to the “Open a 

Locker Manually” procedure in this section.


•  If the order code is entered correctly, but the maximum 

order time has been exceeded, the screen will notify the 

customer to “Please see staff to reorder!”


•  If the order code is entered incorrectly, the screen will 

notify the customer to “Please try again!” After the second 

incorrect attempt, the customer can select to TRY AGAIN.

Enter Order Code

  3.  Open locker(s) with flashing lights and remove food.
 

•  The locker(s) will remain unlocked for 20 seconds. The 

LED lights will flash white light three times and stay 

illuminated while the locker is unlocked.

Summary of Contents for F2G Series

Page 1: ...este manual Cualquier falla en el seguimiento de las instrucciones contenidas en este manual puede resultar en un serio lesi n o muerte Este manual contiene importante informaci n sobre seguridad con...

Page 2: ...lt In Models 10 Operation 11 General 11 Placing an Order 11 Picking up an Order 12 Open a Locker Manually 13 Clear a Single Order 13 Change a Locker s Heated Ambient Setting 13 Change All Lockers Heat...

Page 3: ...cal receptacle Turn OFF power switch unplug power cord and allow unit to cool before performing any cleaning adjustments or maintenance DO NOT submerge or saturate with water Unit is not waterproof Do...

Page 4: ...ome with locked doors and a touchscreen controller only NOTE The Power I O on off switch is located next to the power cord on single sided access models Power Cord w Plug Touchscreen Controller Power...

Page 5: ...tacle NEMA 5 15P NEMA 5 20P Plug Configurations NOTE Receptacle not supplied by Hatco NOTE The specification label is located next to the power cord See the label for the serial number and verificatio...

Page 6: ...Plug Configuration Unit Weight F2GB 3 A 120 321 2 9 NEMA 5 15P 182 lbs 83 kg F2GB 22 A 120 423 3 8 NEMA 5 15P 209 lbs 95 kg F2GB 32 A 120 627 5 5 NEMA 5 15P 295 lbs 134 kg F2GB 42 A 120 831 7 3 NEMA...

Page 7: ...24 C 45 3 8 1152 mm 22 13 16 578 mm 71 1 4 1809 mm F2G 34 C 62 3 16 1578 mm 22 13 16 578 mm 71 1 4 1809 mm Model Suffix Width A Depth B Height C A 12 305 mm 12 305 mm 12 305 mm C 12 305 mm 20 1 2 521...

Page 8: ...14 11 16 372 mm 49 5 8 1259 mm F2GB 43 A 77 3 4 1975 mm 14 11 16 372 mm 49 5 8 1259 mm F2GB 3 C 60 15 16 1548 mm 23 3 16 588 mm 20 507 mm F2GB 22 C 44 1 8 1121 mm 23 3 16 588 mm 34 13 16 883 mm F2GB 3...

Page 9: ...Make sure the unit is at the proper counter height in an area convenient for use Make sure the countertop is level and strong enough to support the weight of the unit and food product 2 Verify that t...

Page 10: ...78 to 78 1 2 1981 1994 mm 46 13 16 to 47 5 16 1188 1201 mm A B Wall Cutout Dimensions 2 Remove the access panels on the bottom and top of each locker column on the customer side by removing the screws...

Page 11: ...he controller Red text indicates locker is overtime White text indicates time food is in locker Locker is disabled Settings Error Locker is heating Order Code Flip Icon Single Sided Models Only Descri...

Page 12: ...laced under If the customer s name is not shown on the list their order is not ready Orders Ready Screen 2 Enter the order code If the order code is entered correctly the screen will notify the custom...

Page 13: ...r lockers linked to the same order Change a Locker s Heated Ambient Setting Use this procedure to change a single locker s Heated Ambient setting 1 On the Select Lockers screen touch the desired locke...

Page 14: ...tings Screen 4 On the Set Passcode screen enter the current passcode and touch ENTER 5 Enter the new password and touch ENTER The unit will notify the operator Password successfully changed 6 Touch th...

Page 15: ...red green blue and magenta 4 Touch the to return to the Select Lockers screen Updating the Touchscreen Controller Software 1 Move the Power I O on off switch to the I on position 2 Insert a USB drive...

Page 16: ...vironments in which they are used Some aftermarket or generic replacement parts do not have the characteristics that will allow them to operate safely in Hatco equipment This unit has no user servicea...

Page 17: ...e To locate the nearest Service Agency log onto the Hatco website at www hatcocorp com select the Support pull down menu and click on Find A Service Agent or contact the Hatco Parts and Service Team a...

Page 18: ...t to the Unit 3 Complete steps 1 8 of the Installing Floor Mount Models procedure in the INSTALLATION section to secure the front of the unit to the floor 4 Secure the unit to the wall using the appro...

Page 19: ...ARTICULAR PURPOSE OR PATENT OR OTHER INTELLECTUAL PROPERTY RIGHT INFRINGEMENT Without limiting the generality of the foregoing SUCH WARRANTIES DO NOT COVER Coated incandescent light bulbs fluorescent...

Page 20: ...re Plattsburgh 800 634 5005 Duffy s AIS Sauquoit 800 836 1014 J B Brady Inc Syracuse 315 422 9271 NORTH CAROLINA Authorized Appliance Charlotte 704 377 4501 OHIO Akron Canton Comm Svc Inc Akron 330 75...

Reviews: