


GB 23
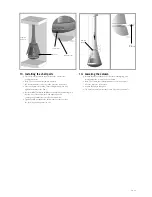
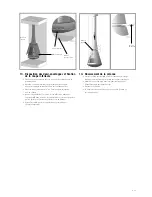
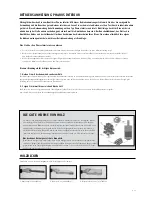
14. Lowering the column
• Remove the two bolts (M8 x 120) from the mounting ring, and
carefully lower the column on the shell parts.
• Note: The column bears stamped numbers as well: they must
be on the front side of the stove.
• Remove the Pharos lifting jack.
• The Pharos Interior is now ready for use. Check its performance.
Bolt
M8x120
Stamped
numbers
13. Installing the shell parts
• Place both shell parts with the hollows on the points of the
positioning screws.
• Note: The shell parts bear stamped numbers:
the stamped numbers must be on the front side of the stove.
• Place the bottom shell on the Pharos lifting jack and jack it up
against the bottom of the frame.
• Insert the M6x75 bolt with an M6 nut and an M6 bodywork ring on it
into the hole of the bottom shell, and tighten it until it
cannot go any further (there is still some thread left).
• Tighten the M6 nut against the bottom shell in order to secure
the shell (Open-end spanner j.w. 13).
Stamped
numbers
Shell part
Lower shell
Bolt+rings+nut
Summary of Contents for PHAROS INTERIOR
Page 2: ......


