background image

3

INSTALLATION AND OPERATION 

INSTRUCTIONS

Note: please read the instructions 

carefully before installation!

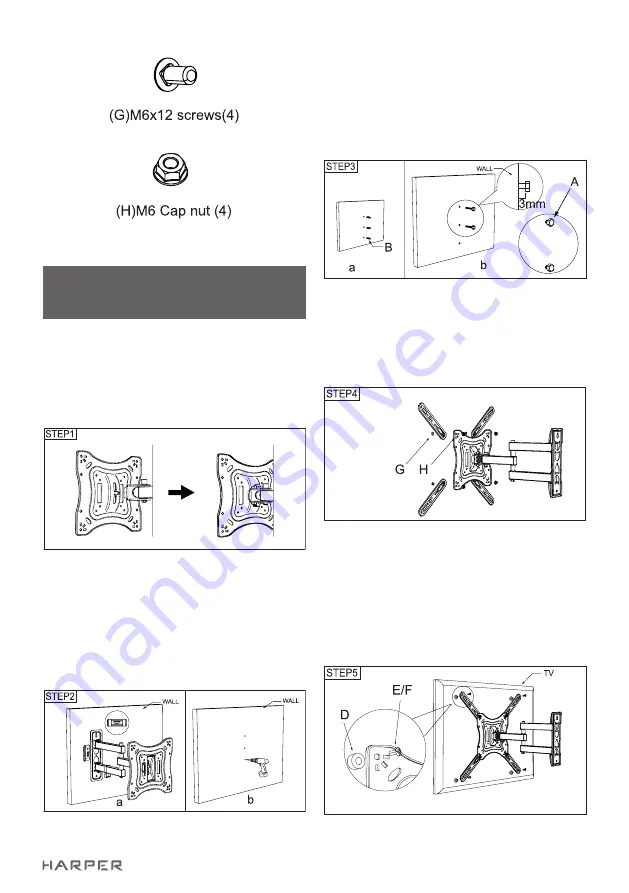
Step 1: Install the TV plate

Step 2: a.Use the wall plate as a template 

to draw three holes. B. Drill holes of dia 

8mm and 60mm depth in the wall.

Step 3: a. Wedge three plastic anchors 

into the holes. B. Screw two self-tap 

screws into plastic anchor that on the 

top two, but do not tighten, keep self-tap 

screws away from all 3mm.

Step 4: Install the adapter.

Step 5: Install the monitor/TV to the front 

plate with suitable screws selected from 

the  parts bag.

Summary of Contents for TVFW-55

Page 1: ...Full motionTV wall mount Наклонно поворотный подвес для телевизоров HARPER TVFW 55 www harper ru RUS User guide Руководство по эксплуатации EN ...

Page 2: ... please contact authorized service centre Do not leave devise and accessories unattended Please keep it out of reach of children and animals Small parts can become cause of suffocation The devise is intended for use in normal climate conditions Extreme climate conditions temperature below 0C or above 45C or high humidity can become reason of malfunction of device PARTS LIST Please check the parts ...

Page 3: ...e to draw three holes B Drill holes of dia 8mm and 60mm depth in the wall Step 3 a Wedge three plastic anchors into the holes B Screw two self tap screws into plastic anchor that on the top two but do not tighten keep self tap screws away from all 3mm Step 4 Install the adapter Step 5 Install the monitor TV to the front plate with suitable screws selected from the parts bag ...

Page 4: ...level and make tighten Step 7 Install the wall plastic cover onto the wall plate Loosen the knob to adjust the angle of monitor TV 20 up and down then screw the knob firmly NOTICE Due to constant improvement of technical characteristics and design manufacture has the right to make changes without prior notice Note This product doesn t contain precious metals ...

Page 5: ...ь к коррозии МЕРЫ ПРЕДОСТОРОЖНОСТИ Не разбирать устройство самосто ятельно это может привести к не исправностям в работе В случае возникновения непола док обращайтесь в авторизован ный сервисный центр Не оставляйте устройство и ак сессуары без присмотра Храни те их вне пределов досягаемо сти детей и домашних животных Мелкие детали устройства могут стать причиной удушья Устройство предназначено для...

Page 6: ...изора Шаг 2 Используйте настенную плату в качестве шаблона Просверлите три отверстия диаметром 8мм и глубиной 60мм Шаг 3 Вбейте в отверстия три пластмассовых дюбеля Затем вкрутите два самонарезающих шурупа так как это показано на рисунке Закручивать нужно не до конца оставить 3мм до шапки винта Шаг 4 Установите необходимые вам расши ряющие адаптеры ...

Page 7: ... отрегулируйте уровень и затяните винт Шаг 7 Установите на настенную пластину пластиковую крышку Ослабьте ручку чтобы отрегулировать уровень наклона телевизора монитора на 20 вверх или вниз затем зафиксируйте положение затянув ручку ВНИМАНИЕ В связи с постоянным усовершенство ванием характеристик и дизайна про изводитель оставляет за собой пра во вносить изменения без предвари тельного уведомления...

Page 8: ...7 tel 74951330210 info harper ru Информация о сертификации товар не подлежит обязательной сертификации Дата производства указана на упаковке Срок службы 2 года Гарантийный срок 1 год Гарантийное обслуживание осуществляется согласно прилагаемому гарантийному талону Гарантийный талон и руководство по эксплуатации являются неотъемлемыми частями дан ного изделия Дополнительную информацию о товаре и да...

Reviews: