background image

2

TABLE OF CONTENTS

Playard warnings ............................................................................... 3
Canopy warnings ............................................................................... 4
General warnings .............................................................................. 5
Suffocation warnings ......................................................................... 6
Parts list ............................................................................................ 7
Playard setup ..................................................................................... 8
Canopy setup ..................................................................................... 9
Care and maintenance ..................................................................... 10
Warranty ......................................................................................... 10

Summary of Contents for Play&Go POP-UP

Page 1: ...SE Do not use this product until you read and understand the instructions in this manual ADULT ASSEMBLY REQUIRED STOP INSTRUCTION MANUAL P O P U P Play Go TM Portable Playard Harmony Juvenile Products...

Page 2: ...2 TABLE OF CONTENTS Playard warnings 3 Canopy warnings 4 General warnings 5 Suffocation warnings 6 Parts list 7 Playard setup 8 Canopy setup 9 Care and maintenance 10 Warranty 10...

Page 3: ...n improvised netting or covers are placed on top of the playpen NEVER add such items to confine child in playpen FOR YOUR CHILD S SAFETY FOLLOW ALL LABELS ON THIS PRODUCT AND IN THESE WRITTEN INSTRUCT...

Page 4: ...must be properly assembled PRIOR to use Make sure that all clips are firmly locked onto the frame DISCONTINUE use if child can remove or disassemble canopy or canopy components NEVER use this accesso...

Page 5: ...use the play yard on uneven or unsafe surfaces NEVER use near stoves heaters or other heat sources ALWAYS keep the play yard away from hazards that may injure your child DO NOT change tamper with or...

Page 6: ...petscanforcethemselvesintoverysmallopenings NEVER tie add anything to in the play yard i e accessories toys monitors etc as this may cause serious injury or death STRANGULATION HAZARD ALWAYS attach th...

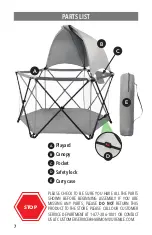
Page 7: ...BEGINNING ASSEMBLY IF YOU ARE MISSING ANY PARTS PLEASE DO NOT RETURN THIS PRODUCT TO THE STORE PLEASE CALL OUR CUSTOMER SERVICE DEPARTMENT AT 1 877 306 1001 OR CONTACT US AT CUSTOMERSERVICE HARMONYJUV...

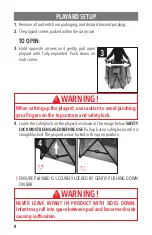
Page 8: ...own in the image below SAFETY LOCK MUSTBE ENGAGED BEFORE USE Pull up bar on safety lock until it is straight locked The playard is now locked in the open position ENSURE PLAYARD IS SECURELY LOCKED BY...

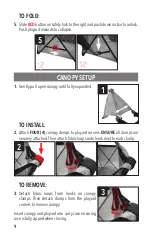
Page 9: ...tach fabric loops onto hook next to each clamp TO REMOVE 3 Detach fabric loops from hooks on canopy clamps Then detach clamps from the playard corners to remove canopy Insert canopy and playard into c...

Page 10: ...replacement parts for this product or replace this product HJP reserves the right to discontinue or change fabrics parts models or products or to make substitutions To make a claim under this warrant...

Page 11: ...NOTES...
Page 12: ...ION FUTURE Ne pas installer ni utiliser ce produit jusqu ce que vous ayez lu et compris les instructions contenues dans ce manuel DOIT TRE ASSEMBL PAR UN ADULTE ARR T MANUEL D INSTRUCTIONS P O P U P P...

Page 13: ...MATI RES Mises en garde Parc 3 Mises en garde Capote 4 Mises en garde g n rales 5 Risque de suffocation 6 Liste de pi ces 8 Assemblage du parc 9 Installation de la capote 10 Entretien et nettoyage 11...

Page 14: ...dans ce parc pour enfant POUR LA S CURIT DE VOTRE ENFANT SUIVRE TOUTES LES CONSIGNES INSCRITES SUR LES TIQUETTES DE CE PRODUIT ET DANS LES PR SENTES INSTRUCTIONS NE PAS UTILISER CE PARC POUR ENFANT M...

Page 15: ...E JAMAIS retoucher le fini de ce produit MISES EN GARDE CAPOTE NE PAS utiliser cet accessoire moins d tre en mesure de suivre pr cis ment les instructions qui l accompagnent La capote y compris toutes...

Page 16: ...venir de se pincer ou se prendre les doigts Garder tous les enfants loign s du parc lors du montage lorsqu il est partiellement ouvert Installer TOUJOURS le parc sur une surface plane S ASSURER la su...

Page 17: ...enfant pr s d une fen tre ou d une porte fen tre o l enfant pourrait saisir les cordes d un store ou d un rideau et s trangler NE JAMAIS placer le parc dans un endroit o des cordons sont la port e de...

Page 18: ...r quoi que ce soit au parc accessoires jouets interphones de surveillance etc car cela pourrait causer des blessures graves ou la mort RISQUE DE STRANGULATION Fixer toujours la capote en toute s curit...

Page 19: ...DE COMMENCER L ASSEMBLAGE S IL VOUS MANQUE DES PI CES VEUILLEZ NE PAS RETOURNER LEPRODUITAUMAGASIN VEUILLEZAPPELERNOTRESERVICE LA CLIENT LE AU 1 877 306 1001 OU NOUS JOINDRE CUSTOMERSERVICE HARMONYJU...

Page 20: ...ILISATION Tirer la barre vers le haut sur le verrou de s curit jusqu ce qu elle soit rectiligne verrouill e Le parc est maintenant verrouill en position ouverte ASSURER QUE LE PARC EST BIEN VERROUILL...

Page 21: ...R 2 Fixer les QUATRE 4 pinces de la capote aux coins du parc S ASSURER que toutes les pinces sont bien fix es Fixer ensuite les boucles de tissu sur le crochet situ c t de chaque pince POUR RETIRER 3...

Page 22: ...de rechangepourceproduitouremplaceraleproduit HJPser serveledroitdecesser lasuite demodifier oudesubstituer toffes pi ces mod lesouproduits Pourpr senteruner clamationautitredecettegarantie vousdevrez...

Reviews: