

© 2017 Harman. All rights reserved. Modero, AMX, AV FOR AN IT WORLD, HARMAN, and their respective logos are registered trademarks of
HARMAN. Oracle, Java and any other company or brand name referenced may be trademarks/registered trademarks of their respective companies.
AMX does not assume responsibility for errors or omissions. AMX also reserves the right to alter specifications without prior notice at any time.
The AMX Warranty and Return Policy and related documents can be viewed/downloaded at www.amx.com.
3000 RESEARCH DRIVE, RICHARDSON, TX 75082 AMX.com | 800.222.0193 | 469.624.8000 | +1.469.624.7400 | fax 469.624.7153
AMX (UK) LTD, AMX by HARMAN - Unit C, Auster Road, Clifton Moor, York, YO30 4GD United Kingdom • +44 1904-343-100 • www.amx.com/eu/
5095704-00 REV: A
Last Revised: 11/2017
Basic KVM Setup
The N2135A Encoders and N2235A Decoders are KVM-capable. By default, USB
connections are enabled and configured to follow video switching. Follow these steps
for basic KVM setup. To learn about some of the more advanced KVM capabilities, see
the section
Advanced KVM Setup (with added security features)
1.
On the N2135A Encoder, connect the USB Mini-B port (designated by a laptop
icon) to the computer to be controlled.
2.
Connect the computer’s video output to the Encoder’s
HDMI IN
port.
3.
On the N2235A Decoder, connect the
HDMI OUT
to the display.
4.
Connect a USB keyboard and mouse to the Decoder’s USB Standard-A ports (they
can be plugged into either port).
NOTE: For wireless devices, simply plug the wireless signal receivers into these
ports. For keyboard and mouse combos (with a single connection) use the
keyboard port.
5.
Using N-Able, click the
Unit Management
tab.
6.
Click the
Auto Discover
button to discover your new devices (if you have not
already done so).
7.
Once discovery is complete (and you see the new units listed in N-Able), click the
Video Matrix
tab.
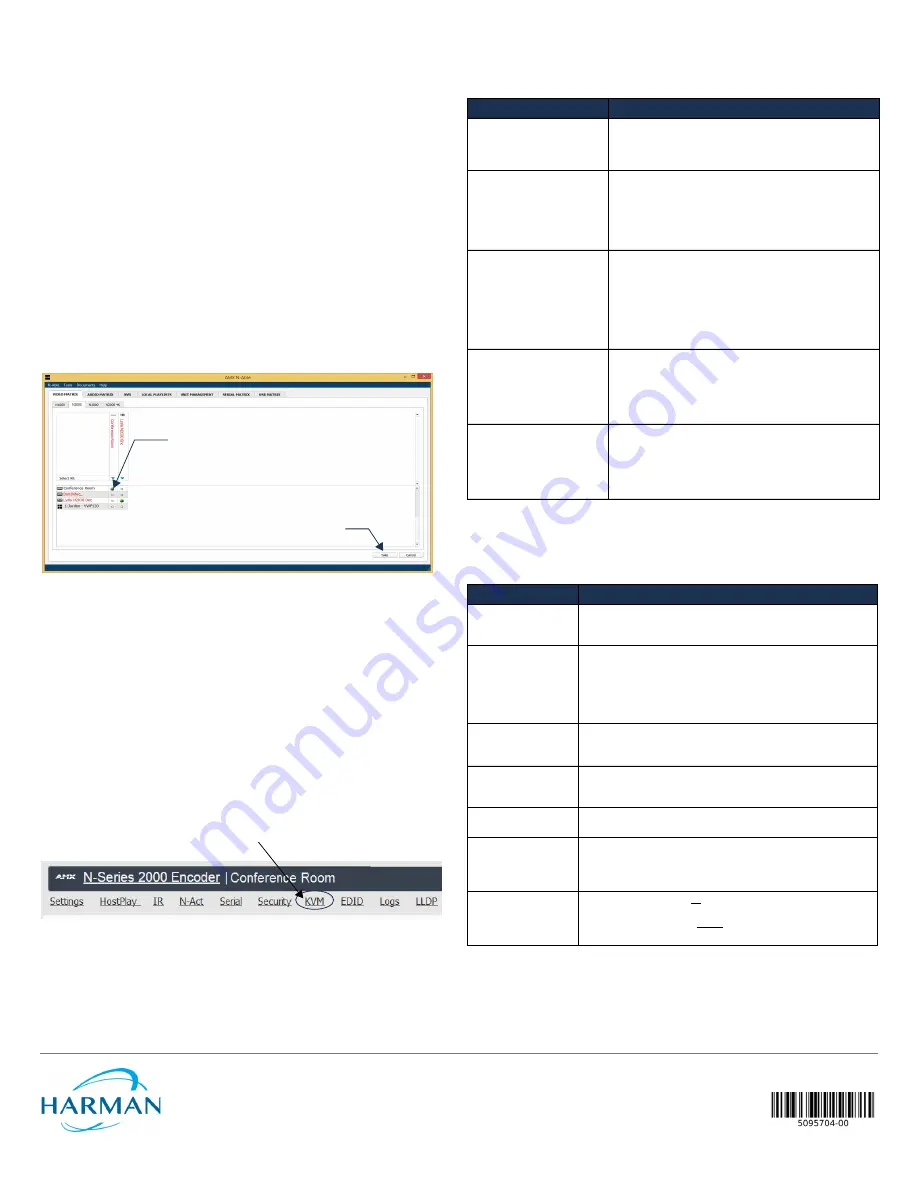
8.
On the matrix, click the common cell for the desired Encoder/Decoder streaming
combination. See the screen shot below for an example.
9.
Click the
Take
button to make the change to your matrix. The radio button turns
green to indicate the connection was successful.
Video/USB Switching Options
USB Follows Video
: By default, units can be switched using N-Able without modifying
the configuration. When you switch video streams (using the matrix as shown above)
the USB functionality will follow the video.
Independent USB Switching:
Use N-Able’s
USB Matrix
tab to switch USB control
(without affecting video).
Independent Video Switching:
To switch video streams
without
affecting USB control,
first select
N-Able > Settings
from N-Able’s main menu. When the
N-Able Settings
dialog box is displayed, disable the
USB follows Video switching for KVM units
. Now you
can use the
Video Matrix
to switch video streams only.
Advanced KVM Functionality:
To have the ability to use KVM hotkeys for switching,
KVM
Advanced Settings
must be enabled on the individual unit (select
KVM
from the top of
the unit’s web interface). The next section discusses these settings in more detail.
Advanced KVM Setup (with added security features)
You can configure devices for more advanced KVM operation on the Encoder and
Decoder
KVM
pages. To access these pages, double-click the unit’s name in the matrix
and click
KVM
at the top of the
Settings
page (see below).
FIG. 3
SELECTING THE KVM PAGE
NOTE: Many of these options are easier to manage in N-Able’s KVM Wizard (especially in
large configurations). Select Tools > KVM Wizard from the N-Able main menu to access
the wizard.
The following table describes some of the more advanced functionality. It is important
to note that many of these options only appear on the
KVM
page when
USB
is enabled
as well as
KVM Advanced Settings
.
Warning! You must assign KVM passwords to your Encoders and Decoders (as well as
change the default login password from admin/password) in order for your system to
be secure.
Troubleshooting Guidelines
Please contact SVSI technical support at [email protected] or 256.461.7143
(x9900) for assistance with any installation issues.
FIG. 2
CREATING STREAMING COMBINATIONS
Enabling this cell causes
Conference Room Decoder
to listen
to
Conference Room Encoder
.
Click
Take
to apply changes.
Options
Descriptions
Permission Levels
Determines which Decoders can communicate with which
Encoders. A Decoder must have a permission level that is
equal to or greater than
the Encoder in order for
communication to be successful.
KVM Encoders table
Use the
KVM Encoders
table (on the Decoder’s
KVM
page)
to:
• Let the Decoder know the Encoder passwords it needs to
establish communication.
• Assign Encoder hotkeys.
• Add/remove Encoders from the Decoder’s list.
Passwords
By default, KVM streams are encrypted with a common
password. You can change the password on the
Settings
page of the Encoder. If you change Encoder passwords, you
will need to supply the new information to the Decoders to
allow communication to continue.
A Decoder only receives password information for the
Encoders on the network that have been associated with
that Decoder as mentioned previously.
Hotkeys
To use hotkeys for easy switching, enable
KVM Directory
Screen Enable
on the Decoder’s
KVM
page. You can now
access the KVM Directory Screen at any time by pressing the
<Scr Lk>
button twice on the keyboard connected to the
Decoder. This screen displays all Encoders associated with
that Decoder (and their corresponding hotkey).
Import and export KVM CSV
files
Multiple Encoders and Decoders can be configured from a
single CSV file (which is generated using the
KVM
Wizard
in
N-Able
). Once all changes are made, upload the file to each
unit using its
KVM
page.Click the
Choose File
button,
browse to the
CSV
file you exported from the wizard, and
click the
Upload
button.
Problem
Possible Solution
Video is not
transmitting.
• Verify that the Encoder
TX Enable
setting is turned on.
(Encoders ship from the factory with their video output turned
off by default.)
Local Play
graphic is
displayed.
• Verify Decoder is assigned to view a valid stream in the N-Able
matrix.
• Verify Decoder is currently in live play mode (black text on matrix
view).
• Verify network is properly configured and set up. If needed,
connect Encoder directly to Decoder to verify network issues.
Host Play
graphic is
displayed.
• Verify Encoder is in live play mode (black text in matrix).
• Verify source is attached and is outputting a valid signal (
HDMI
LED on Encoder is on).
Unsupported
Resolution
graphic is
displayed.
• Change source resolution to a valid resolution (try 720p60).
• Verify cabling is correct.
Copy Protected Content
screen is displayed.
• Contact technical support.
Black screen/no
graphic is displayed.
• Set Decoder to local play. If the local play graphic does not
appear, check the display input settings and cabling.
• If local play appears, set Decoder to live play and verify network
is configured properly.
No audio is detected.
• If there is no audio on all
Decoders, verify audio settings are
correct on Encoder.
• If there is no audio on a single Decoder, verify audio settings are
correct on Decoder.


