background image


 Setting 

up 


HSC 171 HSC 271 HSD 171 HSD 271 

  25 


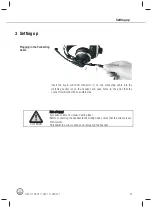
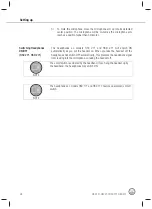
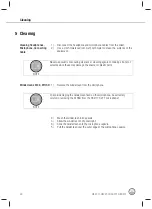
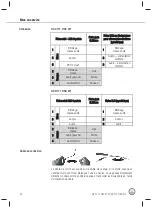
The microphone arm swivels through an arc of 270 degrees, allowing you to 

put the headset on with the microphone sitting in front of either the left or right 
corner of your mouth as required by the job at hand or dictated by available 
space. 


MUTE

ON


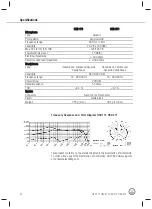
The microphone arm of each model features an automatic ON/MUTE switch. 

1)


To switch the microphone ON, move the microphone arm down far 

enough to place the microphone in front of the corner of your mouth. The 
microphone will switch ON as soon as the microphone arm reaches a 

position lower than horizontal. 

2)


Talk into the microphone. 
The flexible microphone arm allows 
you to adjust the microphone sound 
by varying the working distance. As 

you move the microphone away from 
your mouth, the bass content (and 
overall level) of the audio signal will 

decrease. 

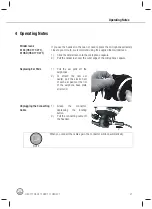
Putting the Headset on 

Switching the Microphone 

ON/OFF and Testing it 


Summary of Contents for AKG HSC 271

Page 1: ...pement MODE D EMPLOI 34 Veuillez lire cette notice avant d utiliser le syst me ISTRUZIONI PER L USO 50 Prima di utilizzare l apparecchio leggere il manuale MODO DE EMPLEO 66 Sirvase leer el manual ant...

Page 2: ...chlusskabel 8 Headset aufsetzen 9 Mikrofon ein ausschalten und testen 9 Kopfh rer ein ausschalten HSC 271 HSD 271 10 4 Anwendungshinweise 11 Windschutz W 44 HSC 171 271 W HSD HSD 171 271 11 Ohrpolster...

Page 3: ...richt und mit einer Sicherheitserdung versehen ist Wenn Sie das Ger t verschrotten entfernen Sie die Batterien bzw Akkus trennen Sie Geh use Elektronik und Kabel und entsorgen Sie alle Komponenten gem...

Page 4: ...d Erfolg HSC 171 HSC 271 HSD 171 HSD 271 1 x Headset HSC 171 1 x Headset HSC 271 1 x Headset HSD 171 1 x Headset HSD 271 1 x Windschutz W 44 f r Mikrofon 1 x Windschutz W HSD f r Mikrofon 2 x Velours...

Page 5: ...tikelnr 2955 H 00510 MK HS XLR 4C Artikelnr 2955 H 00520 Anschluss Kabelset Mikrofon Kopfh rer MK HS XLR 5D 5pin XLR male MK HS XLR 4D 4pin XLR female MK HS PC 3 5mm Klinkenstecker MK HS Studio C 3pin...

Page 6: ...astische Lagerung des Mikrofons garantiert eine weitgehende Unterdr ckung von Hantierungsger uschen Der Mikrofonarm ist um 270 schwenkbar f r rechts oder linksseitiges Tragen und mit einer Mikrofon St...

Page 7: ...ich der Stecker mit einem h rbaren Klick automatisch verriegelt ACHTUNG Verletzungsgefahr Zu hohe Lautst rke verursacht den Verlust des H rsinns Bevor Sie das Headset an das Mischpult anstecken achten...

Page 8: ...ts Ring HSD 171 HSD 271 6 pol Mini XLR Stecker 6 3mm Klinken stecker XLR Stecker symmetrisch 1 Abschirmung Audio Masse 1 Abschirmung Audio Masse 5 Audio 2 Audio 6 Mikrofon Audio 3 Audio 2 Abschirmung...

Page 9: ...mmschaltfunktion ausgestattet 1 Um das Mikrofon einzuschalten schwenken Sie den Mikrofonarm soweit nach unten bis das Mikrofon vor dem Mundwinkel liegt Das Mikrofon schaltet sich ein sobald der Mikrof...

Page 10: ...ch automatisch ein sobald Sie das Headset aufsetzen Wenn Sie das Headset abnehmen schaltet sich der Kopfh rer automatisch aus Dies verhindert ein bersprechen des Kopfh rersignals in das Mikrofon wenn...

Page 11: ...ber das u ere Ende der Mikrofonkapsel 1 Ziehen Sie die Ohrpolster von den H rsystemen ab 2 Zum Befestigen der neuen Ohrpolster ziehen Sie den elastischen Saum rundherum ber die Grundplatte des H rsyst...

Page 12: ...deaktiviert Sie k nnen die Bassabschw chung wie folgt aktivieren 2 1 3 4 1 Ziehen Sie den Phantomspeiseadapter vom Mischpulteingang ab 2 L sen Sie die Befestigungsschraube 1 am Phantomspeiseadapter 3...

Page 13: ...Phantomspeiseadapter vom Mischpulteingang ab 2 L sen Sie die Befestigungsschraube 1 am Phantomspeiseadapter 3 Schrauben Sie die Kabelmuffe 2 ab 4 Ziehen Sie den Print VORSICHTIG aus dem Geh use heraus...

Page 14: ...den Lack sowie die Kunststoffteile besch digen k nnten 1 Nehmen Sie den Windschutz vom Mikrofon ab HINWEIS Ziehen Sie den Windschutz W HSD mit gro er Vorsicht vom Mikrofon des HSD 171 271 ab um den f...

Page 15: ...nz 200 Ohm Empfohlene Lastimpedanz 2 000 Ohm Speisespannung 9 52 V Phantomspeisung Stromaufnahme 2 mA Kopfh rer Bauweise geschlossener ohraufliegender dynamischer Kopfh rer geschlossener ohrumschlie e...

Page 16: ...ener ohraufliegender dynamischer Kopfh rer geschlossener ohrumschlie ender dynamischer Kopfh rer Kennschalldruck 94 dB SPL mW bertragungsbereich 18 26 000 Hz 16 28 000 Hz Nennbelastbarkeit 200 mW Nenn...

Page 17: ...bei der Bestellung f r jeden Ersatzteil die entsprechende Artikelnummer an Artikel Bezeichnung Artikelnummer ECV 171 Ohrpolster 171 Velours 2955Z2501 ECV 271 Ohrpolster 271 Velours 2955Z2601 ECL 171...

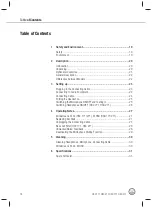
Page 18: ...ing Cable 24 Putting the Headset on 25 Switching the Microphone ON OFF and Testing it 25 Switching Headphones ON OFF HSC 271 HSD 271 26 4 Operating Notes 27 Windscreens W 44 HSC 171 271 W HSD HSD 171...
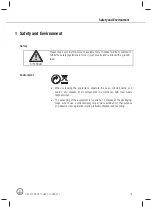
Page 19: ...a ground lead When scrapping the equipment separate the case circuit boards and cables and dispose of all components in accordance with local waste disposal rules The packaging of the equipment is rec...

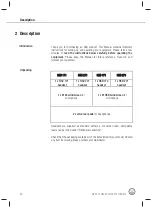
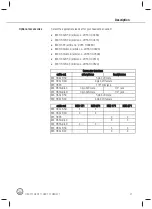
Page 20: ...nd impress your audience HSC 171 HSC 271 HSD 171 HSD 271 1 x HSC 171 headset 1 x HSC 271 headset 1 x HSD 172 headset 1 x HSD 271 headset 1 x W 44 windscreen for microphone 1 x W HSD windscreen for mic...

Page 21: ...rticle no 2955 H 00510 MK HS XLR 4C article no 2955 H 00520 Connector interface cable set microphone headphones MK HS XLR 5D 5pin XLR male MK HS XLR 4D 4pin XLR female MK HS PC 1 8 mini jack MK HS Stu...

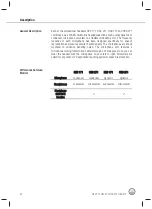
Page 22: ...ures excellent audio quality The microphones are shock mounted to minimize handling noise The microphone arm features a microphone muting function and swivels through a 270 degree arc so you can wear...

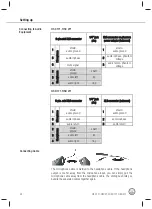
Page 23: ...e headset and push home to the point that the connector will lock with an audible click ATTENTION Risk of injury Excessive volume can cause hearing loss Before connecting the headset to the mixing des...

Page 24: ...D 171 HSD 271 6 pin mini XLR connector 1 4 jack plug XLR connector balanced 1 shield audio ground 1 shield audio ground 5 audio inphase 2 audio inphase 6 Microphone audio return 3 audio return 2 shiel...

Page 25: ...switch 1 To switch the microphone ON move the microphone arm down far enough to place the microphone in front of the corner of your mouth The microphone will switch ON as soon as the microphone arm r...

Page 26: ...l switch ON automatically as you put the headset on When you take the headset off the headphones will switch OFF automatically This prevents the headphone signal from leaking into the microphone on ta...

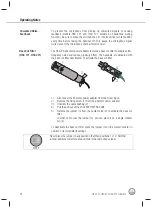
Page 27: ...r edge of the microphone capsule 1 Pull the ear pads off the earphones 2 To attach the new ear pad s pull the elastic hem of each ear pad over the rim of the earphone base plate all around 1 Grasp the...

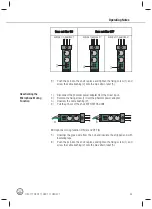
Page 28: ...he bass cut filter deactivated To activate the bass cut filter 2 1 3 4 1 Disconnect the phantom power adapter from the mixer input 2 Remove the fixing screw 1 from the phantom power adapter 3 Unscrew...

Page 29: ...the phantom power adapter from the mixer input 2 Remove the fixing screw 1 from the phantom power adapter 3 Unscrew the cable bushing 2 4 Pull the pcb out of the shell WITH EXTRA CARE a b Microphone...

Page 30: ...may damage the enamel or plastic parts 1 Remove the windscreen from the microphone NOTE To avoid damaging the windscreen fixed on the microphone be extremely careful in removing the W HSD from the HSD...

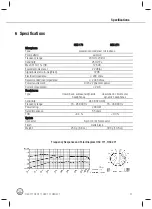
Page 31: ...200 ohms Recommended load impedance 2 000 ohms Power requirement 9 to 52 V phantom power Current consumption 2 mA Headphones Type closed back supraaural dynamic headphones closed back circumaural dyn...

Page 32: ...back supraaural dynamic headphones closed back circumaural dynamic headphones Sensitivity 94 dB SPL mW Frequency range 18 26 000 Hz 16 28 000 Hz Power rating 200 mW Rated impedance 55 ohms THD 0 4 0...

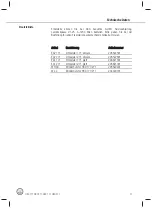
Page 33: ...a When ordering be sure to state the appropriate item number for each item Item Description Item number ECV 171 171 velour ear pad 2955Z2501 ECV 271 271 velour ear pad 2955Z2601 ECL 171 171 smooth ear...

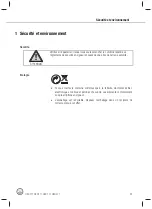
Page 34: ...mise hors service du micro et essal 41 Mise en service mise hors service du casque HSC 271 HSD 271 42 4 Conseils pour l utilisation 43 Bennettes antivent W 44 HSC 171 271 W HSD HSD 171 271 43 Remplace...

Page 35: ...curit en vigueur et poss de une prise de terre de s curit Si vous mettez le combin micro casque la ferraille d montez bo tier lectronique et c bles et liminez chacun de ces l ments conform ment aux p...

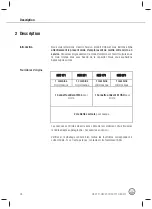
Page 36: ...succ s HSC 171 HSC 271 HSD 171 HSD 271 1 combin micro casque 1 combin micro casque 1 combin micro casque 1 combin micro casque 1 bonnette antivent W44 pour micro 1 bonnette antivent W HSD pour micro 2...

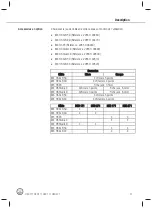
Page 37: ...rence 2955 H 00510 MK HS XLR 4C R ference 2955 H 00520 Connexion C ble Micro Casque MK HS XLR 5D XLR male 5 points MK HS XLR 4D XLR female 4 points MK HS PC Fiche jack 3 5mm MK HS Studio C XLR male 3...

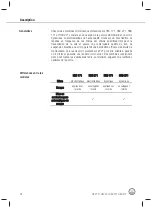
Page 38: ...La suspension lastique du micro garantit une limination efficace des bruits de manipulation Le bras de micro pivotant sur 270 peut tre orient gauche ou droite et poss de une fonction micro muet Ces c...

Page 39: ...nnonce le verrouillage automatique du c ble ATTENTION Risques de blessure Un volume sonore trop lev peut entra ner la perte de l audition Avant de brancher le casque la console de mixage veillez ce qu...

Page 40: ...Pointe 4 Casque Audio droit Anneau HSD 171 HSD 271 Fiche mini XLR 6 points Fiche jack 6 35mm Fiche XLR sym trique 1 Blindage masse audio 1 Blindage masse audio 5 Audio 2 Audio 6 Micro Audio 3 Audio 2...

Page 41: ...muet 1 Pour mettre le micro en service abaissez le bras jusqu ce que le micro se trouve devant la commissure des l vres Le micro se met automatiquement en service d s que le bras est peu pr s horizon...

Page 42: ...e l arceau repose sur la t te La coupure est automatique d s que l arceau ne repose plus sur la t te On vite ainsi la diaphonie du signal casque dans le micro lorsqu on pose le combin REMARQUE L inter...

Page 43: ...sule 1 Retirez les coussinets d oreille des syst mes d coute 2 Pour fixer les nouveaux coussinets d oreille faites passer l ourlet lastique par dessus la plaque de base du syst me d coute 1 Appuyez su...

Page 44: ...r de graves est d sactiv Pour activer l att nuateur de graves proc dez comme suit 2 1 3 4 1 Retirez l adaptateur pour alimentation fant me de l entr e de la console de mixage 2 D vissez la vis de fixa...

Page 45: ...ation fant me de l entr e de la console de mixage 2 D vissez la vis de fixation 1 de l adaptateur pour alimentation fant me 3 D vissez le manchon de c ble 2 4 Sortez AVEC PR CAUTIONS la carte du bo ti...

Page 46: ...u un solvant qui risqueraient d ab mer la laque et les l ments en plastique 1 Enlevez la bonnette du micro REMARQUE Sur le micro HSD 171 271 enlevez la bonnette W HSD avec beaucoup de pr cautions pour...

Page 47: ...00 Ohm Imp dance de charge recommand e 2 000 Ohm Tension d alimentation Alimentation fant me 9 52 V Consommation 2 mA Casque Type Casque ferm dynamique appliqu sur les oreilles Casque ferm dynamique e...

Page 48: ...ferm dynamique appliqu sur les oreilles Casque ferm dynamique enveloppant les oreilles N P A 94 dB SPL mW Gamme de fr quences 18 26 000 Hz 16 28 000 Hz Puissance admissible nominale 200 mW Imp dance n...

Page 49: ...e Veuillez indiquer le num ro de r f rence de chacune des pi ces faisant l objet de la commande Article D signation R ference ECV 171 Oreillette 171 velours 2955Z2501 ECV 271 Oreillette 271 velours 29...

Page 50: ...set 57 Come inserire testare il microfono 57 Come inserire disinserire la cuffia HSC 271 HSD 271 58 4 Indicazioni per l impiego 59 Antisoffio W 44 HSC 171 271 W HSD HSD 171 271 59 Come sostituire i cu...

Page 51: ...alle norme di sicurezza vigenti e se dotato di una messa a terra di sicurezza Se rottamate l apparecchio separate scatola parti elettroniche e cavi e smaltite tutti i componenti secondo le norme di s...

Page 52: ...171 HSC 271 HSD 171 HSD 271 1 Headset HSC 171 1 Headset HSC 271 1 Headset HSD 171 1 Headset HSD 271 1 antisoffio W 44 per microfono 1 antisoffio W HSD per microfono 2 cuscinetti auricolari in velluto...

Page 53: ...ero articolo 2955 H 00510 MK HS XLR 4C Numero articolo 2955 H 00520 Collegamento Cavo Microfono Cuffia MK HS XLR 5D XLR male a 5 poli MK HS XLR 4D XLR female a 4 poli MK HS PC Connettore jack 3 5mm MK...

Page 54: ...o garantisce la soppressione su larga scala dei rumori prodotti dal tocco delle mani Il braccio microfonico pu esser girato di 270 per poterlo portare a sinistra o a destra ed dotato di una funzione p...

Page 55: ...t fin quando il connettore si blocca automaticamente con un clic ben udibile ATTENZIONE Pericolo di lesioni Un volume troppo alto provoca la perdita dell udito Prima di collegare l headset al mixer as...

Page 56: ...ra Punta 4 Cufia Audio destra Annello HSD 171 HSD 271 Connettore mini XLR a 6 poli Connettore jack da 6 3 mm Connettore XLR simmetrico 1 Schermatura massa audio 1 Schermatura massa audio 5 Audio 2 Aud...

Page 57: ...lenziamento 1 Per inserire il microfono girate il braccio microfonico in basso fin quando il microfono si trova davanti all angolo della bocca Il microfono si inserisce appena il braccio microfonico s...

Page 58: ...maticamente appena indossate l headset Se vi togliete l headset la cuffia si disinserisce automaticamente Cos evitate il leakage del segnale della cuffia nel microfono quando vi togliete la cuffia AVV...

Page 59: ...icrofonica 1 Sfilate i cuscinetti auricolari dai sistemi d ascolto 2 Per fissare i nuovi cuscinetti auricolari tendete l orlo elastico tutto intorno alla piastra base del sistema d ascolto 1 Premete i...

Page 60: ...attenuazione disattivata Potete attivare l attenuazione dei bassi nel modo seguente 2 1 3 4 1 Sfilate l adattatore per alimentazione phantom dall ingresso del mixer 2 Allentate la vite di fissaggio 1...

Page 61: ...antom dall ingresso del mixer 2 Allentate la vite di fissaggio 1 disposta sull adattatore per l alimentazione phantom 3 Svitate il manicotto del cavo 2 4 Sfilate CAUTAMENTE il print dalla scatola a b...

Page 62: ...ernice e i componenti in materia sintetica 1 Sfilate l antisoffio dal microfono AVVERTENZA Sfilate l antisoffio W HSD molto cautamente dal microfono dell HSD 171 271 per non danneggiare l antisoffio d...

Page 63: ...m Impedenza di carico raccomandata 2 000 Ohm Tensione di alimentazione 9 52 V alimentazione phantom Assorbimento 2 mA Cuffia Costruzione cuffia dinamica chiusa poggiata sull orecchio cuffia dinamica c...

Page 64: ...ggiata sull orecchio cuffia dinamica chiusa racchiude l orecchio Livello di pressione acustica caratteristica 94 dB SPL mW Risposta in frequenza 18 26 000 Hz 16 28 000 Hz Carico limite nominale 200 mW...

Page 65: ...pezzo di ricambio il rispettivo numero d articolo Articolo Denominazione Numero articolo ECV 171 cuscinetto auricolare 171 in velluto 2955Z2501 ECV 271 cuscinetto auricolare 271 in velluto 2955Z2601 E...

Page 66: ...rse el casco 73 Conectar desconectar y probar el micr fono 73 Conectar desconectar los auriculares HSC 271 HSD 271 74 4 Indicaciones de uso 75 Pantalla antiviento W 44 HSC 171 271 W HSD HSD 171 271 75...

Page 67: ...ntes y tenga una conexi n a tierra 1 Para deshacerse del aparato des rmelo separando caja electr nica y cables y elimine cada uno de los componentes cumpliendo con las correspondientes disposiciones v...

Page 68: ...uevo equipo HSC 171 HSC 271 HSD 171 HSD 271 1 x Casco HSC 171 1 x Casco HSC 271 1 x Casco HSD 171 1 x Casco HSD 271 1 x pantalla antiviento W 44 para micr fono 1 x pantalla antiviento W HSD para micr...

Page 69: ...art culo 2955 H 00510 MK HS XLR 4C Numero de art culo 2955 H 00520 Conexi n Cable Micr fono Auriculares MK HS XLR 5D XLR male de 5 polos MK HS XLR 4D XLR female de 4 polos MK HS PC Clavia jack de 3 5m...

Page 70: ...arantiza tambi n en gran medida la represi n de ruidos de manipulaci n El brazo de micr fono es virable en 270 para uso al lado derecho o izquierdo y est equipado con una funci n de puesta en mudo del...

Page 71: ...que el conector se enclave autom ticamente con un clic audible ATENCI N PELIGRO DE LESIONES Un volumen excesivamente alto causa p rdida de audici n Antes de conectar los auriculares al pupitre de mezc...

Page 72: ...res audio derecha anillo HSD 171 HSD 271 Conector mini XLR de 6 polos Clavija jack de 6 3 mm Conector XLR balanceado 1 apantallamiento masa audio 1 apantallamiento masa audio 5 audio 2 audio 6 Micr fo...

Page 73: ...bios dependiendo de las necesidades o el espacio disponible MUTE ON El brazo de micr fono de todos los modelos est equipado con una funci n de puesta en mudo 1 Para conectar el micr fono vire el brazo...

Page 74: ...brazo de micr fono se encuentra m s alto que la posici n horizontal Los auriculares de los modelos HSC 271 HSD 271 se conectan autom ticamente cuando Vd se pone el casco Cuando Vd se quita el casco se...

Page 75: ...libre de la c psula del micr fono con la pantalla antiviento 1 Retire las almohadillas de los aud fonos 2 Para fijar las nuevas almohadillas pase el borde el stico por encima de la placa de asiento d...

Page 76: ...proceda como sigue 2 1 3 4 1 Desconecte el adaptador de alimentaci n fantasma de la entrada del pupitre de mezcla 2 Suelte el tornillo de fijaci n 1 del adaptador de alimentaci n fantasma 3 Desatorni...

Page 77: ...ntasma de la entrada del pupitre de mezcla 2 Suelte el tornillo de fijaci n 1 del adaptador de alimentaci n fantasma 3 Desatornille el manguito de cable 2 4 Saque el circuito impreso con MUCHO CUIDADO...

Page 78: ...zas de pl stico 1 Retire la pantalla antiviento del micr fono NOTA Retire con mucho cuidado la pantalla antiviento W HSD del micr fono del HSD 171 271 para no da ar la pantalla antiviento fijada en el...

Page 79: ...ga recomendada 2 000 ohmios Tensi n de alimentaci n 9 52 V alimentaci n fantasma Toma de corriente 2 mA Auriculares Tipo de construcci n auricular din mico cerrado descansa sobre las orejas auricular...

Page 80: ...cerrado descansa sobre las orejas auricular din mico cerrado envuelve las orejas Nivel de presi n sonora caracter stico 94 dB SPL mW Campo de frecuencia 18 26 000 Hz 16 28 000 Hz Capacidad de potencia...

Page 81: ...vase indicar el correspondiente n mero de art culo Art culo Designaci n Numero de art culo ECV 171 Almohadilla 171 terciopelo 2955Z2501 ECV 271 Almohadilla 271 terciopelo 2955Z2601 ECL 171 Almohadilla...

Page 82: ...de conex o 88 Colocar o headset 89 Ligar desligar e testar o microfone 89 Ligar desligar os fones HSC 271 HSD 271 90 4 Dicas para a aplica o 91 Paraventos W 44 HSC 171 271 W HSD HSD 171 271 91 Substi...

Page 83: ...cri es de seguran a em vigor e assegure se de que esteja ligado terra Quando pretende desfazer se do aparelho separe a carca a a eletr nica e os cabos e respeite as prescri es de colheita de lixo quan...

Page 84: ...1 HSD 171 HSD 271 1 headset HSC 171 1 headset HSC 271 1 headset HSD 171 1 headset HSD 271 1 paravento W 44 para o microfone 1 paravento W HSD para o microfone 2 almofadas de veludo para os fones Os au...

Page 85: ...do artigo 2955 H 00510 MK HS XLR 4C N mero do artigo 2955 H 00520 Conex o Cabo Microfone Fones de ouvido MK HS XLR 5D XLR male de 5 p los MK HS XLR 4D XLR female de 4 p los MK HS PC Plugue jack de 3...

Page 86: ...mancal el stico do microfone garante uma extensa supress o de ru dos de manejo O bra o do microfone pode ser virado em 270 para o uso no lado direito e no lado esquerdo e est provido de uma fun o par...

Page 87: ...trave automaticamente com um clique aud vel CUIDADO Perigo de danos f sicos O volume de som demasiado alto provoca perda de audi o Antes de ligar os auscultadores com microfone incorporado mesa de mi...

Page 88: ...canal esquerdo agulha 4 Fones canal direito anel HSD 171 HSD 271 Conector mini XLR de 6 p los Plugue jack de 6 3 mm Conector XLR balanceado 1 blindagem massa udio 1 blindagem massa udio 5 udio 2 udio...

Page 89: ...boca conforme a necessidade e o lugar dispon vel MUTE ON O bra o do microfone de todos os modelos est provido de uma fun o que coloca em mudo o microfone 1 Para ligar o microfone gire o bra o do micr...

Page 90: ...al onde engata O microfone desliga se no momento em que o bra o do microfone se encontrar numa posi o superior posi o horizontal Os fones dos modelos HSC 271 e HSD 271 ligam se automaticamente logo qu...

Page 91: ...o paravento at sobre o canto exterior da c psula microf nica 1 Retire as almofadas dos fones 2 Para fixar as novas almofadas estique a bainha el stica em torno do chassi dos fones 1 Pressione o bot o...

Page 92: ...e da f brica Pode ativar a atenua o de graves da seguinte forma 2 1 3 4 1 Tire o adaptador de alimenta o fantasma da entrada da mesa de mixagem 2 Solte o parafuso de fixa o 1 no adaptador de alimenta...

Page 93: ...a o fantasma da entrada da mesa de mixagem 2 Solte o parafuso de fixa o 1 no adaptador de alimenta o fantasma 3 Retire o acoplamento do cabo 2 4 Tire a placa de circuito impresso da carca a COM CAUTEL...

Page 94: ...der o prejudicar o esmalte e as partes de material sint tico 1 Retire o paravento do microfone NOTA Retire com muito cuidado o paravento W HSD do microfone do HSD 171 271 para n o prejudicar o paraven...

Page 95: ...ncia el trica 200 Ohm Imped ncia de carga recomendada 2 000 Ohm Tens o de alimenta o 9 52 V alimenta o fantasma Consumo de corrente 2 mA Fones de ouvido Tipo fones fechados din micos tipo supra aural...

Page 96: ...uvido Tipo fones de ouvido fechados din micos tipo supra aural fones de ouvido fechados din micos circum aurais Sensibilidade 94 dB SPL mW Resposta de freq ncia 18 26 000 Hz 16 28 000 Hz Pot ncia nomi...

Page 97: ...Por favor indique o n mero do artigo para cada pe a de reposi o Artigo Designa o N mero do artigo ECV 171 almofada 171 veludo 2955Z2501 ECV 271 almofada 271 veludo 2955Z2601 ECL 171 almofada 171 liso...

Page 98: ...Notizen Notes Notes Note Notas Notas 98 HSC 171 HSC 271 HSD 171 HSD 271...

Page 99: ...Notizen Notes Notes Note Notas Notas HSC 171 HSC 271 HSD 171 HSD 271 99...

Page 100: ...ireless Headphones Headsets Electroacoustical Components Microphones Casques HiFi Microphones sans fil Casques sans fil Micros casques Composants acoustiques Microfoni Cuffie HiFi Microfoni senza filo...

Reviews: