background image

Summary of Contents for TC300

Page 1: ......

Page 2: ...ew amplifier In addition it describes the proper methods for connecting your amplifier to your system Please read this owner s manual and care fully follow the instructions for connection Table of Contents Harman Kardon design philosophy 2 4 TC600 TC300 and TC304 features 3 introduction 5 Installationprecautions 6 Charging system considerations 7 Mounting location 7 System configurations 8 Connect...

Page 3: ...emature clipping or current limiting Bridgeable All TC Series amplifiers are designed to provide increased power into 2 ohms stereo or 4 ohms bridged Unlike many lower quality amplifiers the TC Series amplifiers can be bridged for increased power Stable reliable operation in these higher power modes is assured by the TC Series wide margin Safe Operating Area S O A which anticipates the toughest op...

Page 4: ...r heat sink localizing the area to be cooled Harman Kardon s exclusive transverse tunnel cooled design employs a fan to eliminate heat directly from the heat sink enabling the amplifier to remain cool to the touch and permitting installation in re stricted spaces such as under car seats This exclusive design not only protects the preamplifier and power supply components from high temperatures but ...

Page 5: ...e high capacity power supply is fully regulated ensuring stable amplifier opera tion over a wide voltage range and corn pletely eliminating damage to speakers due to DC leakage B and remote on power noise filtering The TC Series amplifiers contain power supply filters that effectively reject any power supply related noise such as alternator whine The 12 voltB main power input is filtered by a bank...

Page 6: ...tion wiring route and location of the amplifier s Retain this manual for future reference Important The TC Series amplifiers are professional quality amplifiers that can be incorporated into any automotive system from the simplest to the most complex We strongly recommend professional installation of your TC Series amplifier to ensure that you obtain the optimum performance from your entire system...

Page 7: ...n 18 of the positive battery terminal on the positive B power lead to the amplifier See the Connections section for information about fuse size Make sure that the inlets and outlets for the amplifier s cooling fan are unob structed You must install the amplifier in such a way as to allow free air flow through the cooling tunnel to ensure that the amplifier will be able to dissipate its heat Pay pa...

Page 8: ... may want to install a second battery and an isolation switching system Consult your Harman Kardon dealer for professional assistance Harman Kardon s tunnel cooled design keeps your amplifier cool to the touch enabling you to install it even in a very confined space such as under a seat with limited clearance Just be sure that you don t block or restrict the inlet or outlet to the amplifier s tunn...

Page 9: ...ur head unit that would ordinarily connect directly to your speakers are instead connected to the input of the TC Series amplifier A control on the TC Series amplifier enables you to adjust the input signal level for optimum performance See the Controls and operation section for information on adjusting input level Normal stereo or four channel full range operation Full range means that a single a...

Page 10: ...ier you have several options for using TC Series amplifiers in bridged mode such as Use the TC600 as a dedicated mono amplifier running parallel subwoofers Note Becmtse rher eur e wl fi wnmf em thut cat1 hutrdle 600 watts fc otrtit rr orrs power ithorrt clunia c rzvedo not r ec onrn ctrd irsitlg the TC600 it hridgcd VIOIIO mode wi h nrost sit gle srrhwmjiw Use the TC300 as a dedicated mono amplifi...

Page 11: ...peaker leads will be connected to both the normal stereo connectors and to the bridged monoconnectors simultaneously If you re using the TC304 four channel amplifier the amplifier can operate in normal fourchannel mode and simultane ously provide bridged power output on either one or both front and rear channel Simultaneous bridged mono stereo operation speakers or from the left front to right rea...

Page 12: ...RE YOU BEGIN YOUR INSTALLATION AND DO NOT RECONNECT IT UNTIL YOU ARE COMPLETELY FINISHED Do not connect the main positive lead B from the amplifier to the battery until after all other connections have been made Use the proper gauge of wire I0 gauge or larger from the amplifier to the battery and 18gauge or larger from the amplifier to the speakers If you choose to use crimp type connec tors in yo...

Page 13: ...nough to ensure that the wire will not pull out Wire routing tips Plan your wire routing carefully before you begin your installation Always route signal cables separately from power cables to avoid noise in the system For example run your power cables along one side of the car chassis and the signal cables down the opposite side Keep each ground wire as short as possible to avoid power loss and t...

Page 14: ...amplifier to on the amplifier Make sure you route these ground Use 10 gaugeor larger wire for the positi te terminal of your battery is the leads separately from the preamp output these connections last thing you do afrer all other connections cables to avoid the possibility of noise in in your system have been conzpleted the system There are two methods you can use to complete this connection e r...

Page 15: ...d Run Connect each lead to one of the two the single lead to the area where you have battery terminals on the TC600 mounted your TC600 then use a splitter to split to two 10 gaugeleads that then connect to the two battery terminals on the TC600 12V Ground EL connection Connect two 10 gaugeor larger wires to the two ground connectors on the TC600 then run both leads to the same point on the metal c...

Page 16: ... circuit breaker in the lead Connect a single 10 gaugeor larger wire to Connect the lead to the battery terminal the ground connector on the amp then on the TC300or TC304 Make sure you run the lead to the metal chassis of the car route this lead separately from the preamp Make sure you scrape down to bare metal output cables to avoid the possibility of and make sure that the metal is directly part...

Page 17: ...nal on the battery 12V to the connector on your TC Series amplifier require that you have the power to the Remote terminal on the amplifier Turning on your head unit will in turn radio on when you play a tape or CD Alternatively you can use the accessory automatically turn on the amplifier If your position on the ignition switch to switch head unit does not have a remote on lead 12V to the Remote ...

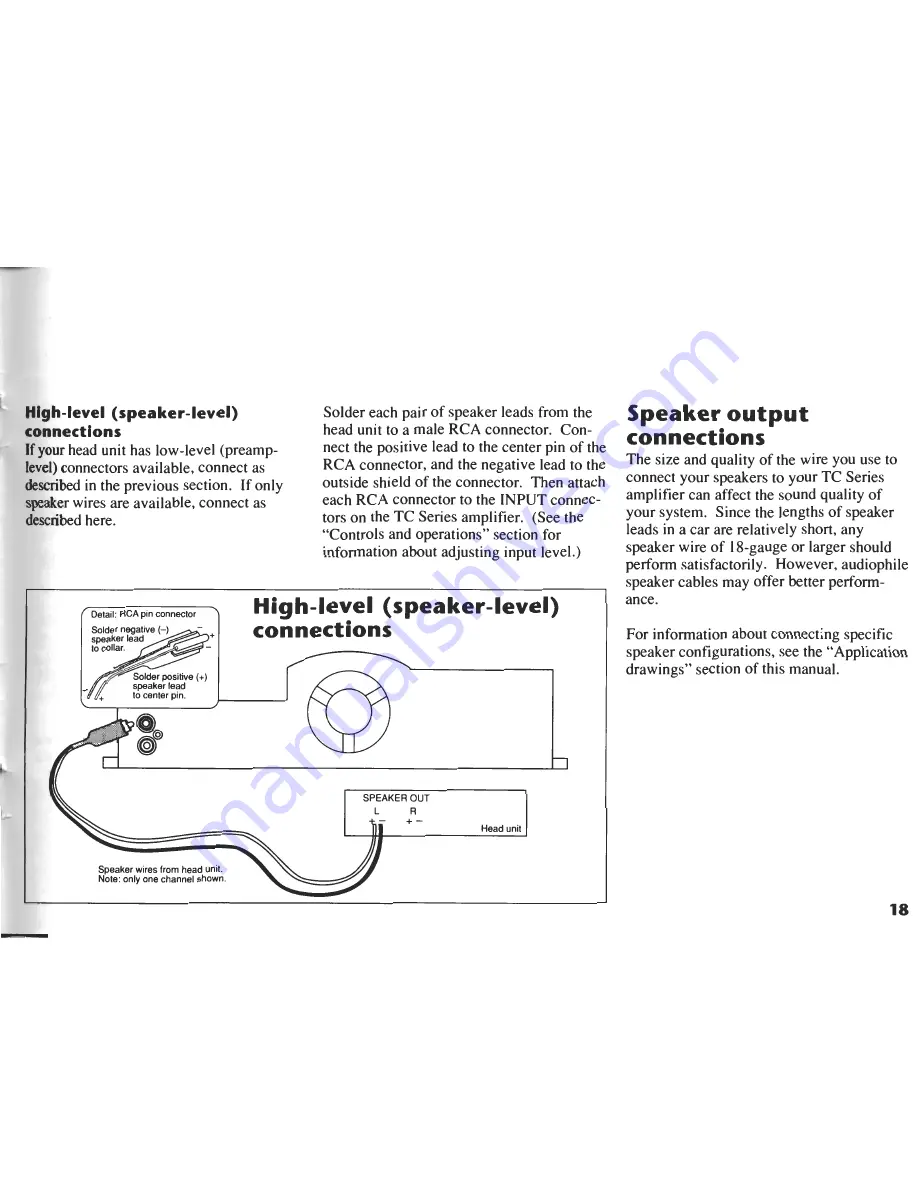
Page 18: ...fier to the left and right INPUT RCA connectors on your TC Series ampli fier See the Controls and operations section for informationabout adjusting input level You may want to use high quality preamp cables althoughnoise at this point should not be a factor because the differential INPUT connectorson the TC Series ampli fiers are capable of rejecting radiated noise induced in cables If you decide ...

Page 19: ...s section for information about adjusting input level f Detail RCA pmconneclor 3 Solder positive speakei lead 1 to center pin L High level speaker level connections SPEAKEROUT L R Speaker wires from head unit Note only onechannelshown Speaker output connections The size and quality of the wire you use to connect your speakersto your TC Series amplifiercan affect the sound quality of your system Si...

Page 20: ...trol WARNING When adjusting and testing the system for proper amplifier input sensitivity control level you may easily reach amplifier output levels which can damage speakers Do not operate the system at ltigl output le vls nl iettdistortio is present Test the system for correct amplifier input level setting by momentarily advancingand reducing the head unit volume control to successively higher l...

Page 21: ...rily advancing and reducing the head unit volume control in successivelyhigher levels as follows If no distortion is present and the system plays loudly enough leave the INPUT control at the MIN position If no distortion is present and the system does not play loudly enough turn up the INPUTcontrol approximately 118 of its rotation clockwise and retest the system for undistorted unclipped output P...

Page 22: ... boost could cause more excursion motion in your woofers than they were designed to handle Indicator LEDs The POWER LED turns on when 10 15 W is present at the battery terminal and the REMOTE ON terminal This indicates that the amplifier is functional The PROTECTION LED turns on if any of the following conditions are present If the speaker wires are shorted If the speaker impedance drops below app...

Page 23: ...ions see em configurations earlier in this al Each configuration requires a ular setting of the Bridge control h is noted in the drawing see the I n titled Controls and operation for information about control settings rossover points shown in some ationsare for example only and may lit your particular application standard stereo operation R Passive BRIDGE L 7 Left Speakers TC600 or TC3OO bridged m...

Page 24: ...TC600 or TC3OO simultane ous bridged mono stereo operation L L R nl l Re R 1 Right satellite speakers 80Hz 2 ohm minimum ...

Page 25: ...TC304four channel dual stereo operation BRIDGE BRIDGE Front Passive v Right Rear Passive TC304 true discrete three channel operation Right satellite satellite I speakers BRIDGE El ...

Page 26: ...TC304 simultaneous Right satellite speakers bridged mono stereo infour channel R Front discrete mode passive X W Left satellite speakers BRIDGE El R Rear L ...

Page 27: ...TC304 two channel dual bridged mono operation See illustration 0 next page also Front R Rear L R Rear L ...

Page 28: ...TC304 two channel dual bridged mono operation 27 INPUT BRIDGE 50Hz I LEVEL EQUALIZATION oo S t Min Max OdB 20dB I CONTROLSElTNGS one set shown ...

Page 29: ...1304 dual simultaneous idged mono stereo operation n four channel mode with non fading ront to rear balance I BRIDGE ...

Page 30: ...ions you can amplifier will eventually activate its protection mode and temporarily shut off To deter achieve optimum operating impedances mine minimum impedances consider the combined impedances of all speakersoperating in which will allow vou to extract maximum each frequency range power from a given amplifier You can also use these combinations as a way of protect ing your speakersfrom being ov...

Page 31: ... and operated full range the amplifier woofer satelliteoperating range thereby satellites and woofer with a passive cross would see a proper impedance load How eventually triggering the amplifier s over filter as shown in the above example ever if a 4 ohm subwoofer is additionally protection mode a 4 ohm bridged load will provide a proper minimum impedance bridged across the left and right channel...

Page 32: ... Check power connections and fuses Remote on terminal not receiving 12V Check remote on connections from head unit Power ground connection s negative is Check power grounds poor Car battery voltage is below 9V or above Check condition of car battery and 16V charging system No sound Power and Protect LEDs are lit Speaker or speaker wire shorted Check speaker wiring and speakers immediately upon tur...

Page 33: ...rate head Speakers are not rated for higher power Upgrade speakers to a model that can unit volume control settings but sound and cannot handle the amplifier s output handle higher power and or readjust distorts at high volumes INPUT control counterclockwise Input control is adjusted too high and Readjust input level control counterclock amplifier is clipping wise to eliminate clipping see Control...

Page 34: ...e amplifier To reverse the direction of the air flow the fan itself must be reversed in its mounting the fan is electrically controlled and simply reversing power to the fan will not change its direction Contact any author ized Harman Kardon installer or service ITC304 screw locations center to perform the fan reversal and take this manual with you To reverse the direction of air flow through the ...

Page 35: ...han 0 1 10 2 25dB lOHz to I00 OoHz O 3dB loodB DC 14 4V 9 16V usable negative ground All specifications and features subject to change wiChout notice 300 watts continuous power IOOW X 2 channels 4ohms 150W X 2 channels 2ohms 3OOW X I channel 4ohms f50A No more than 0 1 0 2 25dB lOHz to IOO OoHz O 3dB IOOdB 0 25V to 2 5V DC 14 4V 9 16V usable negative ground 4 OA IOA 4ohms channel 15A 2ohmslchannel...

Page 36: ......

Reviews: