background image

USING THE HS 300 TUNER

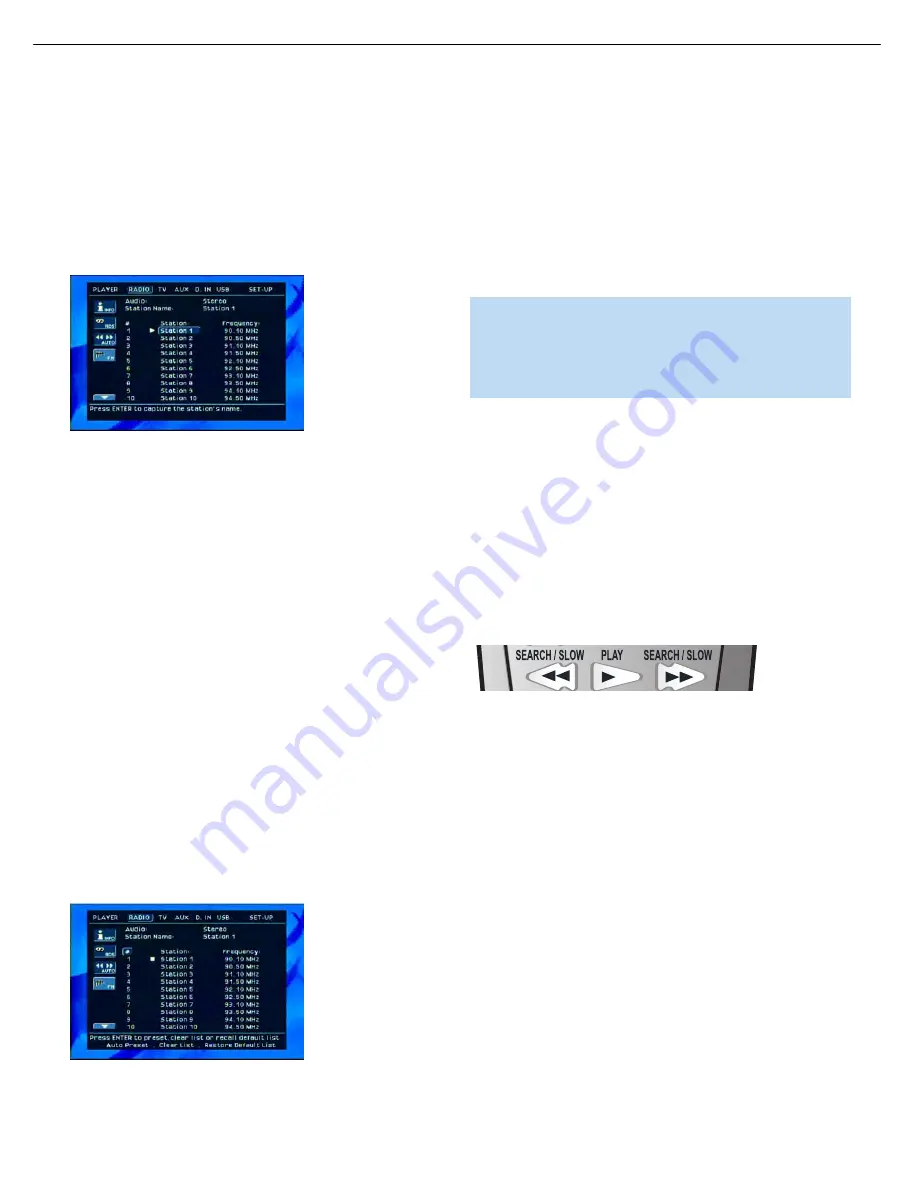
Select the HS 300 tuner as the source either by pressing the RADIO
button on the remote, which will also turn on the system if it is in
Standby mode, or by pressing the OSD button to access the menu for
the current source. Use the 

/

Navigation Buttons to highlight RADIO

and press Enter to select it. The Radio screen will appear as shown in
Figure 90.

Figure 90 – Radio (Tuner) Screen

The screen contains the following information:

AUDIO:

This setting is used to select the audio surround mode.

STATION NAME:

If you have selected the RDS (Radio Data Service)

display by selecting its icon on the left side of the screen, this line will
display any identifier transmitted by the radio station. Press the RDS icon
to deselect it and remove the Station Name line from view.

#:

The HS 300’s tuner includes a total of 60 preset station locations,

30 for each band (AM or FM), which may be viewed on screen. The
numeric column on the left side of the station list indicates the preset
number for each station. The first time you select the tuner as the
source you will see a default list of presets. Most likely these stations 
are not in use in your area. You may select the # symbol at the head 
of this column and you will be presented with the following options 
(see Figure 91):

Auto Preset:

Select this option to have the HS 300 automatically

scan for stations with acceptable signal strength. Each station found
will be added as a preset.

Clear List:

Select this option to clear the list of presets.

Restore Default List:

Select this option to reset the presets to 

the factory default list.

Figure 91 – Programming Presets

Station:

The Station column lists your preset stations by name. Press

the Enter Button to listen to the highlighted station, and press the Enter
Button again when the proper name of the station is shown on the
Station Name line to capture the station’s name, if it is being transmitted
as an RDS signal and if you have selected RDS display using the icon.

Frequency:

Unlike other tuners you may have used previously, the

HS 300 is tuned using the preset locations. You may select a preset
station to listen to as described above, or you may tune a new 
frequency for that preset using the Frequency column.

NOTE:

Changing the frequency so that you may listen to a dif-

ferent station permanently changes the preset for that location.
If you wish to listen to a new station, we recommend that you
scroll down to an unused preset location, or one which you
don’t wish to listen to before tuning to a new frequency.

To tune a new frequency:

1. Highlight the frequency of an unused preset, or a preset you no

longer wish to save.

2. Tune to the new frequency in one of three ways:

Auto Tuning:

If the Tuning icon on the left side of the screen is

depressed so that the word AUTO appears, then the tuner is in auto
tuning mode. Use the Forward or Reverse Search/Slow Buttons on
the remote (see Figure 92) to scan to a higher or lower frequency.
Press the Search Button once, and the tuner will scan until it finds a
station of acceptable signal strength. To stop scanning without finding
such a station, press the opposite-direction Search Button.

Figure 92 – Tuning a Radio Station

Manual Tuning:

If the Tuning icon on the left side of the screen is

deselected so that the word MANUAL appears, then the tuner is in
manual tuning mode. The HS 300 defaults to auto tuning mode;
thus you may find it necessary to select manual tuning mode first.
Use the Forward or Reverse Search/Slow Buttons on the remote
(see Figure 92) to tune to a higher or lower frequency by one 
frequency increment at a time (0.1MHz for FM, or 10kHz for AM).

Direct Tuning:

If you know the frequency of the station you wish 

to listen to, use the Numeric Keys to enter it, and it will be tuned
immediately. You must enter digits for all places in the frequency for 
it to be accepted; e.g., if you wish to tune to station 92.3 FM, enter
9 – 2 – 3 – 0.

To switch between the AM and FM bands, navigate to the tuner band
selector icon on the left side of the screen. Press the Enter Button until
the desired band appears on the icon. Alternatively, press the Radio 
button on the remote repeatedly to toggle between the bands.

Deselect the Info icon on the left side of the screen to remove the 
Audio and Station Name lines from view, enabling you to view a few
more presets at a time on screen.


OPERATION

45

HS300  


harman/kardon


Summary of Contents for HS 300

Page 1: ...RONT PANEL CONTROLS 6 REAR PANEL CONNECTIONS 8 REMOTE CONTROL 10 INSTALLATION CONNECTIONS 13 SYSTEM SETUP 20 OPERATION 28 BASIC TROUBLESHOOTING GUIDE RESET 49 OVERALL EXPLODED VIEW 51 BLOCK DIAGRAM 52...

Page 2: ...or to applying power to the unit under test 2 After removing an electrical assembly equipped with ES devices place the assembly on a conductive surface such as aluminum foil to prevent electrostatic c...

Page 3: ...al overlays control shaft etc Plug the AC line cord of the appliance directly into a 120V AC 60Hz outlet and turn the AC power switch on Any current measured must not exceed o 5mA ANY MEASUREMENTS NOT...

Page 4: ...connections Height measurement includes feet and chassis All features and specifications are subject to change without notice Harman Kardon is a registered trademark and Designed to Entertain is a tra...

Page 5: ...CTXE042 AM antenna AM 300 AWM 1 7 0147CNTCTXE037 FM antenna FM 075 1 0147CNTCTXE038 FM antennab FM TV 75 A 1 8 0147CNTLJX5012 SCART cable 1 9 0147CNTACXE052 AC power cord EU version 1 0147CNTACXE053 A...

Page 6: ...us messages appear in this display in response to commands In addition a variety of indicators will light at various times to display the current source playback mode if appropriate video settings or...

Page 7: ...On Open Close Headphone Jack USB 1 Port NOTE To make it easier to follow the instructions throughout the manual that refer to this illustration a copy of this page may be downloaded from the Product...

Page 8: ...nce It is recommended that you disable the HDMI audio function of your video display to benefit from the HS 300 s multichannel audio processing Remote Infrared IR Input and Output When the remote IR s...

Page 9: ...l Audio Input TV Analog Audio Inputs Auxiliary Analog Audio Inputs Analog Audio Outputs Coaxial Digital Audio Output Coaxial Digital Audio Input Speaker Outputs AC Power Input NOTE To make it easier t...

Page 10: ...itter Lens As buttons are pressed on the remote infrared codes are emitted through this lens Make sure it is pointing toward the component being operated In Learning mode the remote receives codes tra...

Page 11: ...o follow the instruc tions throughout the manual that refer to this illustration a copy of this page may be down loaded from the Product Support section at www harmankardon com REMOTE CONTROL FUNCTION...

Page 12: ...starting point A and a second time to select the end of the passage B Press the button again to end repeat play Pre Ch This button has no function with the HS 300 However for many televisions pressing...

Page 13: ...ck into place until the wire is held snugly Figure 2 Binding Post Speaker Terminals With Bare Wires Subwoofer The subwoofer is a specialized type of loudspeaker that is usually connected in a differen...

Page 14: ...terminals are polarized Connect the white lead to the AM terminal and the black lead to the GND terminal Figure 16 Antenna Connections Step Four Optional Connect Any External Source Components Althou...

Page 15: ...onnect one device s input to the other device s output If you would like to record video from the HS 300 s internal disc player or a USB device connect the recorder s S or composite video input to eit...

Page 16: ...d of the cord into a working unswitched AC outlet See Figure 24 If you are using any external components with the HS 300 system you may plug those into AC power at this time Figure 24 AC Input for Pow...

Page 17: ...again to accept the code and it will flash The remote will exit Program mode b If the device does not turn off try entering another code If you run out of codes you may search through all of the codes...

Page 18: ...ivity based remote which is programmed by accessing a large data base of product codes on the Internet The TC 30 is also capable of learning codes from your device s original remote Most of the button...

Page 19: ...of these buttons TV DISC RADIO D IN USB 1 or USB 2 the HS 300 will select that source See Figure 31 Figure 31 Source Selectors NOTE Any time you press one of the Input Selectors on the remote i e TV D...

Page 20: ...st of the screen contains the various configuration settings with the current setting displayed to the right Use the Navigation buttons to highlight a setting See Figure 34 Figure 34 Selecting a Setti...

Page 21: ...fter either five or 20 seconds When the display is off the blue Power Indicator will remain lit to remind you that the unit is turned on When the Panel Time Out setting is set to Off the display remai...

Page 22: ...ommend that the setting be turned ON However with PBC enabled the Repeat Track Repeat Disc and Random functions may not be available for VCDs NOTE The PBC indicator will light in the front panel displ...

Page 23: ...more compression so that louder passages are much softer Feel free to experiment with the settings at any time DELAY UNIT This setting selects the unit of distance used for calculat ing delay times w...

Page 24: ...bly even level without many dynamic changes If you are using an SPL meter with a disc containing test tones adjust the level of each channel so that the meter reads 75dB If you don t have a meter or a...

Page 25: ...was shot on film even though you are viewing it on video via a DVD Video Choose this option for optimal playback of material that was shot directly to video such as concerts and sports programming VID...

Page 26: ...than gray but the next gradation must clearly be distinct from it All the bars in the gray scale should be gradually and evenly changing from black to white left to right Contrast Adjustment 1 Adjust...

Page 27: ...o select the input to which you connected your TV s audio output and press the Enter Button You may also select a surround mode for this source at the Audio setting line and you may adjust the volume...

Page 28: ...ain more dynamic audio materials even 0dB may be too high allowing for damage to equipment Figure 52 Volume Controls The HS 300 is designed to reproduce audio with a minimum amount of distortion This...

Page 29: ...Figure 55 Mode Button on Remote When the source is selected the HS 300 will make the following selections as appropriate to the source 1 For the TV and D IN sources the HS 300 will select the correct...

Page 30: ...To load discs in the HS 300 first turn it on by pressing in the Standby On Switch or the Open Close button on the top panel or the DISC button on the remote The Power Indicator is amber when the unit...

Page 31: ...ly If the disc contains MP3 WMA or JPEG files or if it is a VCD without playback control the Player Information display will appear See Figure 57 To play one of these files use the Navigation Buttons...

Page 32: ...tep Previous or Skip Step Next button repeatedly Press the Pause or Play Button to resume normal play Frame by frame movement in reverse is not available NOTE Playback of a disc with 96kHz 24 bit audi...

Page 33: ...s of DVD discs to block the use of certain functions during only some parts of a disc For example many discs prohibit the use of fast play buttons or prohibit access to the Chapter Menu display during...

Page 34: ...e disc Select any title and press Enter to expand it and view the chapter list for that title Select a chapter and press the Enter button to begin play of that chapter The arrow s at the lower left of...

Page 35: ...ngly For DVD Audio discs the time display options are Group Elapsed Group Remaining Track Elapsed and Track Remaining Time Bar This display is a graphic representation of the time elapsed for the titl...

Page 36: ...disc s playback To change the subtitle language or turn the subtitles on or off press the Subtitle Button to display the Subtitle banner and show the current configuration Each press of either the Su...

Page 37: ...until the disc is manually stopped The Repeat Rep indicator will light in the front panel display A B Repeat Play The Repeat A B function allows you to select any portion of a DVD Video disc and have...

Page 38: ...ur selection Time Search Function While the disc is in Play mode you may begin playback from a specific time in the track or disc by navigating until the time is highlighted Use the Numeric Keys to en...

Page 39: ...hange Figure 74 Repeat Button A B Repeat Play The Repeat A B function allows you to select any portion of a CD and have it repeat continually until the unit is manually stopped To initiate a Repeat A...

Page 40: ...screen will display a list of the main folders contained on the disc The elapsed time will appear in the upper right corner of the screen It isn t possible to change the time display and the Time Sea...

Page 41: ...sc will immediately begin displaying the images on the disc in order When viewing JPEG images the Angle Button may be used to rotate the image With the image onscreen press the Angle Button once to di...

Page 42: ...me as for DVDs see Figure 80 except that the current track number will be shown rather than the title and there is no chapter display You may select the track number and change it to skip to another t...

Page 43: ...play that track See Figure 83 in which the user scrolled to Track 5 in the list pressed the Enter Button to program it and selected the Add option Track 5 was automatically programmed as the next trac...

Page 44: ...t position in the playlist scroll to the option that shows three dashed lines Use the Numeric Keys to enter the desired order in the playlist and press the Enter button c To delete the track from the...

Page 45: ...may select a preset station to listen to as described above or you may tune a new frequency for that preset using the Frequency column NOTE Changing the frequency so that you may listen to a dif feren...

Page 46: ...ction as the preset stations list is numbered in increasing order down the screen 3 With any station highlighted use the Navigation Buttons to scroll through the list of presets and press Enter to tun...

Page 47: ...ry Source When you highlight AUX at the top of the screen the screen shown in Figure 94 will appear Figure 94 AUX Source Screen Press the Enter Button to select AUX as the source input and to access t...

Page 48: ...play is not available Repeat This setting allows you to repeat play of one track one folder of files or to turn off repeat play Random Random play is not available for USB devices Picture If there ar...

Page 49: ...ters fluorescent lights motors or other electrical appliances No picture Intermittent connections Check all video connections Wrong input Check input selection of TV or video display Progressive Scan...

Page 50: ...pen Close button or turn off HS 300 to close disc drawer Screen Saver not activated Screen saver will not activate when Move cursor to main disc information or playlist area cursor is on top main titl...

Page 51: ...EXPLODED VIEW 51 HS300 harman kardon...

Page 52: ...phone Aux input Audio Block iPod audio input Audio Input ADC Tuner audio input Subwoofer line output Front Panel Board SPDIF input Coaxial In Optical In 5 channels output Audio output DAC Amplifier ou...

Page 53: ...0603 1 8K 5 2 R160 R161 01 57 R 2 E202J Resistor chip 0603 2K 5 8 R13 R14 R15 R16 R18 R41 R87 R92 01 57 R 2 E302J Resistor chip 0603 3K 5 2 R188 R189 01 57 R 2 E332J Resistor chip 0603 3 3K 5 1 R69 01...

Page 54: ...0 80 50V 1 C100 01 54 CS 2 E183X Capacitor multilayer ceramic chip 0603 183 X7R 10 50V 2 C168 C169 01 54 CS 2 E223X Capacitor multilayer ceramic chip 0603 223 X7R 10 50V 4 C16 C117 C127 C136 01 54 CS...

Page 55: ...Low Voltage Video Amplifier contained LPF circuit NJM2561F1 SMD JRC MTP6 1 U14 01 44 IC S E4410 IC Analog Devices Integrated Video Filter ADA4410 6 SMD AD CP 32 3 1 U15 01 44 IC S E0514 IC Semtech ESD...

Page 56: ...FPC double line connector 1 25 11P in line package 1 CN12 01 40 CON S13 FPC2 E020 FPC double line connector 1 25 18P in line package w single touch wht 1 CN4 01 40 CON S05 E007 Connector chip FPC 0 5...

Page 57: ...Q310 Q304 Q305 Q306 01 44 IC S E833 IC NS Dual Audio Operational Amplifier LM833M SMD 1 U301 01 44 IC S E8776 IC Wolfson Stereo CODEC with 5 Channel I P Multiplexer WM8776SEFT SMD Wolfson TQFP48 1 U30...

Page 58: ...C456 C457 C458 C459 C460 01 33 CT EC1U50V Solid Electrolyte Tantalum Chip Capacitor C 1UF 50V 6 C442 C444 C447 C449 C496 C498 01 33 CT EB22U10V Solid Electrolyte Tantalum Chip Capacitor B 22UF 10V 2 C...

Page 59: ...istor chip 0805 30K 1 1 R549 01 57 R 3 E513J Resistor chip 0805 51K 5 1 R564 01 57 R 3 E473J Resistor chip 0805 47K 5 2 R588 R546 01 57 R 3 E6043F Resistor chip 0805 60 4K 1 1 R509 01 57 R 3 E683J Res...

Page 60: ...7 EC530 01 34 CL D EH47U50VD Capacitor AL electrolytic CD288H 47UF 50V 6 3 12 1 EC503 01 34 CL D E288100U25VD Capacitor AL electrolytic CD288H 100UF 25V 6 3 12 5 EC510 EC511 EC514 EC518 EC528 01 34 CL...

Page 61: ...e inductor L ER3501 DIP 1 L502 01 13 L L D E145 Filter inductor L 100A DIP 1 L503 01 13 L L D E141 Filter inductor L 200A DIP 2 L511 L509 01 13 L L D E171 Common Mode Choke LCL 471A 1 L504 01 13 L L D...

Page 62: ...ip 1206 15K 5 3 R652 R653 R654 01 54 CS 3 E821N Capacitor multilayer ceramic chip 0805 820P NPO 5 50V 2 C601 C602 01 54 CS 3 E123X Capacitor multilayer ceramic chip 0805 123 X7R 10 50V 1 C625 01 54 CS...

Page 63: ...300 RE12 0100SJHS300E002 HS300 plastic part HS300 len for VFD 3mm width 1 HS300 RE02 0100FZQT153 Astigmatism PVC 45 5 9 5mm 1 Between volume button and PCB 0100SJQTE019 VFD filter 124 5 33 5 0 5mm 1 0...

Page 64: ...0mm B with magnetism annulus 1 Connect power socket and SMPS 140mm from magnetism annulus to another solder end 0147CNTLJX7E361 Connect cable 2 0 4Y 4Y 580MM A with shield 1 Connect CN605 on 1819C and...

Page 65: ...65 HS300 harman kardon...

Page 66: ...66 HS300 harman kardon...

Page 67: ...67 HS300 harman kardon...

Page 68: ...68 HS300 harman kardon...

Page 69: ...69 HS300 harman kardon...

Page 70: ...70 HS300 harman kardon...

Page 71: ...71 HS300 harman kardon...

Page 72: ...72 HS300 harman kardon...

Page 73: ...73 HS300 harman kardon...

Page 74: ...74 HS300 harman kardon...

Page 75: ...75 HS300 harman kardon...

Page 76: ...76 HS300 harman kardon...

Page 77: ...77 HS300 harman kardon...

Page 78: ...78 HS300 harman kardon...

Page 79: ...ts For HS300 HS500 8050 NPN Transistor SMD 8550 PNP Transistor SMD 2N3904 NPN Transistor SMD 2N3906 PNP Transistor SMD DTC343TK NPN Transistor SMD 2SB1132 Medium Power Transistor SMD 79 HS300 harman k...

Page 80: ...LM9022 Vacuum Fluorescent PIC16C56A MCU DIP Display Filament Drive SMD LC75710NE VFD driver SMD RCLamp0514M ESD Element SMD 80 HS300 harman kardon...

Page 81: ...DDX2160 Power Device SMD IS42S16400B 6T SDRAM SMD AAT3522IGY 3 08 RT9161 A 33 Voltage Regulator SMD Microprocessor Reset Circuit SMD 81 HS300 harman kardon...

Page 82: ...LM833M pre amp SMD NJM2068M pre amp SMD DDX8001 Digital Audio Processor SMD 82 HS300 harman kardon...

Page 83: ...74HCU04 Hex inverter SMD 74HC158 data selectors SMD 74HCT14 Hex inverting Schmitt trigger SMD AT24C64 EEPROM SMD 83 HS300 harman kardon...

Page 84: ...BA00HC5FP Lower Power Device SMD AM29LV160DB 90EC flash SMD 84 HS300 harman kardon...

Page 85: ...MBM29LV160BE 70P flash SMD LM358 Dual Operational Amplifier SMD BA6208F motor driver SMD 85 HS300 harman kardon...

Page 86: ...IER SMD BU1924 RDS decoder SMD BU1924F 1 2 3 4 5 6 7 8 9 10 11 12 13 14 15 16 OUAL RDATA VERL MUX VDD1 VSS1 VSS3 CAP T2 T1 VSS2 VDD2 X1 X0 NC RCLK ADA4410 6 Video Buffer SMD 2SK3018 Silicon N channel...

Page 87: ...TDOTG242LP USB decoder SMD LM324 Dual Operational Amplifier SMD 87 HS300 harman kardon...

Page 88: ...WM8776SEFT Audio ADC DAC SMD XC9536XL High Performance CPLD SMD 88 HS300 harman kardon...

Page 89: ...AML3501 DVD CD RF processor SMD UPA672T N channel MOSFET SMD AZ1117H 1 8 3 3 5 0 AF4835 Low Dropout linear regulator SMD P channel power MOSFET SMD AF2302 N channel MOSFET SMD 89 HS300 harman kardon...

Page 90: ...SiI9030CTU DMI panelLink cinema transmitter SMD ML4800 power factor conection and PWM controller combo SMD 90 HS300 harman kardon...

Page 91: ...E _ N M 1 _ C A S _ N M 1 _ R A S _ N M 1 _ S C S _ N M 1 _ B A 0 M 1 _ B A 1 ECS_N EOE_N M2_BA0 M2_BA1 M2_DQM0 M2_DQM1 M2_SCS_N M2_CAS_N M2_WE_N M2_RAS_N M2_CLKO DVSS_PLL0 AVSS_PLL0 VSS_PLL1 VSS_PLL2...

Page 92: ...or TO 220F 4L KA78R05C Voltage Regulator TO 220F 4L KA78R12 Voltage Regulator TO 220F 4L KA431 Precision Adjustable Voltage Regulator TO 92 PC817 Photoelectric Coupler DIP L7809 Voltage Regulator TO 2...

Page 93: ...LM7805 Voltage Regulator TO 220 78L05 Voltage Regulator TO 92 D10XB60 Bridge Rectifiers In line Package FYPF2010DN Schottky barrier rectifiers TO 220F 93 HS300 harman kardon...

Page 94: ...tra fast recovery ISL9R1560PF2 Power rectifier TO 220F ultrasoft recovery rectifier TO 220 FSDM07652R green mode Fairchild BA033BCO power switch TO 220F Low Dropout voltage regulator TO 220Fp 94 HS300...

Page 95: ...D 12V DGND D 5V DGND DGND D 12V D5V DGND DGND DGND DGND DGND DGND DGND 3 3V D5V 3 3V DGND CN11 20pin 1 0mm 1 2 3 4 5 6 7 8 9 10 11 12 13 14 15 16 17 18 19 20 FB18 50R C3 N A R191 4 7K FB22 50R FB16 5...

Page 96: ...217 218 65 64 63 62 61 60 59 58 137 135 136 1 124 122 121 123 116 117 118 119 VSS_1 2V_4 M2_D_11 M2_D_8 M2_D_12 M2_D_14 M2_D_13 M2_D_10 M2_D_9 M2_D_15_A M2_A_3 M2_A_2 M2_A_1 M2_A_0 M2_A_4 M2_A_5 M2_A_...

Page 97: ...M1_RAS_N EOE_N ECS_N M1_CAS_N RESET_N M2_A18 M2_A19 M2_DQM0 M2_SCS_N M2_BA0 M2_CLK M2_WE_N M2_RAS_N M2_BA1 M2_CAS_N M2_DQM1 M2_D 0 15 M2_A 0 11 Core3 3V Core3 3V Core3 3V DGND Core3 3V Core3 3V DGND D...

Page 98: ...AML3501 12 11 10 9 8 7 6 5 26 23 25 4 28 29 3 2 13 14 15 17 18 19 20 21 24 22 31 30 1 32 16 33 34 35 36 37 38 40 39 41 42 44 45 47 48 27 46 43 C D CN CP D2 C2 B2 A2 DFT CDPD MIRR AIN MB DB AIP VPA B A...

Page 99: ...p R193 0R N A ADA4410 6 U15 ADA4410 6 9 28 1 11 12 13 14 17 18 25 26 30 29 23 8 7 20 21 2 5 4 3 27 15 24 10 19 16 22 6 31 32 GND LEVEL2 Pb1 B1_HD MUX_SD Y1_SD Y2_SD C1_SD VEE CV_OUT VEE VCC MUX_HD LEV...

Page 100: ...69 183 R120 100R EC41 10uF 10V CN14 4pin 2 0mm 1 2 3 4 R137 220R R129 10K CN12 11pin 1 25mm 1 2 3 4 5 6 7 8 9 10 11 B1 Pilot tone filter 1 2 3 6 5 4 7 IN CAP G NC OUT G G D7 1N4148 N A R122 10k C163 5...

Page 101: ...TC1 0 5A R163 4 7K C178 104 R172 10K C0 105 EC47 10uF 10V FB5 50R RN11 33R 1 2 3 4 5 6 7 8 R185 4 7K RN7 33R 1 2 3 4 5 6 7 8 R156 10R R169 4 7M N A C177 104 C182 104 C197 105 R166 0R EC45 22uF 10V R18...

Page 102: ...R379 560R C323 104 N A R356 0R EC319 10UF 16V N A R337 4 75k 1 FB301 50R C B E 3 2 1 Q301 8550 R320 680R R377 10k R371 10k R329 1 78k 1 EC314 47UF 25V R343 110R R319 1 78k 1 R366 2 2k R363 10K C300 2...

Page 103: ...7B OUT7A OUT6B OUT6A VDD3 3 GND NC OUT5B OUT5A OUT4B OUT4A OUT3B OUT3A VDD3 3 GND NC OUT2B OUT2A OUT1B OUT1A EAPD VDD3 3 GND NC BICKO LRCKO SDO12 SDO34 VDD3 3 GND NC SDO56 SDO78 PWDN R444 10K C424 221...

Page 104: ...4 C455 680pF R421 10R R424 10R R430 6 2R C442 1uF 50V R427 10R C444 1uF 50V C454 680pF R420 10R C499 104 R441 10K C488 104 C474 104 C450 104 U404 DDX2100 DDX2160 1 2 3 4 5 6 7 8 9 10 11 12 13 14 15 16...

Page 105: ...27 26 25 24 23 22 21 20 19 18 17 16 15 14 13 12 11 10 9 8 7 6 5 4 3 40 39 38 54 55 53 52 51 50 49 48 47 46 45 44 43 42 41 37 AC AC P2 P3 P4 P5 P6 P7 P8 P9 P10 P11 P12 P13 P14 P15 P16 P17 P18 P19 P20...

Page 106: ...618 4 7K LED604 LED EC603 47uF 16V LED606 LED D606 1N4148 R639 100K R640 10k EC608 47uF 50V R652 15k R638 100R EC605 47uF 50V EC609 47uF 50V R622 180R R643 10k LED605 LED D608 1N4148 V613 G D611 1N414...

Page 107: ...Rev Date Sheet of 5VON RB5 RA0 RB6 RB4 STANDBY DGND 5VON 5VON 5VON C634 104 V604 G R614 200R R615 510R V603 G K602 Open close 1 2 3 4 K601 Standby 1 2 3 4 CN607 7pin 2 0mm 1 2 3 4 5 6 7 C B E 3 2 1 Q...

Page 108: ...375K R514 375K R517 4 7 Z502 16V C512 105 25V EC507 1000U 50V EC505 1000U 50V R534 100 1W EC514 100U 25V EC513 470U 25V EC515 470U 10V R550 4 7K VSS R512 200K 3W C520 470P 1KV C519 470P 1KV D511 FFPF...

Page 109: ...TCH GND GND R TVFORMAT1 TUNER_IN_R 6 5 2 1 4 7 8 11 10 12 15 9 13 14 16 17 18 19 20 GND DATA SDA CLOCK SCL 5 pins 26 1802C from 1 1803C from 200 1804C from 300 1805C from 400 1806C from 500 1819C 1820...

Reviews: