background image

Quick-Start Guide

10

Quick-Start Guide

11

iPod® Functions

iPod Connection Confirmation

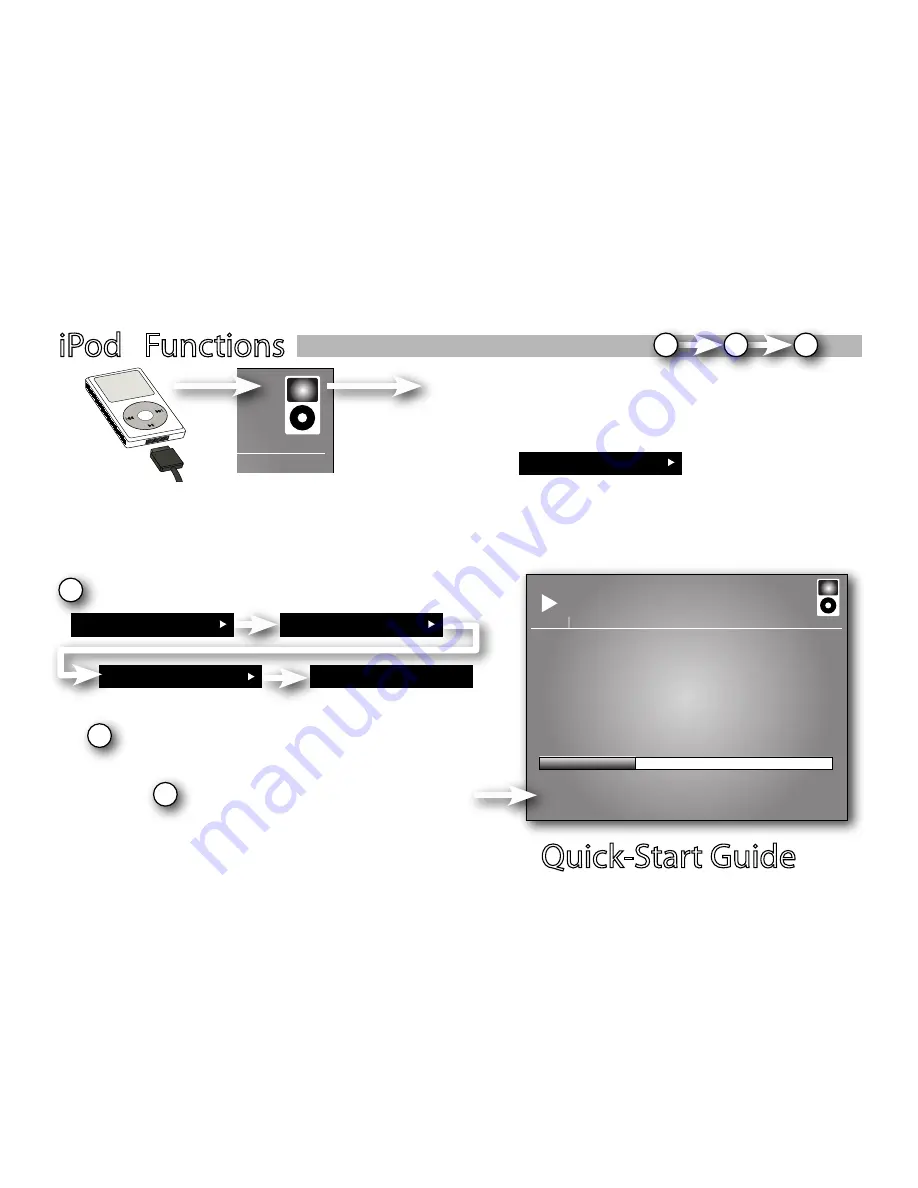
When your iPod is successfuly connected, the iPod icon appears in the 
top-right corner of the display. “

iPod

” will also appear as the first menu 

item.

Playing Music

1

iPod

Your iPod Name

Name of Song

The Drive + Play 2 system is designed to make navigating the menus on your iPod simple and intuitive.  Select 
menu items using the scroll wheel and press the center button to select.  

Select “iPod” from source menu.

2

Browse list and select song.

Now Playing

Name of Song

Artist

Album

0:55

-2:08

Playlists

3

View current selection on the screen.

iPod

1

2

3

Summary of Contents for DP 2US

Page 1: ...Quick Start Guide...

Page 2: ...equipment has been tested and found to comply with the limits for a Class B Digital Device pursuant to Part 15 of the FCC Rules These limits are designed to provide reasonable protection against harmf...

Page 3: ...aser should determine prior to installation or use For safety reasons do not attempt to disable any safety function incorporated in this device Any alteration of this device may cause serious injury a...

Page 4: ...reflections and should be as close as possible to the driver s normal line of sight as long as such positioning does not otherwise obstruct the driver s view or impair the safe operation of the vehicl...

Page 5: ...ws Make sure the arrow points toward the front of the car Installing the Display 1 2 Mounting with Screws Mounting with Adhesive Pad 3 1 Tighten the hex screw to lock the display base onto the mountin...

Page 6: ...it into place The knob can be removed by turning the bottom counterclockwise 3 Attach Control Knob to Base Orient the base so that the arrow is facing the front of the car You can either screw the ba...

Page 7: ...itter Adapter into the audio output jack See diagram on next page 3 To wire into an AUX input connect the included audio cable s 3 5mm plug to the audio output jack and then into your vehicle s AUX in...

Page 8: ...back of radio or FM tuner location Plug the vehicle s antenna into FM Transmitter Adapter Connect FM Transmitter Adapter to Drive Play 2 System If your car s audio system does not provide an auxiliar...

Page 9: ...hted menu item Previous Press and hold to REWIND Rotate ring to move the highlight bar on the screen Note If Drive Play 2 is turned off with the bottom button it must be turned back on that way If the...

Page 10: ...enu item Playing Music 1 iPod Your iPod Name Name of Song The Drive Play 2 system is designed to make navigating the menus on your iPod simple and intuitive Select menu items using the scroll wheel an...

Page 11: ...Drive is successfuly connected the USB icon appears in the top right corner of the display USB Drive will also appear as the first menu item 1 Select USB Drive from source menu Name of Folder Playing...

Page 12: ...M Frequency Preset Once you have selected an FM preset tune your FM radio to that same station you should hear audio playback clearly If that frequency is not playing music clearly select another pres...

Page 13: ...tter appears on the screen 1 Press and hold top menu button in an alpabetically sorted list 2 Turn the ring to advance the letters manually or press the Next or Previous buttons to begin automatic scr...

Page 14: ...3 2 Browse list and select channel Configure the channel 4 Now your iPod plays the channel This lets you customize the content Drive Play 2 system creates channels automatically and you can refine the...

Page 15: ...album Jump to album Keep playing artist This feature will continue playing the current song then play the remaining songs by that artist in order Jump to artist This feature will stop playing the cur...

Page 16: ...any QSG_NA_Rev_1 1 Troubleshoot problems download updates and find out about more features at www driveandplay2 com Please Recycle Troubleshooting Features specifications and appearance are subject to...

Reviews: