background image

Configure Your Speakers

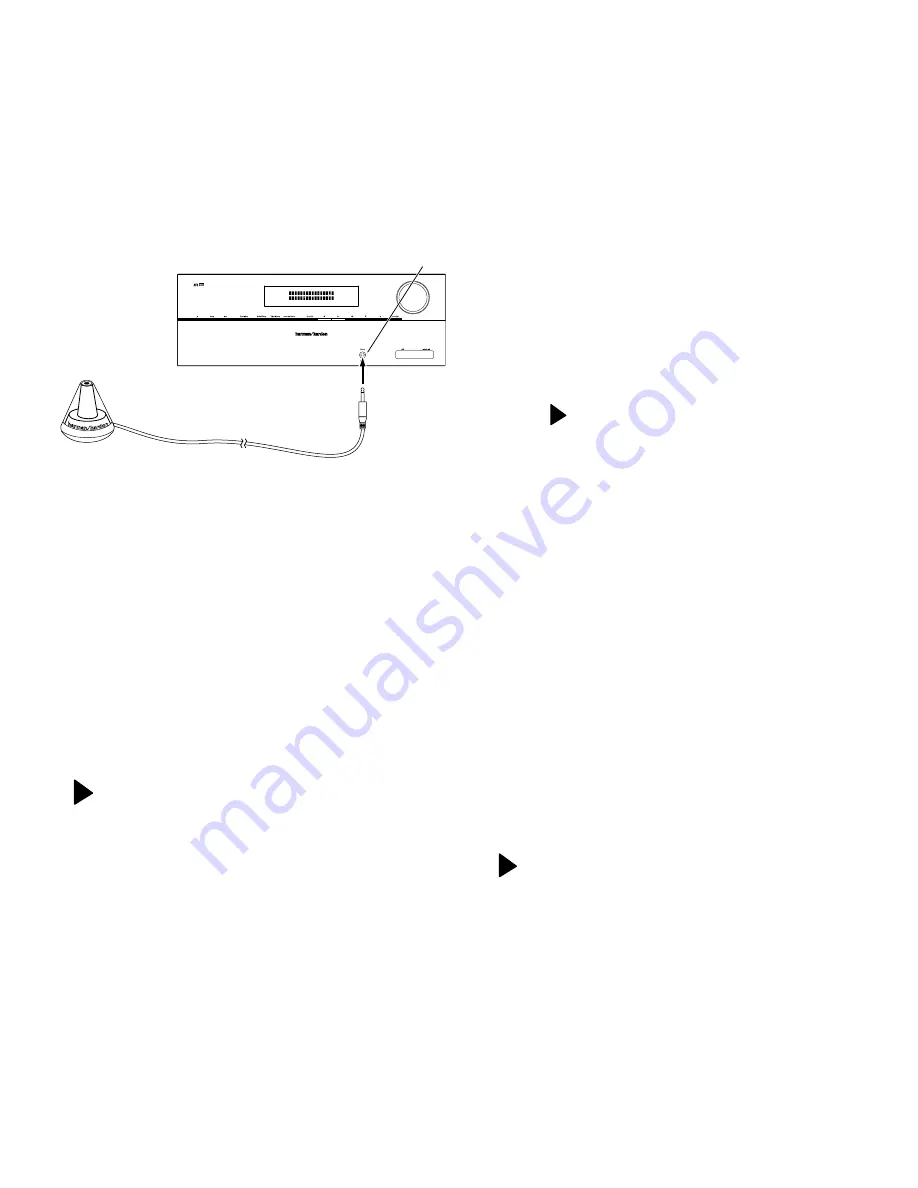
1. Plug the supplied EzSet/EQ™ microphone into the AVR's Headphone connector.

2. Place the microphone at ear height in your listening position.
3.  Turn on your TV and select the TV input where you connected the AVR in 

Connect Your 

TV or Video Display

, on page 3.

4.  Press the remote control’s OSD button. The AVR's on-screen display (OSD) Master 

Menu will appear on the TV.

5. Use the remote’s arrow and OK buttons to select “EzSet/EQ.”

6. Select “YES.”
7. Select “Continue.”
8. Follow the instructions that appear on the OSD screens.

Assign the Digital Audio Connectors

1.  Review the input connections you listed on the

 Input Connections and Source Buttons 

table,  on  page  4.  Note  which  source  devices  you  connected  to  the  digital  audio 

connectors. (If you did not connect any source devices to the digital audio connectors, 

you can skip this section.)

2.  Turn on your TV and select the TV input where you connected the AVR in 

Connect Your 

TV or Video Display

, on page 3.

3.  Press the remote control’s OSD button. The AVR’s on-screen display (OSD) Master 

Menu will appear on the TV.

4.  Use the remote’s arrow and OK buttons to select “Input Setup.” The Input Setup menu 

will appear. 

8

AVR 1650, AVR 165

Connections

EzSet Microphone

(supplied)

AVR

Headphone

Connector

**  MASTER MENU  **

INPUT SETUP
SURROUND SELECT
EzSet/EQ
MANUAL SETUP
SYSTEM SETUP

*  EzSet/EQ  *

Place Microphone at
listening position and
plug into Headphone Jack

Do you want to start
EzSet/EQ?


YES   

NO

**  MASTER MENU  **

INPUT SETUP
SURROUND SELECT
SPEAKER SETUP
SYSTEM SETUP

Summary of Contents for AVR 1650

Page 1: ...Audio video receiver AVR 1650 AVR 165 Quick Start Guide...

Page 2: ...e ventilation slots on the top of the AVR or place objects directly over them Do not place the AVR directly on a carpeted surface Do not place the AVR in moist or humid locations in extremely hot or c...

Page 3: ...t Your TV or Video Display HDMI Monitor Out Connector If your TV has an HDMI connector and you have HDMI or component video source devices use an HDMI cable not included to connect your TV to the AVR...

Page 4: ...DVD Player CD CD Player Tape Cassette Deck or Audio Recorder Aux 1 Portable Media Player The Bridge IIIP iPod iPhone Device AVR Source Button Source Device Connected Digital Audio Input Connector Assi...

Page 5: ...ctors NOTE Make only one type of digital connection HDMI optical or coaxial from each device Analog Audio Devices Make analog audio connections from your source devices that do not have HDMI or digita...

Page 6: ...You can record any composite video signal Connect The Bridge IIIP Connect an optional The Bridge IIIP to the AVR s The Bridge IIIP connector Insert the plug all the way until it snaps into place in th...

Page 7: ...kardon com Connect to AC Power Connect the AC power cord to the AVR s AC Input connector and then to a working AC power outlet Set Up the AVR Install the Batteries in the Remote Control Remove the rem...

Page 8: ...ttons table on page 4 Note which source devices you connected to the digital audio connectors If you did not connect any source devices to the digital audio connectors you can skip this section 2 Turn...

Page 9: ...remote s OSD button to turn off the on screen menu You are now ready to enjoy your AVR IMPORTANT For complete information about using all of your audio video receiver s features and capabilities down...

Page 10: ...registered in the United States and or other countries EzSet EQ is a trademark of HARMAN International Industries Incorporated Blu ray Disc is a trademark of the Blu ray Disc Association HDMI the HDM...

Reviews: