


22
Performa
™
Winch
60.2 STP E/HY
Installation and Maintenance Manual - Mod.D
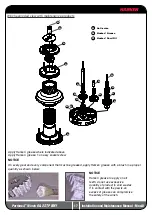
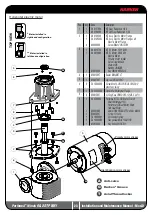
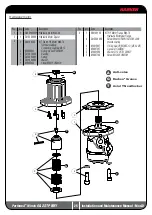
Parts list
Performa Winch 60.2 STP E/HY
Pos Q.ty Code
Description
1
1
1
1
2
A96574500
S476030004
S4130900A7
S415580085
Performa Assy Base W60 EL/HY
W60 Performance Base
Centering bushing Ø12
Bushing Ø22xØ25x8.5
Bushing Ø12xØ35x9
Winch Product Sticker**
2
1
S414400004
Gear Z14 W60
3
1
S413030004
Pawls Carrier Ø8xN2
4
6
S000090004
Racing pawl Ø8*
5
6
S000380001
Pawl Spring Ø8*
6
1
S414390041
Ratchet Gear Z21xN2
7
1
S413120002
Washer Ø22.5xØ45x1
8
1
S278170002
Washer Ø12.5xØ48x1.5
9
1
S281010004
Pin for gear
10
1
S414420041
Ratchet Gear Z26xN4
11
1
S414410004
Pawls Carrier Gear Z13 N4
12
2
A72821800
Roller Bearing Ø14xØ20x18
13
1
S416030004
Gear Pin Ø12xØ18x52,5
14
1
S414480004
Idler and Pinion Z23/Z13 W60
15
2
A74162300
Roll bearing Ø24xØ18x18
16
1
2
1
A94143100
S415580085
S4130900A7
Assy Housing Winch 60.2
Housing W60
Bushing Ø12xØ35x9
Support Bushing W60
Bushing Ø22xØ25x8.5
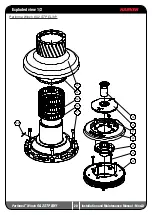
17
6
M0606303
Screw M8x25 UNI 5931
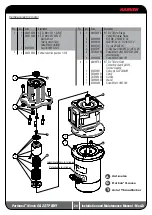
Pos Q.ty Code
Description
18
3
A74145000
Roller Bearing Ø95xØ107x26
19
1
1
A96753600
S413880002
Assy Central Shaft Winch 60 EL/HY
Central Shaft Pred. W60
Washer Ø17.2xØ32x1.5
20
Winch Serial Number Sticker
21
1
S4144300A0
Stripper Arm Housing W60/70
22
1
1
4
A96555900
S414850080
S018520001
Performa Assy Jaws W60
Lower Jaw W60
Upper Jaw W60
Peeler W60 - 70
Spring
23
1
A76537501
Performa Drum Assembly W60
24
47
M0610280
Ball 5/16"
25
4
M0601803
Screw UNI EN ISO 1207 - M6x35 - A4
26
1
S657410019
Performa Black Stripper Arm W60
27
3
M0601903
Screw M6x16 UNI1207
28
1
S4162200B1
Cover 2 Speed W60
29
1
1
1
1
A94149300
S414940085
S414930003
M0679797
Assy Socket W35-80 EL/HY
Socket Handle W20/80
Washer Ø25xØ15x4
Nut Screw for Disconnect Rod
O ring RC 2025 series
30
1
S416130002
Disconnect Rod W60
*Available with service kit; see website www.harken.com
**Winch product sticker


