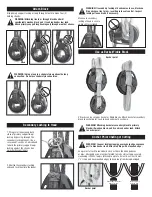
WARNING! Using a loop in a choker style weakens the loop
connection. Do not use choker style connection.
WARNING! Attaching line to or through block head will
considerably weaken block, and it can break under low load.
Attach primary support loop/lashing only through mouth of sheave.
Attach Block
1. Wrap small line around both
sides of primary support loop/
lashing by passing through the
secondary lashing tunnel. Use a
secure knot such as a Carrick bend
to hold the primary support loop/
lashing against the cheeks. See
www.harken.com/knots.
WARNING! If secondary lashing at head comes loose, block can
flip and cause line to jam, resulting in loss of control. Inspect
lashing often and redo if necessary.
Make sure secondary
lashing at head is secure
so block stays aligned.
Secondary Lashing to Head
V blocks can be set up as becket or fiddle blocks. Attach becket or secondary
block to anchor point. Lash to head and mouth as shown.
WARNING! Attaching becket or secondary block to primary
block will weaken block, and it can break under load. Attach
to anchor point.
Use as Becket/Fiddle Block
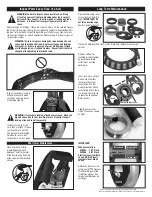
Anchor Point Chafing or Cutting
Loops must attach to round bails such as those found on padeyes
or pins. Sharp edges on many perforated toe rails will cut loop, severely
weakening it. When loop is attached to a plate, it must be at least 6 mm
(
1
/
4
") thick and have rounded edges to keep loop from being damaged.
Sharp edges will
damage loop.
Round edges to prevent
damage to loop.
WARNING! Loops or lashings running over a sharp edge can cause
part to break under load. Attach to fitting with a rounded edge.
Anchor point
Anchor point
Mouth
2. Shorten the secondary lashing
ends and tuck them into the tunnel.
Slip primary support lashing or loop through mouth to make four (4)
holding strands.


