background image

Page | 29 


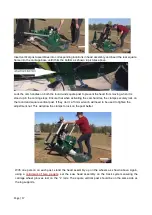
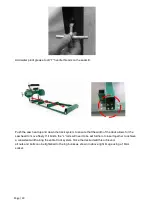
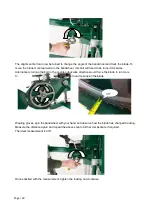
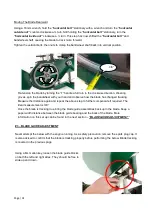
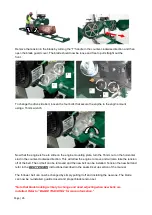
The alignment bolt can now be turned to change the angle of the bandwheel and track the blade. To 

move the blade more rearward on the bandwheel, this bolt will need to be turned clockwise. 

Alternatively, turning the bolt in the counter-clockwise direction would force the blade to run more 

forward on the bandwheel. Turn the bolt a 1/2 turn and re-tension the blade. 


Wearing gloves, spin the bandwheel with your hand and observe how the blade has changed tracking. 

Measure the distance again and repeat the above step to further compensate if required. 

The ideal measurement is 3/8

”. 


Once satisfied with the measurement, tighten the locking nut clockwise. 


Summary of Contents for GT26

Page 1: ...NG Read carefully and understand all INSTRUCTIONS before operating Failure to follow the safety rules and other basic safety precautions may result in serious personal injury 2017 GT26 Sawmill Owner s Manual ...

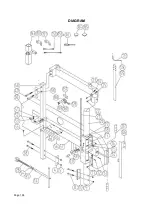
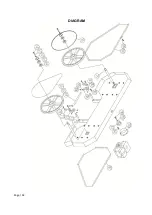
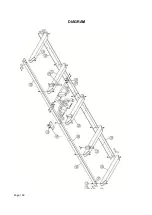
Page 2: ...LL ASSEMBLY INSTRUCTIONS 12 Inspection 12 Tracks 12 Log Dog Supports 14 Carriage Assembly 16 Engine 24 SAWMILL SET UP PROCEDURES 26 Belt Tension 26 Blade Tracking 27 Blade Guide Adjustment 31 Blade Tension 32 SAWMILL MAINTENANCE 34 Changing the Blade 34 Replacing Belts 34 TROUBLESHOOTING 36 PARTS LIST 37 PART DIAGRAMS 39 NOTES 44 ...

Page 3: ...caution are factors which cannot be built into this product but must be supplied by the operator WARNING Only operate the engine in a well v e n t i l a t e d area Carbon Monoxide produced by the engine during use can kill Do not use indoors near windows or in other sheltered areas NOTE All Federal and State laws and any regulation having jurisdiction covering the safety requirements for use of th...

Page 4: ...king medication that can impair judgement reaction times mobility alertness or otherwise cause negative side effects Individuals who fail to meet any of these requirements are not qualified to use the equipment or handle blades Personal Protection Equipment PPE that meet the Australian standard should always be worn when operating the equipment and handling blades This include Protective gloves as...

Page 5: ...ts completely clear of the blade cables and any other moving parts Remember that as the carriage moves so do the blade cables and other moving parts Keep clear of all danger areas Never operate the petrol powered engine in an enclosed area Operate petrol powered engine outside only in a well ventilated area The exhaust gases of the engine can cause nausea delirium and potentially death unless adeq...

Page 6: ...erly carried out The blade is disengaged The equipment stands firmly and securely and the rails are fully supported along their full length The carriage retaining under wheels and bed end stops are properly and securely installed All components fasteners cables and parts are properly and securely installed and in good working order All safety sheets are filled out All safety features are properly ...

Page 7: ... fuel tank before installing or removing the battery When operating the electric powered motor RISK OF ELECTRIC SHOCK Hazardous voltage inside the disconnect box starter box and at the electric motor can cause shock burns or death Electrical short danger Ensure that you do not short out any part of the electrical system Shorting out the electrical system can cause both of the saw head support cabl...

Page 8: ...ents fasteners cables and parts are properly maintained and adjusted and in good working order before operation Before performing any service maintenance cleaning repairs or adjustments before opening the blade and band wheel guards before removing or installing blades before moving the sawmill and before storing the equipment turn the engine ignition key to the OFF position remove the ignition ke...

Page 9: ... carriage Risk of tripping on the rails or the cross bunks Risk of being crushed between the sawmill and a moving log WARRANTY Hardwood Mills warrant that each new GT26 sawmill will be free under normal use and maintenance from any defects in workmanship and materials for a period of ONE YEAR from the date of purchase by the ORIGINAL purchaser Should any trouble develop during this period return o...

Page 10: ...ATION 1 Wear heavy duty work gloves ANSI approved goggles behind a full face shield steel toed work boots and a dust mask 2 Operate only with assistance 3 Ensure guide blocks are tight and track is level 3 Fill the lubrication tank with clean water and washing up detergent 5 Start and operate the engine according to the provided engine manual 6 Depress the throttle to bring the blade up to full sp...

Page 11: ... Sawhead Vertical Posts Spray posts before use with a silicone spray lubricant such as 3 in 1 or Jig A Loo 9 Bandwheel Guards Routinely remove any build up of sawdust that may collect inside the bandwheel guards 10 Lubrication Tank Only fill with a water washing up detergent mixture one to two caps or in winter months use windshield washer fluid Do not leave lubricant in tank if temperatures fall ...

Page 12: ... stage This will be done after the head is assembled and rolled along the track It is ideal to assemble the tracks on a solid and level footing that is a minimum of 4 off of the ground We recommend you attach the leveling legs to sleepers which we discuss later in the instruction manual This will allow for easy cleanup of sawdust from under the tracks and height adjustment of the log supports and ...

Page 13: ... seam joint to join the two sections together shown in top right image Ensure to only hand tighten at this stage The bolts will be fully tightened once the head assembly is free to roll on the tracks and provide the correct track width Assemble carriage stops at the ends of the tracks 4 stops total and tighten ...

Page 14: ...us locations along the track where this assembly can be bolted Depending on how many track sections are being used select a log clamp position that will secure the log firmly against the log supports Insert log supports into track cross supports and secure with T handles The T handle threads should be coated with waterproof grease The sawmill includes two sets of log supports a short set and a lon...

Page 15: ...ure The red arrows indicate where the locations of the leveling legs are There are six per 2 metres of track 18 in total on the machine On the intermediate bunks the leveling legs alternate We recommend placing the mill leveling legs on sleepers running left to right as shown above You need to make sure the bunks are also level To do this you use a spirit level going left to right on top of each b...

Page 16: ...mbly shown on right Place a moving blanket on the shipping pallet that the sawmill crate was strapped to The blanket will prevent the blade guard covers from becoming scratched Using a minimum of two people or a mechanical advantage system remove the head assembly from the sawmill crate and place face down on the blanket The head assembly is very heavy proper technique must be used to avoid injury...

Page 17: ... that when activating the cam handles the clamps securely lock on the round and square vertical post If they don t a 13mm wrench will need to be used to tighten the adjustment nut This will allow the clamps to lock on the post better With one person on each post stand the head assembly up on the wheels as shown above Again using a minimum of two people set the saw head assembly on the track system...

Page 18: ...olts into the back plate as shown in above image Align the square post holes with the corresponding black top cross support holes Tighten using an 18mm socket Place the measuring scale bracket as shown above and insert bolts and nuts It is important to alternate tightening of the nuts top then bottom to ensure the black round clamp begins to compress evenly on both the top and bottom until flanges...

Page 19: ...tall the square indicator rod to the sawmill using the two bolts and tighten using a 10mm socket Slide the scale indicator over the square rod and tighten Route the cables on both sides as shown in the above image ...

Page 20: ...l need to adjust the cable ends at the rear handle to either raise or lower one side Install the lube tank brace to the top cross support as shown Insert lube tank bottle into the brace and attach the hose to the copper spout near the blade guide assembly as shown below Please Note We recommend adding some dishwashing liquid to the tank to help lubricate the wood two to three capfuls ...

Page 21: ...e round bar as shown in above left image With the throttle lever in the idle position fully open pull the cable tight at the engine and tighten the screw to hold it in place This will take all of the slack out of the cable PLEASE NOTE The idler screw as shown above needs to be sticking out approx 4mm as shown in picture above Failure to do this will result in the engine not running at its full RPM...

Page 22: ...n is achieved when the blade deflects no more than a total of 1 8 1 4 up down Alternatively a 24mm socket on a torque wrench may be used to tighten the T handle to 8 20 ft lbs torque See above right image Note It is very important to take the tension off of the blade by turning the T handle in the counter clockwise direction when the sawmill is not in use Failure to do so will result in flat spots...

Page 23: ...t the width of the track allows for the saw head to move freely If it binds the L rails will need to be set further or closer together to achieve a consistent width along the entire track system Once the desired width is achieved all nuts and bolts can be tightened to the log bunks as shown in above right image using a 16mm socket ...

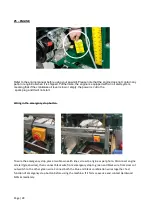
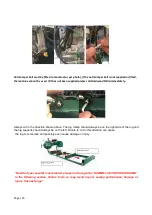
Page 24: ...the spark plug and it will not start Wiring in the emergency stop button To wire the emergency stop place two brown earth lines screw to engine as per photo Disconnect engine oil alert green wires then connect black wire from emergency stop to green and black wire from door cut out switch to the other green wire Connect both the blue and black combination wires together Test function of emergency ...

Page 25: ...rection shown above The log clamp should always be on the right side of the log and the log supports should always be on the left Failure to cut in this direction can cause the log to come lose and possibly even cause damage or injury Now that your sawmill is assembled please run through the SAWMILL SET UP PROCEDURES in the following section Failure to do so may result in poor sawing performance d...

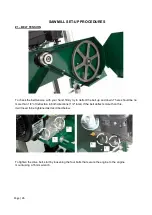
Page 26: ...lect the belt up and down There should be no more than 1 4 of deflection in both directions 1 2 total If the belt deflects more than this it will need to be tightened as described below To tighten the drive belt start by loosening the four bolts that secure the engine to the engine mount using a 16mm wrench ...

Page 27: ...set tighten the four engine bolts Alternatively if the drive belt is too tight the 16mm nut on the horizontal stud can be turned counter clockwise 2 BLADE TRACKING Never attempt the below with the engine running As a safety precaution remove the spark plug cap It is also advised to wear gloves and safety glasses when working with the blade as it is extremely sharp When fitting a brand new blade al...

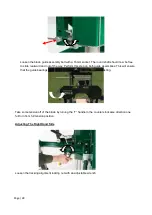
Page 28: ... on both guide assemblies This will ensure that the guide bearings do not influence tracking of the blade while adjusting Take some tension off of the blade by turning the T handle in the counter clockwise direction one full turn from full tension position Adjusting The Right Hand Side Loosen the tracking alignment locking nut with an adjustable wrench ...

Page 29: ... in the counter clockwise direction would force the blade to run more forward on the bandwheel Turn the bolt a 1 2 turn and re tension the blade Wearing gloves spin the bandwheel with your hand and observe how the blade has changed tracking Measure the distance again and repeat the above step to further compensate if required The ideal measurement is 3 8 Once satisfied with the measurement tighten...

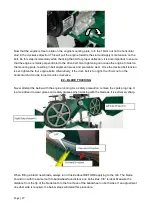
Page 30: ...tical bolts a turn This will take the clamping force off of the bandwheel shaft caused by these two bolts and allow it to move freely in the following steps Moving The Blade Forward Using a 16mm wrench hold the horizontal bolt stationary with a wrench and turn the horizontal inside nut counter clockwise a turn Still holding the horizontal bolt stationary turn the horizontal outside nut clockwise a...

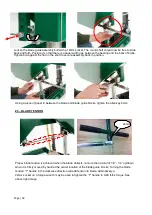
Page 31: ...erve how the blade has changed tracking Measure the distance again and repeat the above step to further compensate if required The ideal measurement is 3 8 Once the blade is tracking true bring the blade guide assemblies back up to the blade Keep a paper width distance between the blade guide bearing and the back of the blade More information on this set up can be found in the next section BLADE G...

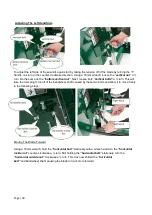
Page 32: ...piece of paper in between the blade and blade guide blocks tighten the allen key bolts 4 BLADE TENSION 24mm Proper blade tension is achieved when the blade deflects no more than a total of 1 8 1 4 up down when it is firmly moved by hand at the center location of the blade guide blocks Turning the blade tension T handle in the clockwise direction will add tension to blade Alternatively a 24mm socke...

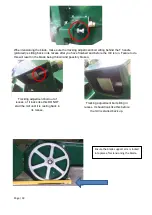
Page 33: ...is run Failure to do this will result in the blade being thrown and possibly broken Tracking adjustment bolt sitting in recess It should look like this before the mill is started back up Tracking adjustment bolt out of recess of it looks like this DO NOT start the mill until it is resting back in its recess Ensure the blade support arm is locked into place after tensioning the blade ...

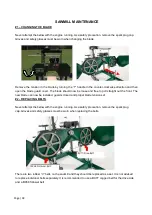
Page 34: ...de should now be loose and free to pull straight out the front The new blade can now be installed guards closed and proper blade tension set 2 REPLACING BELTS Never attempt the below with the engine running As a safety precaution remove the spark plug cap Gloves and safety glasses must be worn when replacing the belts There are two rubber V belts on the sawmill and they should be replaced as a set...

Page 35: ...rizontal stud in the counter clockwise direction This will allow the engine to move and will also take the tension off of the belt The old belt can be removed and the new belt can be installed Tension the new belt and refer to the BELT TENSION instructions described in the sawmill set up section of the manual The follower belt can now be changed by simply pulling it off and installing the new one ...

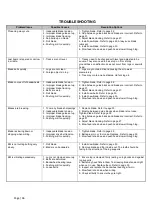
Page 36: ...page 33 5 Install new blade Refer to page 33 6 Slow feed rate down and push head slower through log Blades are breaking 1 Too many blade sharpenings 2 Inadequate blade tension 3 Improper blade guide set up 4 Improper blade tracking 5 Pushing mill too quickly 1 Replace blade Refer to page 33 2 Binding between guide blocks when blade is too loose Tighten blade Refer to page 32 3 Gap between guide bl...

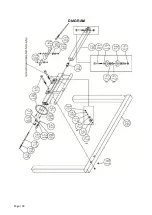
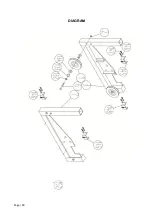
Page 37: ...eiver Tube 1 87 T Bolt 5 88 Log Fastener Rocker Arm 1 89 Fastener Crank 1 90 Horizontal Log Support Joiner 1 91 Vertical Log Support Short 2 92 Track B 2 93 Nut M8 1 DIAGRAM PARTS LIST P N Description Spec Q ty 1 Track Wheel 4 2 Hex Nut M20 4 3 Saw Head Wheel Base Left 1 4 Spacer Plate 1 5 Nut M12 6 6 Hex Bolt M20 110 4 7 Saw Head Wheel Base Right 1 8 Hex Bolt M12 80 5 9 Nut M12 6 10 Spacer Plate ...

Page 38: ...Spacer Plate 1 131 Handle Sleeve φ16 2 132 Bushing φ20 8 133 Circlip φ42 4 P N Description Spec Q ty 134 Ball Bearing 6004 4 135 Pushing Handle 1 136 Log Support Assembly Joint 1 137 Throttle Cable 1 138 Fastener Plate 1 139 Bolt M6X55 1 140 Nut M6 2 141 Throttle Handle 1 142 Nut M10 2 143 Square Support Assembly 1 144 ACME Thread Rod Receiver 1 145 Track wheel Sweeper Left 2 146 Nut M8 8 147 Bolt...

Page 39: ...Page 39 DIAGRAM ...

Page 40: ...Page 40 DIAGRAM ...

Page 41: ...Page 41 DIAGRAM ...

Page 42: ...Page 42 DIAGRAM ...

Page 43: ...Page 43 DIAGRAM ...

Page 44: ...Page 44 NOTES ...

Page 45: ...Page 45 ...

Reviews: