background image

HS B-PE02 - Multimedia GPS Interface

4


HS B-PE02 - Multimedia GPS Interface

5


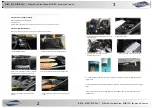
12 .Put the video interface module


in a proper place 


13.


Enter the original radio interface to set AUX


14.


press the audio frequency setting


15


.Enter the audin frequency setting, then 

(the icon


showing on red arrow)                  


sound icon(showing on the red arrow)


16 .Tick off the volume adjustment and Aux input      

17 .Back to radio interface, and touch "AUX" icorn

submenu (like showing on the picture)

18. While the AUX input setting completes, press " LIST" on steering wheel button for 3 seconds to enter our navigation 

interface

4. DIP Switch Description


“1”UP  


“2”


UP   


for 7inch 


monitor 


“1”


UP


“2”


Down  


for 8inch 


monitor 


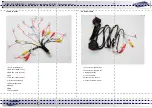
5. Product connector description


Summary of Contents for HS B-PE02

Page 1: ...servanza di tali regole comporta la decadenza della garanzia Distribuito da HARDSTONE ITALIA MILANO ITALY Web www hardstone it Email info hsaudio com Interfaccia Video GPS Sistema originale con schermo capacitivo da 7 8 Canbus Ingresso Retrocamera con IPAS 3 AV USB Audio Video 1080P Touchscreen CITROEN C3 C6 PEUGEOT 308 3008 4008 HS B PE02 ...

Page 2: ... corner of the screen 5 Detach the decoration panel around the gear 6 take out the panel carefully and pay attention to the shift lever cables 7 Take out the handle of the gear shift lever and 8 remover the screws unplug the cable 9 Take out the panel beneath gear shift lever 10 Take out the OEM head unit and OEM screen and detach the screw of DVD 11 connect the power cable to the head unit and us...

Page 3: ...ting then the icon showing on red arrow sound icon showing on the red arrow 16 Tick off the volume adjustment and Aux input 17 Back to radio interface and touch AUX icorn submenu like showing on the picture 18 While the AUX input setting completes press LIST on steering wheel button for 3 seconds to enter our navigation interface 4 DIP Switch Description 1 UP 2 UP for 7inch monitor 1 UP 2 Down for...

Page 4: ... AUX IN for digital TV box 3 RXD No need connect 4 ACC 5 TXD No need connect 6 IR No need connect 7 360 detection cable 8 Battery 9 GND 10 Connect DVR 5 2 Power cable 1 Connect car original screen 2 Connect car original CD unit 3 Reverse detection 4 12V for camera 5 Video in for rear camera 6 Connect interface AUX in ...

Reviews: