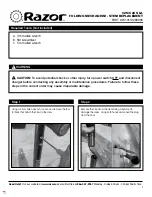
background image

Page 6

SKU 47870

7.

Ride the Electric Scooter on a flat surface away from obstacles.

Sit on the Electric Scooter.  Readjust handle bar height if necessary.

Turn the Key in the Keylock (10) to the On position.

Grab the T Tube handle bar, and turn the Throttle Handle (13) toward you (counter-

clockwise) to accelerate. The Electric Scooter will move forward. Note: if you start
moving with a foot push, the battery charge will be extended.

To stop, turn the Throttle Handle away from you (clockwise) and squeeze the left

Brake Handle (14) to stop.

Caution: 

The internal control circuit will shut down the motor when there is more than 30

amps of current draw. The motor circuit will reset itself in a few seconds. This may happen
when going up a steep hill that the motor force cannot handle. If this happens, immediately
apply the brake so you do not roll backward.

8.

When you are finished riding, continue engaging the Brake Lever, release the Throttle

Handle, and get off the Electric Scooter.

9.

Turn the key in the Keylock to the Off position and remove the key.

10. If you are transporting the Electric Scooter, disassembly the T Tube handle bar, and

the Upper and Bottom Seat Tubes.

Maintenance

Battery

1.

Charge the battery after each use.

2.

Charge the battery fully (4 to 6 hours).

3.

To avoid accidents, charge the supplied battery only.  Do not use a different charger

with this battery.

4.

Do not expose the battery to rain or wet conditions.

5.

To avoid damage of cable and plug, never pull the cable to disconnect the charger.

6.

Do not use the charger if the cable or plug are damaged.

7.

Repairs should be carried out by qualified technicians only.

8.

Do not touch the battery poles with any conductive source.

9.

Do not store the battery in a box with other metal objects.

10. Do not throw the batteries in a fire. Properly recycle.

11. Replace only with the same type of sealed lead acid or gell cell rechargeable, deep

cycle type batteries. Never mix different brands of batteries as they could have
different chemical reactions.

Summary of Contents for 47870

Page 1: ... Mission Oaks Blvd Camarillo CA 93011 Visit our Web site at http www harborfreight com Copyright 2002 by Harbor Freight Tools All rights reserved No portion of this manual or any artwork contained herein may be reproduced in any shape or form without the express written consent of Harbor Freight Tools For technical questions and replacement parts please call 1 800 444 3353 47870 ...

Page 2: ...ways be followed to reduce the risk of personal injury and damage to equipment Read all instructions before using this tool 1 Observe area conditions Do not use Electric Scooter in damp or wet locations Don t expose to rain 2 Keep children away Children must never be allowed to use the Electric Scooter Minimum age for use is 16 years 3 Store idle equipment When not in use the Electric Scooter must...

Page 3: ... that may affect proper operation Any part that is damaged should be properly repaired or replaced by a qualified technician Do not use if the On Off Switch does not operate properly 12 Replacement parts and accessories When servicing use only identical replacement parts Use of any other parts will void the warranty Only use accessories intended for use with this tool Approved accessories are avai...

Page 4: ...e factors which cannot be built into this product but must be supplied by the operator Unpacking When unpacking check to make sure the following parts are included If any parts are missing or broken please call Harbor Freight Tools at the number on the cover of this manual as soon as possible T Tube 15 Upper Seat Tube 19 Quick Lug 8 Took Kit 26 Charger Unit 25 Quick Lug 8 Quick Lug 8 Bottom Seat T...

Page 5: ...our waist line 8 Charge batteries as described under Operation Operation WARNING Do not ride the Electric Scooter without first reading and understanding all the Safety Warnings and Precautions on pages 2 to 4 Also find and test the controls before using 1 Plug the battery Charger Unit 25 output cord into the Charge Socket 18 and tighten in place 2 Plug the Charger Unit line cord into the electric...

Page 6: ... Brake Lever release the Throttle Handle and get off the Electric Scooter 9 Turn the key in the Keylock to the Off position and remove the key 10 If you are transporting the Electric Scooter disassembly the T Tube handle bar and the Upper and Bottom Seat Tubes Maintenance Battery 1 Charge the battery after each use 2 Charge the battery fully 4 to 6 hours 3 To avoid accidents charge the supplied ba...

Page 7: ... a tire first deflate the tire and remove the four hub bolts Remove the inner and outer tires and repair or replace Drive Belt Adjustment and Replacement Periodic adjustment of the Drive Belt 5 will be necessary to maintain proper tension If while accelerating a popping sound is heard the Drive Belt is slipping and immediate adjustment is necessary To adjust the Drive Belt 1 Turn the Key in the Ke...

Page 8: ...Page 8 SKU 47870 Parts List D I D D D D G D D D D D D D 6 D G NOTE Some parts are listed and shown for illustration purposes only and are not available individually as replacement parts ...

Page 9: ...MAKE ANY REPAIRS TO THE PRODUCT OR THAT HE OR SHE IS QUALIFIED TO REPLACE ANY PARTS OF THE PRODUCT IN FACT THE MANUFACTURER AND OR DISTRIBUTOR EXPRESSLY STATES THAT ALL REPAIRS AND PARTS REPLACEMENTS SHOULD BE UNDERTAKEN BY CERTIFIED AND LICENSED TECHNICIANS AND NOT BY THE BUYER THE BUYER ASSUMES ALL RISK AND LIABILITY ARISING OUT OF HIS OR HER REPAIRS TO THE ORIGINAL PRODUCT OR REPLACEMENT PARTS ...

Reviews: