background image

5

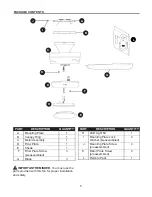
 PACKAGE CONTENTS


IMPORTANT REMINDER

: You must use the 

parts provided with this fan for proper installation 
and safety.

A

Mounting Plate 

1

B

Canopy Ring

1

C

Motor Assembly

1

 D  Fitter 

Plate 

1

E

Shade

1

  F 

Fitter Plate Screw 

3

   (preassembled)

G

Blade 3

DESCRIPTION

PART

QUANTITY

H

LED Light Kit 

1

I

Mounting Plate Lock 

4

   Washer 

(preassembled)

J

Mounting Plate Screw 

4

   (preassembled)

Motor Plate Screw 

3

   (preassembled)

L Remote 

Pack


1

DESCRIPTION

PART

QUANTITY

B

G

I

H

K

C

E

A

J

D

F

L

Summary of Contents for MAZON MZ44MBK3LR

Page 1: ...returning to your retailer call our customer service department at 1 888 251 1003 8 a m 8 p m EST Monday Sunday You could also contact us at partsplus lowes com or visit www lowespartsplus com 4007498...

Page 2: ...o radio communications However there is no guarantee that interference will not occur in a particular installation If this equipment does cause harmful interference to radio or television reception wh...

Page 3: ...Consult a qualified electrician if in doubt When mounting fan to a ceiling outlet box use a METAL octagonal outlet box do NOT use a plastic outlet box Secure the outlet box directly to the building st...

Page 4: ...tch or circuit breaker in order to avoid electrical shock WARNING Be sure outlet box is properly grounded and that a ground wire green or bare is present Once installation is complete carefully check...

Page 5: ...1 B Canopy Ring 1 C Motor Assembly 1 D Fitter Plate 1 E Shade 1 F Fitter Plate Screw 3 preassembled G Blade 3 DESCRIPTION PART QUANTITY H LED Light Kit 1 I Mounting Plate Lock 4 Washer preassembled J...

Page 6: ...ded Electrical Tape Phillips Screwdriver Pliers Safety Glasses Stepladder and Wire Strippers Helpful Tools not included AC Tester Light Tape Measure Do It Yourself Wiring Handbook and Wire Cutters PRE...

Page 7: ...G will be at least 30 inches from any obstruction and at least 7 ft above the floor 2 2 7 ft min 30 in min G 3 3 C Secure mounting plate A to outlet box using screws spring washers and flat washers p...

Page 8: ...to rest on top of motor for the time being Motor J Hook 8 6 7 INITIAL INSTALLATION 3 5 Locate mounting plate screw J mounting plate lock washer I on outer edge of mounting plate A that is closest to t...

Page 9: ...ND GREEN wires together from fan on motor assembly C and mounting plate A to BARE GREEN wire from ceiling ROUND GREEN BARE WHITE BLACK BLACK WHITE ROUND GREEN BARE GROUND GREEN BLACK WHITE WHITE FROM...

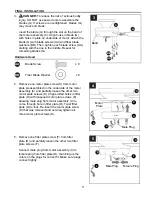
Page 10: ...our grooves at top of motor assembly C and raise canopy B until you hear tabs snap into grooves NOTE Canopy ring B should fit flush to ceiling when done correctly Remove motor assembly C from J hook a...

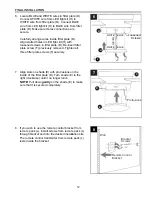
Page 11: ...itter plate screw F from fitter plate D and partially loosen the other two fitter plate screws F Connect male plug from motor assembly C to female plug from fitter plate D matching up the colors on th...

Page 12: ...moved Tighten all three fitter plate screws F securely 6 3 6 BLUE WHITE WHITE BLUE Loosened Screws H D F Align slots on shade E with protrusions on the inside of the fitter plate D Turn shade E to the...

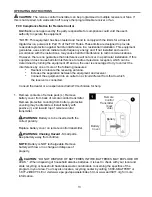
Page 13: ...f the following measures Reorient or relocate the receiving antenna Increase the separation between the equipment and receiver Connect the equipment into an outlet on a circuit different from that to...

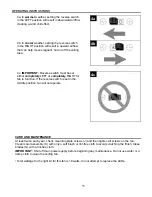
Page 14: ...utton for fan HIGH speed 2 button for fan MEDIUM speed 1 button for fan LOW speed 0 button to turn fan OFF button to turn light ON or OFF Tap button quickly to turn lights off or on Hold button down t...

Page 15: ...setting the reverse switch in the RIGHT position will result in upward airflow that can help move stagnant hot air off the ceiling area At least twice each year check mounting plate screws J and then...

Page 16: ...lade 3 Full range dimmer switch 4 Fan is new 5 Motor assembly is loose 1 Tighten all blade screws 2 Replace blade 3 Use only with included speed control device 4 Allow fan a break in period of a few d...

Page 17: ...nt of defective parts for the ceiling fan must be reported within the first year from the date of purchase For the balance of the warranty call our customer service department at 1 888 251 1003 for re...

Reviews: