background image

5

SAFETY INFORMATION

Please read and understand this entire manual before attempting to assemble, operate or install the 

product.
• 

Before you begin installing the fan, disconnect the power by removing fuses or turning off the circuit 

breakers.

•  Make sure all electrical connections comply with local codes, ordinances, the National Electrical 

Code and ANSI/NFPA 70-199. Hire a qualified electrician or consult a do-it-yourself wiring 

handbook if you are unfamiliar with installing electrical wiring.

•  Make sure the installation site you choose allows a minimum clearance of 7 ft. from the blades to 

the floor and at least 30 in. from the end of the blades to any obstruction.

•  The net weight of this fan is: 15.67lb (7.11kg).

DANGER:

 When using an existing outlet box, make sure the outlet box is securely attached to 

the building structure and can support the full weight of the fan. Failure to do this can result in serious 

injury or death. The stability of the outlet box is essential in minimizing wobble and noise in the fan 

after installation is complete.

WARNING:

 To avoid personal injury, the use of gloves may be necessary while handling fan 

parts with sharp edges.


WARNING:

 Using a full-range dimmer switch to control fan speed will cause a loud humming 

noise from the fan. To reduce the risk of fire or electric shock, do NOT use this fan with any solid-state 

speed control device.

WARNING: 

To reduce the risk of fire, electric shock or personal injury, mount the fan to an outlet 

box marked “ACCEPTABLE FOR FAN SUPPORT” and use the mounting screws provided with the 

outlet box. Most outlet boxes commonly used for the support of lighting fixtures are not acceptable 

for fan support and may need to be replaced. Consult a qualified electrician if in doubt. Secure the 

outlet box directly to the building structure. The outlet box and its support must be able to support the 

moving weight of the fan (at least 35 lbs.). 

WARNING: 

To reduce the risk of fire, electric shock or personal injury, wire connectors provided 

with this fan are designed to accept only one12-gauge house wire and two lead wires from the fan. If 

your house wire is larger than 12-gauge and/or there is more than one house wire to connect to the 

two fan lead wires, consult an electrician for the proper size wire connectors to use.

WARNING: 

To reduce the risk of fire, electric shock or personal injury, do not bend the blade 

arms when installing them, balancing the blades or cleaning the fan. Do not insert objects between 

the rotating fan blades.

WARNING: 

To reduce the risk of personal injury, use only parts provided with this fan. The use 

of parts OTHER than those provided with this fan will void the warranty.

Summary of Contents for FLANAGAN II 42477

Page 1: ..._________________ ITEM 1059426 1059427 1060138 FLANAGAN II CEILING FAN MODEL 42477 42478 42483 AS21025 Questions problems missing parts Before returning to your retailer call our customer service depa...

Page 2: ...4 Safety Information 5 Preparation 6 Initial Installation 7 Standard or Angle Mounting Instructions 9 Wiring 11 Final Installation 12 Operating Instructions 15 Care and Maintenance 16 Troubleshooting...

Page 3: ...py E 1 G Yoke Cover 1 H Motor Assembly 1 I Set Screw preassembled to the Motor Assembly H 2 J Mounting Bracket Screw preassembled to the Mounting Bracket D 4 K Fitter Plate preassembled to the Motor A...

Page 4: ...4 HARDWARE CONTENTS Wire Connector Qty 3 1 extra Blade Screw Qty 15 1 extra Blade Washer Qty 15 1 extra Motor Screw Qty 15 1 extra XX shown actual size AA BB CC...

Page 5: ...a loud humming noise from the fan To reduce the risk of fire or electric shock do NOT use this fan with any solid state speed control device WARNING To reduce the risk of fire electric shock or perso...

Page 6: ...interference will not occur in a particular installation If this equipment does cause harmful interference to radio or television reception which can be determined by turning the equipment off and on...

Page 7: ...ncluded Angle Mounting is best suited for angled or vaulted ceilings A longer downrod is sometimes necessary to ensure proper blade clearance Important If using the angle mount check to ensure the cei...

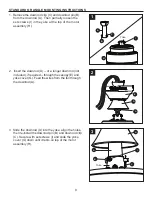
Page 8: ...r later use Turn the canopy in a counterclockwise direction Detach mounting bracket D from canopy E 5 Attach mounting bracket D to outlet box not included using screws and washers provided with the ou...

Page 9: ...rt the downrod A or a longer downrod not included if required through the canopy E and yoke cover G Feed the wires from the fan through the downrod A 3 Slide the downrod A into the yoke align the hole...

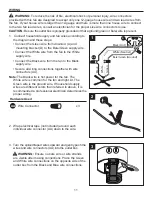
Page 10: ...in of insulation from the end of the white wire Twist the stripped ends of each strand of wire within the insulation with pliers not included Repeat the step for the black wire Note If you did not cu...

Page 11: ...wire Connect the Black wire from the fan to the Black supply wire Secure all wiring connections together with wire connectors AA Note The Black wire is hot power for the fan The White wire is common...

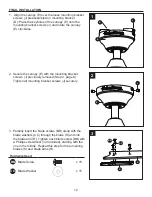
Page 12: ...g bracket screws J previously removed Step 4 page 8 Tighten all mounting bracket screws J securely 3 Partially insert the blade screws BB along with the blade washers CC through the blade S and into t...

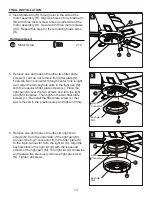
Page 13: ...with the loosened fitter plate screws L Place the light pan M over the two screws and turn the light pan M clockwise Then tighten the two fitter plate screws L Re install the fitter plate screw L that...

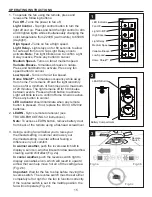
Page 14: ...suring the polarity of the battery matches the polarity indicated in the battery compartment positive to positive and negative to negative Replace the battery cover and press the fan power button on t...

Page 15: ...on to activate Light will blink twice to confirm Home Sheild is active Press any button to cancel LED indicator should illuminate when any remote button is pressed If not replace the DC3V CR2032 batte...

Page 16: ...The fan does not move 1 The power is off or the fuse is blown 2 There is a faulty wire connection 3 The plugs are not connected properly 4 The reverse switch is not completely engaged 1 Turn the powe...

Page 17: ...until secure The fan operates correctly but the lights are not working 1 The light kit wire plugs are not connected properly 2 There is a faulty wire connection 1 Ensure that the 6 pin connectors from...

Page 18: ...arying climate conditions this warranty does not cover any changes in brass finish including rusting pitting corroding tarnishing or peeling Brass finishes of this type give their longest useful life...

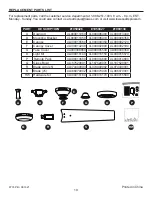
Page 19: ...g Bracket 4L000011050 4L000006410 4L000006350 E Canopy 4L000015560 4L000004350 4L000002120 F Canopy Cover 4L000014240 4L000002900 4L000002190 G Yoke Cover 4A000008660 4A000005540 4A000009350 O Light K...

Reviews: