background image

DOWNROD-STYLE FAN MOUNTING

If you decided to cut back the lead wires in 
Step 4, strip 1/2 in. of insulation from end of 
white wire. Twist stripped ends of each strand 
of wire within the insulation with pliers (not 
included). Repeat Step 5 for black, blue (if 
applicable) and green wires.

5

 5. 

6. 

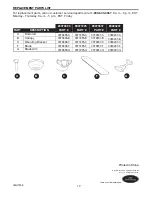
Remove canopy cover from bottom of canopy (B). 
[

NOTE

: It may be necessary to use the handle 

end of a screwdriver (not included) to remove the 
canopy cover by tapping on the canopy cover 
from the 

inside

 of the canopy (B).] 

NOTE

: Closemount-style mounting is more 

suitable for ceilings lower than 8 ft. high. The 
downrod (A), canopy cover, pin and clip are not 
used in this type of installation.

CLOSEMOUNT-STYLE FAN MOUNTING

1. 

9

Lowes.com/harborbreeze

C

Slot

Tab

6

A

Canopy

Cover

B

1

B

Install ball end of downrod (A) into opening of 
mounting bracket (C). Align slot in ball with tab in 
mounting bracket (C). 


DANGER

: Failure to align slot in ball with tab 

may cause the fan to wobble or fall, which could 
result in serious injury or death.

Continue to 

WIRING

 on page 11.

Summary of Contents for CLASSIC STYLE BDB52LW5N

Page 1: ...RECEIPT HERE Serial Number Purchase Date E192641 LISTED Questions problems missing parts Before returning to your retailer call our customer service department at 1 800 643 0067 8 a m 6 p m EST Monda...

Page 2: ...lified electrician or consult a do it yourself wiring handbook if you are unfamiliar with installing electrical wiring Make sure the installation site you choose allows a minimum clearance of 7 ft fro...

Page 3: ...g fan lead wires consult an electrician for the proper size wire connectors to use To reduce the risk of fire or electrical shock do not use the fan with any solid state speed control device or contro...

Page 4: ...preassembled M Pin preassembled 1 N Clip preassembled 1 PART DESCRIPTION QUANTITY A Downrod 1 B Canopy 1 C Mounting Bracket 1 D Motor Housing 1 E Plastic Locking Mechanism 5 F Blade 5 G Blade Arm 5 H...

Page 5: ...tents list and hardware contents list If any part is missing or damaged do not attempt to install operate or assemble the product Estimated Assembly Time 120 minutes Tools Required for Assembly not in...

Page 6: ...ft min 30 in min 2 F 6 Determine mounting method to use A Downrod style mount standard or angled ceiling B Closemount style standard ceiling only IMPORTANT If using the angle mount check to make sure...

Page 7: ...this will support the fan IMPORTANT If using the angle mount make sure open end of mounting bracket C is installed facing the higher point of the ceiling and ensure the ceiling angle is not steeper t...

Page 8: ...the downrod Start at the TOP of the ball on the downrod and measure 8 in of lead wire and then cut the excess wire off with wire cutters not included NOTE If you do not cut back the lead wires Steps 4...

Page 9: ...ove the canopy cover by tapping on the canopy cover from the inside of the canopy B NOTE Closemount style mounting is more suitable for ceilings lower than 8 ft high The downrod A canopy cover pin and...

Page 10: ...he mounting bracket C using one of the non slotted holes in the canopy B 4 3 CLOSEMOUNT STYLE FAN MOUNTING 10 Lowes com harborbreeze D 3 B D Remove every other screw and lock washer from top of motor...

Page 11: ...from ceiling Connect WHITE wire from fan to WHITE wire from ceiling Connect GREEN wire from fan on downrod A and mounting bracket C to BARE GREEN wire from ceiling 1 NOTE This fan is remote control a...

Page 12: ...nd partially loosen these two canopy mounting screws L Remove the other two canopy mounting screws L Now lift canopy B to mounting bracket C again aligning slotted holes in canopy B with loosened cano...

Page 13: ...counterclockwise to lock plastic locking mechanism E into place Repeat Steps 2 and 3 for each blade arm G and blade F 3 Locate motor screws I and lock washers K previously removed Step 5 page 7 Inser...

Page 14: ...stat setting in summer and lower your thermostat setting in winter without feeling a difference in your comfort NOTE Wait for fan to stop before moving the reverse switch 2 2A In warmer weather settin...

Page 15: ...r completely DOWN for fan to function If the reverse switch is set in the middle position fan will not operate 2C TROUBLESHOOTING WARNING Before beginning work shut off the power supply to avoid elect...

Page 16: ...ion or by using parts not produced by the manufacturer of this fan or affixing accessories not produced by the manufacturer of this fan are the purchaser s own responsibility The distributor assumes n...

Page 17: ...ademark of LF LLC All Rights Reserved Lowes com harborbreeze JMLI1508 A B F C G 0076888 A 0076888 B 0076888 C 0076888 F 0076888 G PART DESCRIPTION 0076888 0077285 0079837 0080297 PART PART PART PART A...

Reviews: