background image

18

Lowes.com/harborbreeze

CARE AND MAINTENANCE

At least twice each year, lower the canopy to check the downrod assembly, and then tighten all 

screws on the fan . Clean the motor housing with only a soft brush or lint-free cloth to avoid scratching 

the finish. Clean the blades with a lint-free cloth. 

Bulb Replacement: Use 40-watt max . candelabra-base incandescent or CFL equivalent .

Battery Replacement: Use a 23-amp, 12-volt alkaline battery .

Important:

 Shut off the main power supply before you begin any maintenance tasks . Do not use 

water or a damp cloth to clean the ceiling fan .

TROUBLESHOOTING

PROBLEM

POSSIBLE CAUSE

CORRECTIVE ACTION

The fan does not 

move .

1 .  The power is off or the fuse is 

blown .

2 .  There is a faulty wire connection .

3 .  The single-pin connectors are not 

connected properly .

4 .  The DC motor is obstructed 

during operation .

5 .  The power of the motor is over 

80W .

1 .  Turn the power on or check the 

fuse .

2 .  Turn the power off . Loosen 

the canopy and check all 

connections .

3 .  Check that the single-pin 

connectors from the light kit and 

fan are connected properly .

4 .  Disable the power supply to the 

fan motor and re-start the motor .

5 .  The blade is overweight . Do not 

install the unapproved blades .

The fan is noisy .

1 .  The blades are loose . 


2 .  There is a cracked blade .
3 .  The wall control is not compatible 

with the fan .

4 .  The outlet box is not secure . 

5 .  The mounting bracket is not 

secure .

1 .  Check and tighten all screws 

that hold the fan blades to the 

blade arms and the motor .

2 .  Replace the cracked blade .
3 .  Do not use a full range dimmer 

switch to control the fan speed .

4 .  Ensure the outlet box is secured 

to the building structure .

5 .  Ensure the mounting bracket is 

secured to the outlet box and 

that the screws are tight .

Summary of Contents for 0184428

Page 1: ...8 a m 6 p m EST Monday Thursday 8 a m 5 p m EST Friday 1 Lowes com harborbreeze Harbor Breeze is a registered trademark of LF LLC All Rights Reserved ATTACH YOUR RECEIPT HERE Serial Number ___________...

Page 2: ...Safety Information 5 Preparation 6 Initial Installation 7 Standard or Angle Mounting Instructions 9 Closemount Instructions 11 Wiring 12 Final Installation 13 Operating Instructions 17 Care and Mainte...

Page 3: ...H Motor Assembly 1 I Adapter Plate 1 J Yoke Cover 1 K Blade Arm 5 L Blade 5 M Glass Shade 1 N Light Pan 1 O Bulb 3 P Remote Pack 1 Q Set Screw preassembled to Motor Assembly H 2 R Mounting Bracket Sc...

Page 4: ...4 Lowes com harborbreeze HARDWARE CONTENTS Wire Connector Qty 3 1 extra Blade Screw Qty 15 1 extra Blade Washer Qty 15 1 extra Motor Screw Qty 10 1 extra AA BB CC DD shown actual size...

Page 5: ...d will cause a loud humming noise from the fan To reduce the risk of fire or electric shock do NOT use a full range dimmer switch to control the fan speed WARNING To reduce the risk of fire electric s...

Page 6: ...two conditions 1 this device may not cause harmful interference and 2 this device must accept any interference received including interference that may cause undesired operation PREPARATION Before beg...

Page 7: ...Angle mounting is best suited for angled or vaulted ceilings A longer downrod is sometimes necessary to ensure proper blade clearance Important If using the angle mount check to ensure the ceiling an...

Page 8: ...racket D to outlet box not included using screws and washers provided with the outlet box Note It is very important you use the proper hardware when installing the mounting bracket D as this will supp...

Page 9: ...2 Insert the downrod A through the canopy E and yoke cover J Thread the wires from the motor assembly H through the downrod A K 3 Slide the downrod A into the yoke of the motor assembly H align the ho...

Page 10: ...wire in Step 4 strip 1 2 in of insulation from the end of the white wire Twist the stripped ends of each strand of wire within the insulation with pliers not included Repeat the step for black and gre...

Page 11: ...type of installation 2 Remove three Phillips head closemount screws U from the top of the motor assembly H Align the canopy E with the holes in the top of the motor assembly H then re install the Phil...

Page 12: ...the White supply wire Connect the Black wire from the fan to the Black supply wire Secure all wiring connections together with wire connectors AA Note The Black wire is hot power for the fan The Whit...

Page 13: ...ce the keyholes of the canopy E onto the mounting bracket screws R and rotate the canopy E clockwise 2 Secure the canopy E with the mounting bracket screws R previously removed Step 4 page 8 Tighten a...

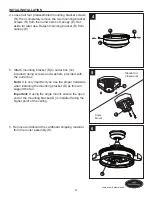
Page 14: ...arm K through slots in the side of the motor assembly H Align the holes of one blade arm K with two motor screw holes in underside of the motor assembly H Secure with two motor screws DD Repeat this s...

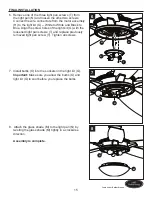
Page 15: ...Align the screw holes of the light kit G with the loosened light pan screws T and replace previously removed light pan screw T Tighten all screws 7 Install bulbs O into the sockets on the light kit G...

Page 16: ...e wall bracket 10 Turn on power supply to the fan 11 Remove the battery cover from the back of the remote found in remote pack P Insert the battery from remote pack P into the remote ensure polarity o...

Page 17: ...ht mode Sleep Timer Turns fan off after 2H 2 hours 4H 4 hours or 8H 8 hours Light On Off Turns light off or on Delayed Light Off Delays turning off light for 1 minute which allows safe exit from room...

Page 18: ...rs are not connected properly 4 The DC motor is obstructed during operation 5 The power of the motor is over 80W 1 Turn the power on or check the fuse 2 Turn the power off Loosen the canopy and check...

Page 19: ...e balancing kit V 3 Turn off the power Loosen the canopy and verify that the mounting bracket is secure to the electrical outlet box The bracket must be flush without movement against the outlet box 4...

Page 20: ...te control see p 17 4 The remote control has been synced to this fan at the factory and the dip switch as been switched to 0 inside the battery compartment If you have more than one remote control in...

Page 21: ...id Due to varying climate conditions this warranty does not cover any changes in brass finish including rusting pitting corroding tarnishing or peeling Brass finishes of this type give their longest u...

Page 22: ...1 800 643 0067 8 a m 6 p m EST Monday Thursday 8 a m 5 p m EST Friday PART DESCRIPTION PART A Downrod 184428 A D Mounting Bracket 184428 D E Canopy 184428 E F Canopy Cover 184428 F G Light Kit 184428...

Reviews: