


24
PASSWORD SETTING
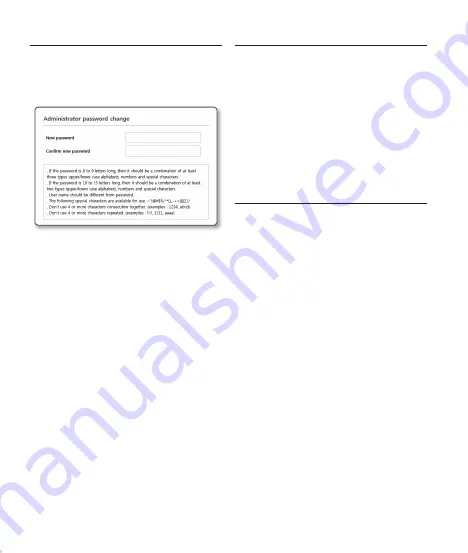
When you access the product for the first time, you
must register the login password.
When the “
Password change
” window appears,
enter the new password.
J
`
For a new password with 8 to 9 digits, you
must use at least 3 of the following: uppercase/
lowercase letters, numbers and special
characters. For a password with 10 to 15
digits, you must use at least 2 types of those
mentioned.
-
Special characters that are allowed. :
~`!@#$%^*()_-+=|{}[].?/
`
For higher security, you are not recommended
to repeat the same characters or consecutive
keyboard inputs for your passwords.
`
If you lost your password, you can press the
[
RESET
] button to initialize the product. So,
don’t lose your password by using a memo pad
or memorizing it.
LOGIN
Whenever you access the camera, the login
window appears.
Enter the User ID and password to access the
camera.
a
Enter “
admin
” in the <
User Name
> input
box.
b
Enter the password in the <
Password
>
input field.
c
Click [
OK
].
CONNECTING TO WiFi
Camera setting
a
Connect OTG adapter (5-pin) and WiFi
dongle to the micro USB terminal.
Smartphone setting
a
Install the Wisenet Installation application.
b
Select the camera SSID after turning on
the Wifi.
c
Run the Wisenet Installation application.
d
When you log in to the camera, the video
will be connected. (initial password: 4321)
`
The video will be played without being logged in
during the initial connection.
e
You can adjust angle of view while
watching the video through smartphone.
Summary of Contents for WISENET XND-6010
Page 1: ...XND 6010 6020R 8020R 8030R 8040R XNV 6010 6020R 8020R 8030R 8040R NETWORK CAMERA Quick Guide ...
Page 3: ...INSTALLATION 3 ...
Page 5: ...INSTALLATION 5 1 3 1 4 ...
Page 6: ...INSTALLATION 6 1 2 A C T L IN K NETWORK 1 5 1 6 ...
Page 7: ...INSTALLATION 7 micro USB 1 8 Installation 1 7 Not included WiFi dongle OTG adapter ...
Page 8: ...INSTALLATION 8 1 9 ...
Page 9: ...INSTALLATION 9 1 10 ...
Page 11: ...INSTALLATION 11 1 13 1 2 FR ON T US B VIDEO D C 12 V RES ET 1 2 3 4 5 6 7 a b 1 14 24 ...
Page 13: ...INSTALLATION 13 ...
Page 15: ...INSTALLATION 15 1 3 1 4 1 2 A C T LI N K NET WO RK 1 2 A C T LI N K NET WO RK ...
Page 16: ...INSTALLATION 16 1 5 1 6 1 2 A C T LI N K NET WO RK 1 2 A C T LI N K NET WO RK ...
Page 17: ...INSTALLATION 17 1 7 1 8 1 2 FRO NT US B VIDEO D C 12 V RESET 1 2 3 4 5 6 7 ...
Page 18: ...INSTALLATION 18 1 9 1 10 ...
Page 19: ...INSTALLATION 19 1 11 1 12 1 2 A C T L IN K NETWORK ...
Page 20: ...INSTALLATION 20 micro USB 1 14 Installation 1 13 Not included WiFi dongle OTG adapter ...
Page 21: ...INSTALLATION 21 1 15 ...
Page 22: ...INSTALLATION 22 1 16 ...


