


User’s Manual
13
ENGLISH
User’s Manual
12
13
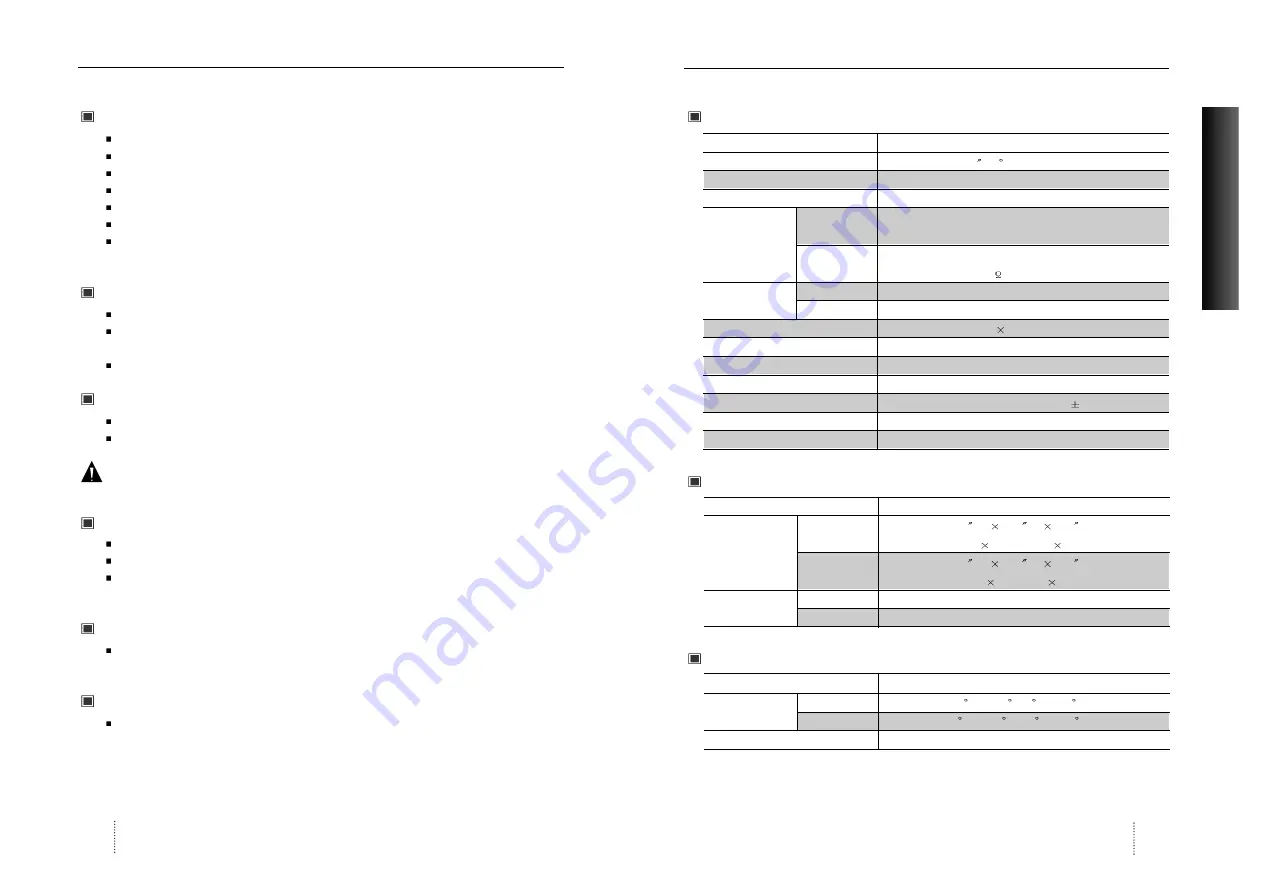
Specifications
Electrical Specifications
Mechanical Specifications
Environmental Specifications
ITEM
E19BL
CRT Type
19 , 90 deflection FST
CRT Dot pitch
0.26mm
CRT Surface
Non-glare
H/V Separate, TTL, positive/negative
H/V Composite, TTL, positive/negative
RGB Analog (0.7Vp-p), positive
75
Terminated
30KHz~85KHz (Automatically)
47Hz~160Hz (Automatically)
Maximum Resolution
1280Dots
1024Lines (75Hz)
Pixel Clock(Max.)
135 MHz
Display Size (Standard)
Horizontal 350mm, Vertical 262mm
Power Consumption(Max.)
110 Watts
Power Supply
AC 100~240Volt, 50/60Hz
3Hz
Input Connector
D-Sub, 15Pin Connectors
Display Colors
Unlimited
ITEM E19BL
18.5 (W)
18.2 (D)
18.3 (H)
470mm(W)
462.5mm(D)
466mm(H)
21.6 (W)
22.6 (D)
22.4 (H)
540mm(W)
537mm(D)
543mm(H)
43Ibs (19.5Kg)
49.6Ibs (22.5Kg)
ITEM E19BL
32 F to 104 F (0 C to 40 C)
-4 F to 140 F (-20 C to 60 C)
10% to 85% R.H. Non-condensing
Input
Signal
Dimension
Sync
Video
Carton
Unit
Horizontal
Net
Vertical
Gross
Operating
Storage
Humidity
Scanning
frequency
Weight
Temperature
Troubleshooting
No picture
Check that the AC cord is correctly connected.
Check that the AC socket is live by plugging in another piece of equipment.
Power switch and computer power switch should be in position.
Ensure that the signal cable is properly connected to the video card or PC.
Ensure that the video card is securely seated in the PC.
Check the connector for bent or pushed-in pins.
Press a key on the keyboard or move the mouse, in case the screen power-saver mode has
blanked the screen.
Image is scrolling or unstable
Signal cable should be securely attached to the computer.
Check the pin assignments and signal timings of the monitor and your video card with
respect to recommended timings and pin assignments.
Ensure that the video card is securely seated in the PC.
Picture is fuzzy
Adjust the Contrast and Brightness Controls.
Push the Degauss Button once.
Caution
: A minimum interval of 20 minutes should exist before the Degauss Button is used a
second time. Do not hold the button down continuously.
Picture bounces or a waving pattern is present in the picture
Move electrical devices that may be causing electrical interference away from the monitor.
See the inside front cover of this manual for FCC information.
Unshielded audio speakers placed next to the monitor can cause picture distortion. Move
the speakers away.
Edges of the display image are not square
Adjust the distortion using the Side Pincushion or Trapezoid Pincushion Balance, Parallel
adjustment controls under the on screen menu.
Display image is not centered, too small, or too large
Adjust the horizontal and vertical image sizes using the Horizontal and Vertical Size
adjustment controls under the on screen menu.