background image

Explanation of terms and symbols

Page EN-3

Explanation of terms and symbols

Please read through 
the safety instruc-
tions and this user 

manual carefully before using 
the appliance. This is the only 
way you can use all the func-
tions reliably and safely.

Be absolutely sure to also ob-
serve the national regulations in 
your country, which are also va-
lid in addition to the regulations 
specified in this user manual.

Keep all safety notices and in-
structions for future reference. 
Give all safety notices and ins-
tructions to the next user of the 
appliance.

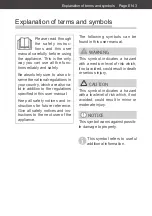
The following symbols can be 
found in this user manual.

 WARNING

This symbol indicates a hazard 
with a medium level of risk which, 
if not avoided, could result in death 
or serious injury.

 CAUTION

This symbol indicates a hazard 
with a low level of risk which, if not 
avoided, could result in minor or 
moderate injury. 

 NOTICE

This symbol warns against possib-
le damage to property. 

This symbol refers to useful 
additional information.

Summary of Contents for HVBA8008SKC

Page 1: ...Staubsauger Gebrauchsanleitung HVBA8008SKC Anleitung Version 2101 00891 20211110 Bestell Nr 20294662 Nachdruck auch aus zugsweise nicht ge stattet ...

Page 2: ...ellen DE 18 Saugen beenden DE 19 Gerät transportieren DE 19 Abstellen und Aufbewahren DE 20 Kurzfristiges Abstellen DE 20 Platzsparendes Aufbewahren DE 20 Pflege und Wartung DE 21 Staubbeutel ersetzen und Motorschutzfilter reinigen wechseln DE 21 Hygienefilter reinigen wechseln DE 23 Gerät reinigen DE 24 Bodendüse reinigen DE 25 Turbobürste reinigen DE 25 Saugschlauch abnehmen DE 25 Fehlersuchtabe...

Page 3: ...en für die Zukunft auf Geben Sie alle Sicherheitshinweise und Anwei sungen an den nachfolgenden Verwender des Geräts weiter Folgende Signalbegriffe finden Sie in dieser Gebrauchsanleitung WARNUNG Dieser Signalbegriff bezeichnet eine Gefährdung mit einem mittle ren Risikograd die wenn sie nicht vermieden wird den Tod oder eine schwere Verletzung zur Folge ha ben kann VORSICHT Dieser Signalbegriff b...

Page 4: ... beaufsichtigt wer den Es dürfen keine technischen Ver änderungen am Gerät vorgenom men werden Wenn die Netzanschlussleitung des Geräts beschädigt ist muss sie durch den Hersteller oder sei nen Kundendienst oder eine qua lifizierte Fachkraft ersetzt werden um Gefährdungen zu vermeiden Verwenden Sie das Gerät aus schließlich wie in dieser Ge brauchsanleitung beschrieben Jede andere Verwendung gilt ...

Page 5: ... Wartung dürfen nicht durch Kinder ohne Beauf sichtigung durchgeführt werden Gefahr für Kleinkinder Trotz der Filter kann noch eine geringe Menge an Schmutz partikeln in der Ausblasluft des Geräts vorhanden sein Diese können bei kleinen Kin dern durch Einatmen zu aller gischen Reaktionen führen Nicht in der unmittelbaren Nähe von Kindern staub saugen Für Kinder jeden Alters gelten weitere Vorsicht...

Page 6: ...nschlussleitung de fekt ist wenn es Rauch entwickelt oder verbrannt riecht wenn es ungewohnte Ge räusche von sich gibt IndiesenFällenNetzstecker aus der Steckdose ziehen und Gerät reparieren lassen siehe Kapitel Service Wenn die Netzanschlusslei tung dieses Gerätes beschä digtwird musssiedurchden Hersteller oder seinen Kun dendienst oder eine ähnlich qualifizierte Person ersetzt werden um Gefährdun...

Page 7: ...aratu ren am Gerät dürfen aus schließlich autorisierte Fachkräfte vornehmen so wie unser Service siehe SeiteDE 28 Eigenständige Reparaturen an dem Gerät können Sach und Perso nenschäden verursachen und die Haftungs und Garantieansprüche verfal len Niemals versuchen das defekte oder vermeintlich defekte Gerät selbst zu re parieren In diesem Gerät befinden sich elektrische und mecha nische Teile die ...

Page 8: ...zfilter fehlt oder beschädigt ist Der aufgesaugte Staub kann sonst in das Gerät eindringen bzw indieRaumluftgelangen HINWEIS Beschädigungsgefahr Unsachgemäßer Umgang mit dem Gerät kann zu Sach schäden führen Beim Auspacken keine spit zen Gegenstände verwen den Niemals sich auf das Gerät setzen oder stellen Gerät nur mit eingesetztem Motorschutzfilter benutzen Der Motorschutzfilter darf nicht beschädi...

Page 9: ...ls die Netzanschluss leitung über die rote Mar kierung hinaus herauszie hen Weiteres Ziehen kann die Kabeltrommel beschä digen Den Staubsauger nie direkt neben eine Heizung oder ei nen Ofen stellen Den Hygienefilter niemals auf einer Heizung oder mit einem Haar oder Wäsche trockner etc trocknen Der Filter kann dadurch un brauchbar werden Zum Waschen des Mo torschutzfilters nicht die Waschmaschine od...

Page 10: ...gsfach Lieferung kontrollieren 1 Packen Sie das Gerät aus Verwenden Sie dabei keine scharfen oder spitzen Gegen stände Entfernen Sie vor sichtig alle Verpackungsteile Kunststoffprofile Klebestreifen und Schaumpolster 2 Sollte die Lieferung unvollstän dig sein oder das Gerät einen Transportschaden aufweisen nehmen Sie bitte Kontakt mit unserem Service auf siehe Seite DE 28 ...

Page 11: ...fach 6 8 Staubbeutelfach 9 Entriegelungsgriff für das Staubbeutelfach 10 Tragegriff 11 Parkhalterung 12 Netzanschlussleitung mit Netzstecker 13 Luftaustritt mit Filterab deckung und Hygienefilter 14 Saugschlauch mit Handgriff 15 Teleskoprohr 16 Bodendüse 17 Umschalt Fußhebel 18 Turbobürste 19 Polsterdüse 20a Möbelpinsel auseinandergezogen 20b Fugendüse zusammengeschoben Geräteteile Bedienelemente ...

Page 12: ...ten da sie für große ebene Flächen geeignet ist Das beste Saugergebnis erhalten Sie wenn Sie das Gerät mit Hilfe des Umschalt Fußhebels 17 an den Untergrund anpassen Wählen Sie diese Stellung für kurz florige oder glatte Böden wie Na delfilz PVC Parkett oder Fliesen Wählen Sie diese Stellung für hochflorige Teppiche Der Umschalt Fußhebel lässt sich auch während des Betriebs um stellen Je nach Bode...

Page 13: ... Düsen befinden sich im Aufbewahrungsfach 6 Drücken Sie die Entriegelungs taste 7 für das Aufbewahrungs fach um den Deckel des Aufbe wahrungsfachs 6 zu entriegeln Klappen Sie den Deckel dann auf Polsterdüse 19 Die Polsterdüse 19 ist besonders geeignet um Polstermöbel und Matratzen abzusaugen Sie kön nen die Polsterdüse mit oder ohne Bürstenaufsatz verwenden Möbelpinsel Fugendüse 20a 20b Mit dem Mö...

Page 14: ...in Staub beutel eingesetzt sein sollte ge hen Sie bitte wie folgt vor 9 8 1 Öffnen Sie den Deckel des Staubbeutelfachs 8 am Entriegelungsgriff 9 und klap pen Sie den Deckel nach oben 21 2 Stecken Sie einen Staubbeutel in den Staubbeutelhalter 21 3 Verschließen Sie das Staubbeu telfach wieder Achten Sie dabei darauf dass der Staubbeutel nirgends eingeklemmt wird Gerät einrichten 14 15 1 Stecken Sie...

Page 15: ...se aus z B die Boden düse 16 und stecken Sie sie auf das Teleskoprohr 15 Sie können alle Düsen auch di rekt auf den Handgriff am Saug schlauch stecken 23 4 Die Länge des Teleskoprohrs lässt sich verändern und da durch an die Körpergröße des Benutzers anpassen Drücken Sie hierfür die Ver riegelung 23 nach unten und schieben Sie dabei das Teles koprohr auseinander oder zu sammen Mit einem Klick rast...

Page 16: ...en Glühende Asche brennen de Zigaretten etc setzen den Filter in Brand Feuch tigkeit kann zum Kurzschluss führen spitze Gegenstände beschädigen den Filter und können zum Kurzschluss führen VORSICHT Gesundheitsgefahr Unsachgemäßer Umgang mit dem Gerät kann zu Beein trächtigungen der Gesund heit führen Das Gerät nicht benutzen wenn der Hygiene oder der Motorschutzfilter fehlt oder beschädigt ist Der ...

Page 17: ...ng sichtbar wird Wenn die rote Markierung zum Vorschein kommt ist die Net zanschlussleitung zu weit ab gewickelt Ziehen Sie sie wieder etwas ein siehe Abschnitt Sau gen beenden auf Seite DE 19 2 Stecken Sie den Netzstecker in eine vorschriftsmäßig installier te Steckdose 5 3 Treten Sie mit dem Fuß auf den Ein Ausschalter 5 um das Gerät einzuschalten 4 Zum Saugen ziehen und schie ben Sie die Düse ü...

Page 18: ...Teppichen und Pols tern und eine hohe Saugkraft um Bodenbeläge zu reinigen Nebenluftventil 24 Bei Bedarf können Sie die Saug kraft mithilfe des Nebenluftven tils 24 weiter verringern Die Abdeckung des Nebenluftventils lässt sich stufenlos verschieben Falls Sie versehentlich etwas ein oder ansaugen können Sie durch Öffnen des Neben luftventils augenblicklich die Saug kraft verringern Auf diese Weis...

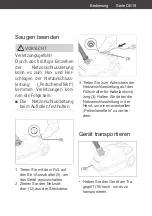
Page 19: ...tung beim Aufrollen festhalten 5 1 Treten Sie mit dem Fuß auf den Ein Ausschalter 5 um das Gerät auszuschalten 2 Ziehen Sie den Netzste cker 12 aus der Steckdose 3 3 Treten Sie zum Aufwickeln der Netzanschlussleitung auf den Fußschalter für Kabelaufwick lung 3 Halten Sie dabei die Netzanschlussleitung in der Hand um einen eventuellen Peitscheneffekt zu verhin dern Gerät transportieren 10 Heben Sie...

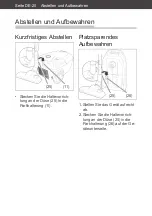
Page 20: ...zfristiges Abstellen 11 25 Stecken Sie die Haltevorrich tung an der Düse 25 in die Parkhalterung 11 Platzsparendes Aufbewahren 26 25 1 Stellen Sie das Gerät aufrecht ab 2 Stecken Sie die Haltevorrich tung an der Düse 25 in die Parkhalterung 26 auf der Ge räteunterseite ...

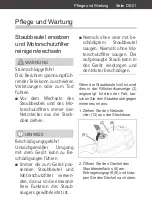
Page 21: ...Immer die zum Gerät pas senden Staubbeutel und Motorschutzfilter verwen den da nur so die einwand freie Funktion des Staub saugers gewährleistet ist Niemals ohne oder mit be schädigtem Staubbeutel saugen Niemals ohne Mo torschutzfilter saugen Der aufgesaugte Staub kann in das Gerät eindringen und den Motor beschädigen Wenn der Staubbeutel voll ist wird dies in der Füllstandsanzeige 2 angezeigt Ist d...

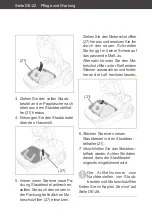
Page 22: ...schutzfilter 27 heraus und ersetzen Sie ihn durch den neuen Schneiden Sie ihn ggf mit einer Schere auf das passende Maß zu Alternativ können Sie den Mo torschutzfilter unter fließendem Wasser auswaschen und hinter her an der Luft trocknen lassen 21 6 Stecken Sie einen neuen Staubbeutel in den Staubbeu telhalter 21 7 Verschließen Sie das Staubbeu telfach wieder Achten Sie dabei darauf dass der Stau...

Page 23: ...echsel gereinigt werden Wenn sich Geruchsbildung durch das Reinigen nicht beseitigen lässt oder der Hygienefilter 30 zu stark verschmutzt ist muss er ausge tauscht werden 1 Ziehen Sie den Netzste cker 12 aus der Steckdose min max 30 29 28 2 Schieben Sie die Verriege lung 28 zur Seite und nehmen Sie die Filterabdeckung 29 ab 3 Ziehen Sie den Hygienefil ter 30 heraus 4 Spülen Sie den Hygienefil ter ...

Page 24: ...die Steckdose stecken wenn alle Teile des Geräts voll kommen trocken sind HINWEIS Beschädigungsgefahr UnsachgemäßerUmgangmit dem Gerät kann zu Beschädi gungen des Geräts führen Verwenden Sie keine ag gressiven Reinigungsmittel Bürsten mit Metall oder Nylonborsten sowie keine scharfen oder metallischen Reinigungsgegenstände wie Messer harte Spach tel und dergleichen Diese können die Oberflächen be s...

Page 25: ... Einklemmens Die Turbobürste vor der Reinigung immer vom Teleskoprohr bzw vom Handgriff des Saug schlauchs abnehmen Wenn die Turbobürste nicht mehr richtig funktioniert 1 Ziehen Sie den Netzste cker 12 aus der Steckdose und ziehen Sie die Turbobürs te 18 vom Teleskoprohr 15 bzw vom Handgriff des Saug schlauchs 14 ab 2 Entfernen Sie Fusseln und Haare von der Bürste und vom Luftschaufelrad Saugschla...

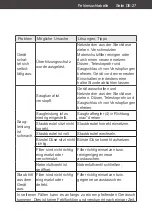
Page 26: ...en ausführen Problem Mögliche Ursache Lösungen Tipps Gerät arbeitet nicht Ein Ausschalter nicht betätigt Ein Ausschalter betätigen Netzstecker sitzt lose Festen Sitz des Netzsteckers in der Steckdose kontrollieren Steckdose defekt Gerät an einer anderen Steckdose ausprobieren Sicherung hat ausgelöst Sicherung bzw den Sicherungsautomaten kontrollieren Netzanschlussleitung defekt Sofort den Netzstec...

Page 27: ...r und Saugschlauch von Verstopfungen befreien Saugleistung ist zu niedrig eingestellt Saugkraftregler 4 in Richtung max drehen Staubbeutel sitzt nicht korrekt Staubbeutel korrekt einsetzen Staubbeutel ist voll Staubbeutel wechseln Bürste Düse sitzt nicht richtig Bürste Düse korrekt aufsetzen Filter sind nicht richtig eingesetzt oder verschmutzt Filter richtig einsetzen bzw reinigen gegen neue aust...

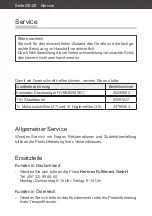
Page 28: ...e an die Produktberatung Ihres Versandhauses Ersatzteile Kunden in Deutschland Wenden Sie sich bitte an die Firma Hermes Fulfilment GmbH Tel 057 32 99 66 00 Montag Donnerstag 8 15Uhr Freitag 8 14 Uhr Kunden in Österreich Wenden Sie sich bitte an das Kundencenter oder die Produktberatung Ihres Versandhauses Bitte beachten Sie sind für den einwandfreien Zustand des Geräts und die fachge rechte Benut...

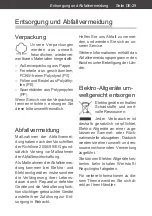
Page 29: ...räten insbesondere die Verlängerung ihrer Lebens dauer durch Reparatur defekter Geräte und die Veräußerung funk tionstüchtiger gebrauchter Geräte anstelle ihrer Zuführung zur Ent sorgung in Betracht Helfen Sie uns Abfall zu vermei den und wenden Sie sich an un seren Service Weitere Informationen enthält das Abfallvermeidungsprogramm des Bundes unter Beteiligung der Län der Elektro Altgeräte um wel...

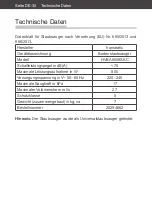
Page 30: ...chnung Bodenstaubsauger Modell HVBA8008SKC Schallleistungspegel in dB A 75 Maximale Leistungsaufnahme in W 800 Versorgungsspannung in V 50 60 Hz 220 240 Maximale Saugkraft in kPa 17 Maximaler Volumenstrom in l s 27 Schutzklasse II Gewicht zusammengebaut in kg ca 7 Bestellnummer 20294662 Hinweis Der Staubsauger wurde als Universalstaubsauger getestet ...

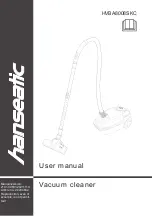
Page 31: ...Vacuum cleaner User manual HVBA8008SKC Manual version 2101 00891 20211110 Article no 20294662 Reproduction even of excerpts is not permit ted ...

Page 32: ...Moving the appliance EN 19 Shutdown and storage EN 20 Briefly setting aside EN 20 Space saving storage EN 20 Care and maintenance EN 21 Replacing the dust bag and cleaning changing motor protection filter EN 21 Cleaning changing the hygiene filter EN 23 Cleaning the appliance EN 24 Cleaning the floor nozzleEN 24 Cleaning the turbo brushEN 25 Remove suction hose EN 25 Troubleshooting table EN 26 Se...

Page 33: ...ified in this user manual Keep all safety notices and in structions for future reference Give all safety notices and ins tructions to the next user of the appliance The following symbols can be found in this user manual WARNING This symbol indicates a hazard with a medium level of risk which if not avoided could result in death or serious injury CAUTION This symbol indicates a hazard with a low le...

Page 34: ...ard Use the appliance exclusively as described in this user manual Any other use is deemed improper and may result in damage to property or even personal injury The manufacturer accepts no lia bility for damage caused by impro per use Safety notices In this chapter you will find gene ral safety notices which you must always observe for your own pro tection and that of third parties Please also obs...

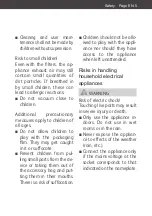
Page 35: ...cate Prevent children from pul ling small parts from the de vice or taking them out of the accessory bag and put ting them in their mouths There is a risk of suffocation Children should not be allo wed to play with the appli ance nor should they have access to the appliance when left unattended Risks in handling household electrical appliances WARNING Risk of electric shock Touching live parts may...

Page 36: ...kly from the mains in the event of a fault Keep the appliance mains plug and supply cord away from naked flames and hot surfaces Do not kink pinch or run over the supply cord with the appliance This can re sult in a break in the cord Never leave the applian ce unattended while the mains plug is connected to the socket Never pull the mains plug out of the socket by the supply cord always hold the ma...

Page 37: ...rotection against po tential sources of danger Only parts corresponding to the original appliance specifications may be used for repairs CAUTION Risk of injury Improper handling of the ap pliance may result in injury Hold the supply cord when winding it up Forcefully re tracting the supply cord can cause a whipping effect on account of the supply cord swinging uncontrolla bly Lay out the supply cor...

Page 38: ...ce The motor pro tection filter must not be damaged Only the original supplied accessories and the speci fied dust bag motor protec tion filter and hygiene filter may be used Never vacuum clay plas ter cement masonry dust or drilling dust Vacuuming these materials blocks the filter Never vacuum water or other liquids Never vacuum wet carpets rugs On freshly shampooed car pets always wait until the dete...

Page 39: ...ter or oven Never dry the hygiene filter on a heater or with a hair dryer or tumble dryer This may render the filter unu sable Never wash the motor pro tection filter in a washing machine or dishwasher The filter must be air dried only Do not use any abrasive cle aners scouring or thinning agents to clean the appli ance and accessories They could damage the surface of the appliance ...

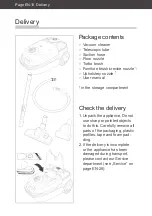
Page 40: ...zle User manual in the storage compartment Check the delivery 1 Unpack the appliance Do not use sharp or pointed objects to do this Carefully remove all parts of the packaging plastic profiles tape and foam pad ding 2 If the delivery is incomplete or the appliance has been damaged during transport please contact our Service department see Service on page EN 28 ...

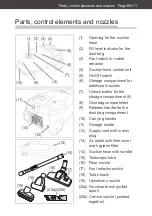
Page 41: ...ent 6 8 Dust bag compartment 9 Release handle for the dust bag compartment 10 Carrying handle 11 Storage holder 12 Supply cord with mains plug 13 Air outlet with filter cover and hygiene filter 14 Suction hose with handle 15 Telescopic tube 16 Floor nozzle 17 Foot selector switch 18 Turbo brush 19 Upholstery nozzle 20a Furniture brush pulled apart 20b Crevice nozzle pushed together Parts control e...

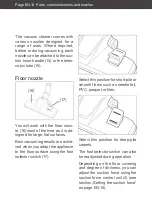
Page 42: ...de signed for large flat surfaces Best vacuuming results are achie ved when you adapt the appliance to the floor surface using the foot selector switch 17 Select this position for short pile or smooth floors such as needle felt PVC parquet or tiles Select this position for deep pile carpets The foot selector switch can also be readjusted during operation Depending on the floor covering and degree ...

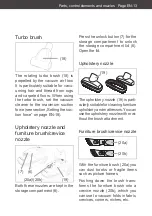
Page 43: ... nozzles are kept in the storage compartment 6 Press the unlock button 7 for the storage compartment to unlock the storage compartment lid 6 Open the lid Upholstery nozzle 19 The upholstery nozzle 19 is parti cularly suitable for cleaning furniture upholstery and mattresses You can use the upholstery nozzle with or wi thout the brush attachment Furniture brush crevice nozzle 20a 20b With the furni...

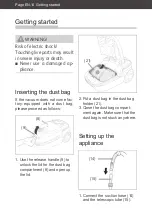
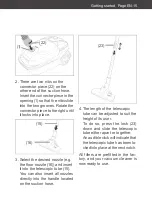
Page 44: ...m does not come fac tory equipped with a dust bag please proceed as follows 9 8 1 Use the release handle 9 to unlock the lid for the dust bag compartment 8 and open up the lid 21 2 Put a dust bag in the dust bag holder 21 3 Close the dust bag compart ment again Make sure that the dust bag is not stuck anywhere Setting up the appliance 14 15 1 Connect the suction hose 14 and the telescopic tube 15 ...

Page 45: ... the floor nozzle 16 and insert it into the telescopic tube 15 You can also insert all nozzles directly into the handle located on the suction hose 23 4 The length of the telescopic tube can be adjusted to suit the height of its user To do so press the lock 23 down and slide the telescopic tube either apart or together An audible click will indicate that the telescopic tube has been lo cked into p...

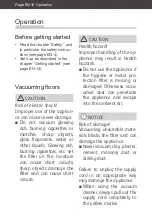
Page 46: ...can cause short circuits sharp objects damage the filter and can cause short circuits CAUTION Health hazard Improper handling of the ap pliance may result in health hazards Do not use the appliance if the hygiene or motor pro tection filter is missing or damaged Otherwise vacu umed dust can penetrate the appliance and escape into the ambient air NOTICE Risk of damage Vacuuming unsuitable mate rials ...

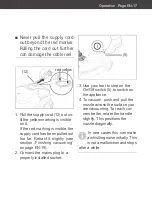
Page 47: ... out too far Retract it slightly see section Finishing vacuuming on page EN 19 2 Connect the mains plug to a properly installed socket 5 3 Use your foot to step on the On Off switch 5 to switch on the appliance 4 To vacuum push and pull the nozzle across the surface you are vacuuming To reach cor ners better rotate the handle slightly This positions the nozzle diagonally In rare cases this can mak...

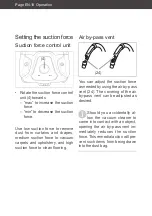
Page 48: ...n force to vacuum carpets and upholstery and high suction force to clean flooring Air by pass vent 24 You can adjust the suction force as needed by using the air by pass vent 24 The covering of the air by pass vent can be adjusted as desired Should you accidentally al low the vacuum cleaner to come into contact with an object opening the air by pass vent im mediately reduces the suction force This...

Page 49: ...injury Hold the supply cord when winding it up 5 1 Step on the On Off switch 5 to switch off the appliance 2 Pull the mains plug 12 out of the socket 3 3 To retract the supply cord press your foot down on the foot switch for the cable retrac tor 3 To avoid a whipping effect hold the supply cord in your hand Moving the appliance 10 To transport the appliance lift it by its carrying handle 10 ...

Page 50: ... aside min max 11 25 Insert the mounting bracket found on the nozzle 25 into the storage holder 11 Space saving storage 26 25 1 Position the appliance upright 2 Insert the mounting bracket found on the nozzle 25 into the storage holder 26 on the bottom of the appliance ...

Page 51: ...mage Always use the correct dust bag and motor protecti on filter for the appliance Otherwise the vacuum cle aner may not function op timally Never vacuum without a dust bag or with one that is damaged Never vacuum without the motor protec tion filter Dust which has been vacuumed up can get inside the appliance and damage the motor The fill level indicator 2 shows when the dust bag is full If this h...

Page 52: ...mply remove the motor pro tection filter 27 and replace it with the new one If necessary cut it to size using scissors Alternatively you can also wash the motor protection filter under running water and then let it air dry 21 6 Put a new dust bag in the dust bag holder 21 7 Close the dust bag compart ment again Make sure that the dust bag is not stuck anywhere Article numbers for ordering replacem...

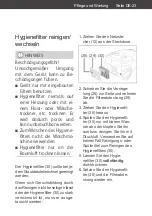
Page 53: ...the dust bag is changed If odours cannot be removed by cleaning or the hygiene filter 30 is too heavily soiled it must be replaced 1 Pull the mains plug 12 out of the socket min max 30 29 28 2 Slide the lock 28 sideways and carefully remove the filter cover 29 3 Pull out the hygiene filter 30 4 Rinse the hygiene filter 30 only with clean water tap it out and or clean it with compres sed air Never ...

Page 54: ...y NOTICE Risk of damage Improper handling of the ap pliance may cause it to beco me damaged Do not use any aggressive cleaners brushes with me tal or nylon bristles or sharp or metallic cleaning utensils such as knives hard scra pers etc They could dama ge the surfaces 1 Wipe the housing the dust bag compartment 8 the inside of the air outlet and the accessories with a damp cloth as required Never...

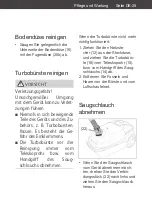
Page 55: ...brush from the telescopic tube or from the suction hose handle before clea ning If the turbo brush is no longer wor king properly 1 Disconnect the mains plug 12 from the socket and remove the turbo brush 18 from the telescopic tube 15 from the suction hose handle 14 2 Remove any lint and hairs from the brush and from the air bla de wheel Remove suction hose 22 If you want to remove the suc tion ho...

Page 56: ... specialists are allowed to carry out this repair work Problem Possible cause Solutions tips Appliance is not working The On Off switch has not been pressed Press the On Off switch Mains plug is loose Check that the mains plug is firmly inserted into the socket The socket is defective Try the appliance with a different socket Fuse has tripped Check fuse and or circuit breakers Supply cord is defec...

Page 57: ...s telescopic tube or the suction hose Setting for the suction force set too low Rotate the suction force control unit 4 towards max Dust bag is not positioned correctly Insert the dust bag correctly Dust bag is full Change the dust bag Brush nozzle is not positioned correctly Position the brush nozzle correctly Filters are inserted incorrectly or are contaminated Insert the filter correctly or cle...

Page 58: ...oduct advice centre if you have questions complaints or accessory orders Spare parts Customers in Germany Please contact Hermes Fulfilment GmbH Tel 49 0 57 32 99 66 00 Monday Thursday 8 am 3 pm Friday 8 am 2 pm Customers in Austria Please contact your mail order company s customer service centre or product advice centre Please note You are responsible for the condition of the appliance and its pro...

Page 59: ...ective devices through repair and reselling used working ap pliances instead of disposing of them Please help us reduce waste and contact our Service department if your product is faulty More information can be found in the brochure Waste Prevention Programme of the German Go vernment with the Involvement of the Federal Länder Disposing of old electrical devices in an environmentally friendly mann...

Page 60: ... Name of appliance Vacuum cleaner Model HVBA8008SKC Sound power level in dB A 75 Maximum power consumption in W 800 Supply voltage in V 50 60 Hz 220 240 Maximum suction force in kPa 17 Maximum volumetric flow rate in l s 27 Protection class II Weight assembled in kg ca 7 Order number 20294662 Notice The vacuum cleaner was tested as a universal vacuum cleaner ...

Reviews: