background image

Freezing foods / storing frozen foods

Page EN-21

the food’s consistency, taste and nutritional 
value. 

Freezing food has a positive effect on its shelf 
life. You can also avoid food waste in this way.

If you are freezing a large quantity of 
food  at  once,  set  "Quick  freezing" 
2  hours  beforehand  (see  on 
page EN-14). Be sure to take note of the 

maximum freezing capacity. The maximum 
storage time in the event of a fault is shown 
on the appliance’s type plate.

•  Set the temperature in the freezer com-

partment to –18 °C and fill the fridge 
compartment in such a way that the tem-
perature conditions inside are optimally 
utilised, guaranteeing optimal food stor-
age: 
– place  food  you  want  to  freeze  on  the 

glass shelves (8), in the freezer draw-
ers (11) and (12) or in the 4-star door 
shelves (13). 

– Store the frozen food that can be stored 

at  temperatures  up  to  –12  °C  in  the 
2-star door shelf (14).

•  Combine the drawers, glass shelves and 

door shelves as shown in the diagram on 
page EN-11 to achieve the most efficient 
use of energy for your appliance.

Preparing food

•  Only freeze high quality food.
•  Freeze fresh and prepared food dry and 

unseasoned. Unsalted foods are more 
durable.

•  Allow prepared food to cool before freez-

ing. This not only saves power, but also 
prevents excessive frost formation in the 
freezer.

•  Carbonated drinks are not suitable for 

freezing because the carbon dioxide es-
capes during freezing.

Selecting suitable packaging

Packaging is important when freezing. This 
will protect against oxidation, penetration by 
microbes, transfer of odours and flavourings 
and drying out (freezer burn). 
•  Only use packaging material that is 

strong, impermeable to air and liquid, not 
too stiff and labelled. It should be desig-
nated as suitable for freezer use.

Portioning food

•  Create flat portions if possible; these 

freeze through to the core faster.

•  Expel the air from the freezer bag as this 

causes the contents to dry out and takes 
up space.

•  Use plastic clips, rubber bands or adhe-

sive tapes to seal.

•  Fill liquid containers no more ¾ full, be-

cause liquids expand when frozen.

•  Do not store any glass or metal contain-

ers containing liquid. The containers can 
burst.

•  Only freeze strong alcohol standing up-

right and closed tightly.

•  Label the frozen food by type, quantity, 

amount and expiry date. 
Use waterproof marker pens or adhesive 
labels wherever possible.

Freezing capacity

You will find the freezing capacity for your ap-
pliance on the appliance's type plate.

•  Adhere to the maximum freezing capacity 

if possible.

Up to the indicated maximum freezing 
capacity:

If you adhere to the maximum freezing capac-
ity, the food will freeze quickly. The tempera-
ture in the freezer briefly rises after placing 
fresh goods inside. After 12 hours, the goods 
are frozen to the core.

Summary of Contents for HSBS17990FI

Page 1: ...ide K hl Gefrier Kombination Gebrauchsanleitung Anleitung Version 2001 01039_DE 20200916 Bestell Nr 89534109 52229559 51637249 Nachdruck auch auszugswei se nicht gestattet HSBS17990FI HSBS17990FBK HSB...

Page 2: ...beleuchtung DE 26 Inbetriebnahme DE 27 Bevor Sie das Ger t in Betrieb nehmen DE 27 Transportieren und Auspacken DE 27 Geeigneten Standort w hlen DE 27 Ger t aufstellen und ausrichten DE 29 T ren justi...

Page 3: ...ublade klein 5 T rablagen 1 Eierablage 1 Schraubenschl ssel 1 Gebrauchsanleitung Lieferung kontrollieren 1 Transportieren Sie das Ger t an einen ge eigneten Standort und packen Sie es aus siehe Inbetr...

Page 4: ...Verwenden Sie das Ger t ausschlie lich wie in dieser Gebrauchsanleitung beschrieben Jede andere Verwendung gilt als nicht be stimmungsgem und kann zu Sachsch den oder sogar zu Personensch den f hren...

Page 5: ...ntspricht der Schutzklas se I und darf nur an eine Steckdose mit ordnungsgem installiertem Schutzleiter angeschlossen werden Beim Anschlie en darauf achten dass die richtige Spannung anliegt N here In...

Page 6: ...hren Der Anschluss an eine Zeitschaltuhr oder ein separates Fernwirksystem zur Fern berwachung und steuerung ist unzul ssig Ortsver nderliche Mehrfachsteckdo sen oder Netzteile nicht an der R ck seite...

Page 7: ...as Luft Gemische bilden k nnen Zum Abtauen auf keinen Fall Abtau sprays verwenden Sie k nnen explo sive Gase bilden Risiken f r Kinder WARNUNG Erstickungsgefahr Kinder k nnen sich in der Verpackungs f...

Page 8: ...s oder Eisw rfeln geeignet Ein Zwei und Drei Sterne F cher sind nicht f r das Einfrieren von fri schen Lebensmitteln geeignet Wenn das K hl Gefrierger t l ngere Zeit leer steht das Ger t ausschalten a...

Page 9: ...und zu Sach sch den f hren Ger t nur an eine ordnungsgem installierte Schutzkontakt Steckdose anschlie en Der Anschluss an eine Steckdosenlei ste oder eine Mehrfachsteckdose ist unzul ssig Ger t nicht...

Page 10: ...Ger teinne ren verwenden Sie ist nicht zur Be leuchtung eines Raumes geeignet Beim Reinigen beachten Auf keinen Fall aggressive k r nige soda s ure l semittelhal tige oder schmirgelnde Reinigungs mit...

Page 11: ...gen im K hlbereich 6 Glasablage ber den Obst Gem se schubladen 7 Obst Gem seschubladen 8 Glasablagen im Gefrierbereich 9 Eisw rfelbereiter 10 Eisw rfelschublade 11 gro e Gefrierschublade 12 kleine Gef...

Page 12: ...EMP zum Einstellen der Temperatur im K hlbereich 20 Taste LOCK UNLOCK zum Sperren und Entsperren des Bedienfelds 21 Anzeige LOCK UNLOCK leuchtet wenn das Bedienfeld gesperrt ist 22 Anzeige QUICKREF le...

Page 13: ...ist eingeschaltet 2 Macht das Ger t st rende Ger usche berpr fen Sie den festen Stand und entfernen Sie Gegenst nde die auf dem Ger t liegen Bedienung Ausschalten 1 Ziehen Sie den Netzstecker aus der...

Page 14: ...e Einstel lung W hlen Sie bei ansteigender Umgebungs temperatur z B im Sommer eine entspre chend niedrigere Einstellung Gefrierbereich FRZ TEMP MODE LOCK 15 16 1 Dr cken Sie einmal die Taste FRZ TEMP...

Page 15: ...hlen FRZ TEMP MODE LOCK 25 22 17 W hlen Sie die Einstellung QUICKREF Schnelles K hlen 22 wenn Sie z B m ch ten dass eine Dose die Sie in den K hlbe reich gestellt haben schneller gek hlt wird 1 Dr cke...

Page 16: ...odus auf unter schiedliche Weise ausstellen Dr cken Sie viermal die Auswahltaste MODE 25 Auf den Display erscheint die urspr ngli chen Temperatureinstellungen Der Urlaubsmodus ist ausgestellt Dr cken...

Page 17: ...rausnehmen und bei Bedarf anders anordnen Die effizienteste Energienutzung f r Ihr Ger t erzielen Sie wenn Sie die Schubladen Glas und T rablagen wie in der Abbildung auf Sei te DE 11 gezeigt kombinie...

Page 18: ...aufsystemen in Ber hrung kommen k nnen regel m ig reinigen Rohes Fleisch und Fisch in geeigneten Beh ltern im K hlschrank so aufbe wahren dass es andere Lebensmittel nicht ber hrt oder auf diese tropf...

Page 19: ...scharnier Bewahren Sie kleine Flaschen und Tu ben in den gro en T rablage 2 auf Legen Sie gut verschlossene Flaschen in die Flaschenablage 4 Legen Sie Gekochtes und Gebackenes auf die Glasablagen 5 Le...

Page 20: ...m ausreichend k hlen Raum oder einem anderen K hlger t lagern Die maximale Lagerzeit bei ei ner St rung entnehmen Sie dem Typ schild des Ger ts Nach einer St rung berpr fen ob die eingelagerten Lebens...

Page 21: ...nsmittel vorbereiten Frieren Sie nur qualitativ einwandfreie Le bensmittel ein Frieren Sie frische und zubereitete Spei sen ungesalzen und ungew rzt ein Un gesalzen eingefrorene Lebensmittel ha ben ei...

Page 22: ...se verklumpt ist vor allem bei Bee ren und Gem se leicht festzustellen Schnee und Saftspuren aufweist Transportieren Sie Tiefk hlkost in Spezial boxen aus Styropor oder in Isoliertaschen Beachten Sie...

Page 23: ...denem Wasser bereitet wurden kann die Ge sundheit gef hrden Durch falsche Handhabung besteht die Gefahr einer Lebensmittelvergiftung Zur Bereitung von Eisw rfeln nur fri sches Trinkwasser verwenden 1...

Page 24: ...ind All zweckreiniger mit einem neutralen pH Wert T rdichtungen und Ger teteile aus Kunststoff sind emp ndlich gegen l und Fett Verunreinigungen m g lichst schnell entfernen Nur weiche T cher verwende...

Page 25: ...tzen Sie die Ablagen und die Schubla den wieder ein 9 Legen Sie die Lebensmittel in den K hl bereich zur ck 10 Stecken Sie den Netzstecker in die Steckdose bzw schalten Sie die Siche rung wieder ein 1...

Page 26: ...ng wieder ein 2 Stecken Sie den Netzstecker in die Steck dose bzw schalten Sie die Sicherung wieder ein 3 Um den Gefrierbereich schnell herunter zuk hlen dr cken Sie die Auswahltaste MODE 25 so oft dr...

Page 27: ...n Transportieren Sie das Ger t mithilfe einer M bel Rollplatte und einer zweiten Per son Packen Sie das Ger t aus und entfer nen Sie vorsichtig alle Verpackungsteile Kunststoffprofile Klebestreifen Sc...

Page 28: ...ebene Raumtemperatur ber oder unterschritten wird ber Klimaklassen Halten Sie immer die vorgeschriebene Umgebungstemperatur ein siehe Bestimmungsge m er Gebrauch auf Seite DE 4 Klimaklasse bedeutet da...

Page 29: ...nen der T ren darf sich das Ger t nicht bewegen T ren justieren Es kann vorkommen dass die T ren nicht auf gleicher H he stehen auch wenn die K hl Gefrier Kombination selbst vollkommen waagerecht ausg...

Page 30: ...and vor geschaltet sein ziehen Sie gegebe nenfalls eine Fachkraft zurate siehe Service auf Seite DE 32 Netzanschlussleitung nicht knicken oder klemmen und nicht ber scharfe Kanten legen Die Folge kann...

Page 31: ...uf Seite DE 14 Ger t k hlt nicht ausreichend Temperatur ist zu hoch ein gestellt Niedrigere Einstellung w hlen siehe Be stimmungsgem er Gebrauch auf Sei te DE 4 T r ist nicht fest verschlos sen oder T...

Page 32: ...f r eine Mindestdauer von sieben Jahren nach dem Inverkehrbringen des letzten Exemplars des Modells zur Ver f gung T rdichtungen stehen f r einen Zeit raum von zehn Jahren zur Verf gung Kunden in Deu...

Page 33: ...Austritt von K lte mittel besteht Brandgefahr Achten Sie darauf dass an einem K hlger t bis zur fachgerechten Ent sorgung keine K hlrippen oder Rohre besch digt werden Unser Beitrag zum Schutz der Ozo...

Page 34: ...e 130 W Versorgungsspannung Frequenz Nennstrom 220 240 V 50 Hz 1 A Schutzklasse I Klimaklasse SN N ST Dieses Ger t ist f r den Betrieb bei einer Umgebungstemperatur zwischen 10 C und 38 C bestimmt Die...

Page 35: ...Side by side Fridge freezer User manual Manual version 2001 01039_EN_20200916 Order no 52229559 51637249 89534109 Reproduction even of excerpts is not permitted HSBS17990FBK HSBS17990FR HSBS17990FI...

Page 36: ...EN 26 Start up EN 27 Before starting to use the applianceEN 27 Moving and unpacking EN 27 Choosing a suitable location EN 27 Setting up and aligning the appliance EN 28 Adjusting the doors EN 29 Clea...

Page 37: ...1 Ice cube drawer 1 Freezer drawer large 1 Freezer drawer small 5 Door shelves 1 Egg tray 1 Spanner 1 User manual Check the delivery 1 Move the appliance to a suitable place and unpack it see Start u...

Page 38: ...e appliance exclusively as described in this user manual Any other use is deemed im proper and may result in damage to property or even personal injury The manufacturer accepts no liability for damage...

Page 39: ...d information about this can be found on the nameplate To disconnect this appliance from the power supply pull the mains plug out of the socket The appliance must therefore be connected to an easi ly...

Page 40: ...ble sock et outlets or portable power supplies at the rear of the appliance Risks associated with using refrigerants WARNING Risk of re and explosion Your appliance s refrigeration circuit contains th...

Page 41: ...pliance as they may create ignitable gas air mixtures Never use defrosting sprays to de frost They can generate explosive gases Risks to children WARNING Risk of suffocation Children can become entang...

Page 42: ...ff defrost clean dry and leave the door open to prevent mould developing within the appliance Health hazard The appliance may not operate proper ly if the ambient temperature exceeds or falls below th...

Page 43: ...d to damage to property Do not store glass or metal contain ers containing water lemonade beer etc Water expands when frozen and can burst the container Risk of damage to property If the cooling unit...

Page 44: ...ttack the plastic surfaces All purpose cleaners with a neutral pH are recommended Door seals and plastic parts are sensitive to oil and grease Remove contaminants as quickly as possi ble Use only soft...

Page 45: ...5 Glass shelves in fridge 6 Glass shelf above fruit vegetable drawers 7 Fruit vegetable drawers 8 Glass shelves in freezer 9 Ice cube maker 10 Ice cube drawer 11 Large freezer drawer 12 Small freezer...

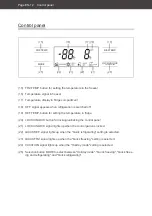
Page 46: ...F TEMP button for setting the temperature in fridge 20 LOCK UNLOCK button for locking unlocking the control panel 21 LOCK UNLOCK signal lights up when the control panel is locked 22 QUICKREF signal li...

Page 47: ...tched on 2 If the appliance is making unusual noises check that it is stable and remove any ob jects that may be on top of it Operation Switching off 1 Disconnect the mains plug from the socket The si...

Page 48: ...CK 15 16 1 Press the FRZ TEMP button 15 once The signal 16 will flash 2 Press the FRZ TEMP button enough times until the desired temperature is dis played Once the indicator stays illuminat ed the tem...

Page 49: ...ure setting is shown again on the display The symbol goes out Quick refrigerat ing is switched off Quick freezing and Quick refrigerating at the same time You can set Quick freezing and Quick re frige...

Page 50: ...rtment and thus turn off Holiday mode Stand by mode If no button has been pressed for 25 seconds all display indicators will switch off To get the display indicators to light up press any button open...

Page 51: ...Operation Page EN 17 Rearranging the door shelves The door shelves 13 and 14 can also be taken out and re positioned 1 Lift the door shelves up and take them out 2 Insert the door shelf from above...

Page 52: ...in contact with food and acces sible drainage systems Store raw meat and sh in suitable containers in the refrigerator so that it does not come into contact with or drip onto other food If the refrig...

Page 53: ...tainers closer to the door hinge Store small bottles and tubes in the large door shelf 2 Place securely closed bottles in the bot tle rack 4 Place cooked and baked foods on the glass shelves 5 Place f...

Page 54: ...age time in the event of a fault is shown on the appliance s type plate After a malfunction check wheth er the stored food is still edible Con sume thawed and defrosted foods immediately do not refree...

Page 55: ...n in the freezer Carbonated drinks are not suitable for freezing because the carbon dioxide es capes during freezing Selecting suitable packaging Packaging is important when freezing This will protect...

Page 56: ...ar door shelves Inthefreezercompartmentofyourfridge freez er there are 2 star door shelves 14 They are labelled with the symbol The tem perature in the 2 star door shelves is 12 C and colder Only use...

Page 57: ...ad to risks of causing food poisoning Use only fresh drinking water to make ice cubes 1 Remove the ice cube maker 9 from the freezer 26 9 2 Fill the ice trays 26 to the WATER LEV EL mark with fresh dr...

Page 58: ...ing door seals The door seals must be checked regularly so that no air can enter the appliance 1 To test them clamp a thin piece of paper in various places The paper should be difficult to pull throug...

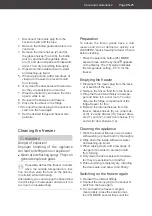
Page 59: ...ool room or insulated bag Preparation To ensure the frozen goods have a cold reserve and do not defrost as quickly set QUICKFRZ Quick freezing at least 3 hours before cleaning Press the selection butt...

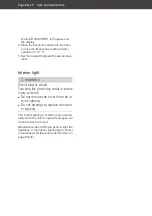
Page 60: ...ING Risk of electric shock Touching live parts may result in severe injury or death Do not remove the cover from the in terior lighting Do not attempt to replace the interi or lighting The interior li...

Page 61: ...wheeled platform for furniture and with a second person Unpack the appliance and carefully re move all packaging plastic moulding adhesive strips protective film and foam padding from the inside outs...

Page 62: ...as firm a base as possible 2 To ensure adequate air circulation maintain a minimum distance of 10 cm to the rear wall maintain a distance of 10 cm on the sides free an area of at least 30 cm above th...

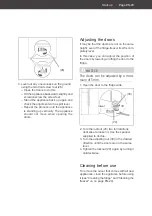
Page 63: ...fridge freezer itself is com pletely level In this case you can adjust the position of the doors by lowering or lifting the door to the fridge NOTICE The doors can be adjusted by a maxi mum of 5mm 1 O...

Page 64: ...ast 3 mm consult a quali ed professional if necessary see Service on page EN XX Do not kink or pinch the mains cable or lay it over sharp edges This can re sult in a break in the cable CAUTION Fire ha...

Page 65: ...n page EN 14 The appliance doesn t cool suffi ciently Temperature has been set too high Select a lower setting see Setting the temperature on page EN 14 Door is not tightly closed or door seal is not...

Page 66: ...rs and spare parts Spare parts are available for a minimum peri od of seven years after the final version of the model has been placed on the market Door seals are available for a period of ten years...

Page 67: ...nd insulation must be proper ly disposed of Refrigerant leakage may cause a re hazard Until the point of proper disposal en sure that none of the cooling ns or tubes on a refrigerating appliance are d...

Page 68: ...cyclopentane Rated power 130 W Supply voltage frequency rated current 220 240 V 50 Hz 1 A Protection class I Climate class SN N ST This appliance is intended to be used at an ambient temperature betw...

Reviews: