background image

The door hinges are on the right upon delivery. 
As changing the door hinges requires some 
manual skills, please read through the steps 
of the procedure beforehand. To change the 
door hinges, you will need the following tools:
– Cross-head screwdriver
– 8 and 10 mm open-end wrench or socket 

wrench

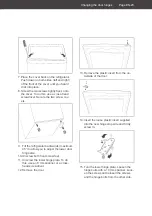
1. Pull out the blind plug from the top of the 

door.

2. Loosen both screw covers on the top of 

the cover using a flat-head screwdriver. 

3. Unscrew the two screws (on the left and 

right) from the top of the cover. To do this, 
use a cross-head screwdriver. 

4. Lever out the two sides of the cover on 

the front slightly and lift the cover up. In 
doing so, ensure you do not damage the 
temperature controller. 

5. Unscrew the three fixing screws for the 

hinge plate and the two screws on the 
opposite side. To do this, use an 8 mm 
spanner or a cross-head screwdriver.
Remove the hinge plate. 

6. Screw the hinge plate as well as the two 

screws back onto the respective opposite 
side.

Changing the door hinges

Changing the door hinges

Page EN-22

Summary of Contents for HKS8555EW

Page 1: ...K hlschrank Gebrauchsanleitung Anleitung Version 2001 01023_DE_20200924 Bestell Nr 34291655 62263144 Nachdruck auch auszugsweise nicht gestattet HKS8555EW HKS8555EI...

Page 2: ...g DE 20 Ger t elektrisch anschlie en DE 20 T ranschlag wechseln DE 22 K hlschrank ausrichten DE 24 Fehlersuchtabelle DE 25 Service DE 27 Beratung Reklamation und Bestellung DE 27 Reparaturen und Ersat...

Page 3: ...ckungsteile Kunststoffprofile Klebestreifen und Schaumpolster 3 Pr fen Sie ob die Lieferung vollst ndig ist 4 Kontrollieren Sie ob das Ger t Transport sch den aufweist 5 Sollte die Lieferung unvollst...

Page 4: ...e andere Verwendung gilt als nicht be stimmungsgem und kann zu Sachsch den oder sogar zu Personensch den f hren Der Hersteller bernimmt keine Haftung f r Sch den die durch nicht bestimmungsgem en Gebr...

Page 5: ...r Netzstecker nach dem Auf stellen nicht mehr zug nglich ist muss eine allpolige Trennvorrichtung gem berspannungskategorie III in der Hausinstallation mit minde stens 3 mm Kontaktabstand vor geschalt...

Page 6: ...nderliche Mehrfachsteckdo sen oder Netzteile nicht an der R ck seite des Ger tes platzieren Risiken im Umgang mit K ltemitteln WARNUNG Brand und Explosionsgefahr Im K ltemittelkreislauf Ihres Ger tes...

Page 7: ...e bilden k nnen Zum Abtauen auf keinen Fall Abtau sprays verwenden Sie k nnen explo sive Gase bilden Risiken f r Kinder WARNUNG Erstickungsgefahr Kinder k nnen sich in der Verpackungs folie verfangen...

Page 8: ...dass es andere Lebensmittel nicht ber hrt oder auf diese tropft Wenn das K hlger t l ngere Zeit leer steht das Ger t ausschalten abtau en reinigen und die T r offen lassen um Schimmelbildung zu verme...

Page 9: ...eine elektrischen Ger te innerhalb des K hlraums betreiben die nicht der vom Hersteller empfohlenen Bau art entsprechen Zum Beschleunigen des Abtauvor gangs keine anderen mechanischen Einrichtungen od...

Page 10: ...Ger teteile Bedienelemente 1 Temperaturregler und Innenbeleuchtung 2 T rfach 3 3 Schraubfu 2 1 2 2 2 4 3 3 5 6 5 4 Gem sefach 5 Glasablage 3 6 Tauwasserablauf 5 Ger teteile Bedienelemente Seite DE 10...

Page 11: ...f 0 Der Kompressor ist ausgeschaltet Das Ger t k hlt nicht Die Innenbeleuchtung funktioniert weiterhin 2 Um das Ger t ganz auszuschalten ziehen Sie den Netzstecker 3 Wenn das Ger t ausgeschaltet ist l...

Page 12: ...r gt 6 C Wenn Sie eine niedrigere Temperatur einstellen ben tigen Sie mehr K hl leistung Das erh ht den Energieverbrauch Glas und T rablagen Die effizienteste Energienutzung f r Ihr Ger t erzielen Sie...

Page 13: ...Ger t lagern k nnen um sie ber den l ngstm glichen Zeitraum best m glich aufzubewahren Auf diese Weise ver meiden Sie Lebensmittelabf lle K hlbereich best cken 5 5 5 5 4 4 2 2 2 2 5 5 5 5 Best cken S...

Page 14: ...iben legen oder stellen Sie alle zu k hlenden Lebensmittel nur verpackt in den K hlbe reich Verwenden Sie spezielle Kunststoff beh lter f r Lebensmittel oder handels b liche Folien Legen Sie die Leben...

Page 15: ...s Kunststoff sind emp ndlich gegen l und Fett Verunreinigungen m g lichst schnell entfernen Nur weiche T cher verwenden T rdichtungen kontrollieren und reinigen Die T rdichtungen m ssen regelm ig kon...

Page 16: ...lt bleiben 4 Nehmen Sie die Gem sefach 4 und die Glasablagen 5 aus dem K hlbereich heraus Um die T rf cher 2 herauszunehmen dr cken Sie sie seitlich etwas zusammen und ziehen Sie sie gleichzeitig nach...

Page 17: ...beleuch tung nicht entfernen Nicht versuchen die Innenbeleuch tung auszutauschen Die Innenbeleuchtung schaltet sich beim ff nen der T r automatisch ein und erlischt beim Schlie en Als Leuchtmittel wer...

Page 18: ...age des K lte mittelkreislaufskeinz ndf higesGas Luft Gemisch entstehen kann muss der Aufstellraum laut Norm EN378 eine Mindestgr e von 1 m je 8 g K ltemittel haben Die Menge des K ltemittels in Ihrem...

Page 19: ...heizung installiert ist stellen Sie das K hl ger t auf eine Isolierplatte aus festem Ma terial ber Klimaklassen Halten Sie immer die vorgeschriebene Umgebungstemperatur ein siehe Be stimmungsgem er G...

Page 20: ...bis das Ger t senkrecht aus gerichtet ist Beim ffnen der T ren darf sich das Ger t nicht bewegen Grundreinigung Um den Geruch zu entfernen der allen neuen Ger ten anhaftet wischen Sie den Innenraum v...

Page 21: ...hr Wenn das K hlger t liegend transpor tiert wurde kann Schmiermittel aus dem Kompressor in den K hlkreislauf gelangt sein Nach dem Transport und vor dem An schlie en das Ger t ca 2 Stunden aufrecht s...

Page 22: ...inem Schlitz Schraubendreher 3 Drehen Sie die zwei Schrauben links und rechts aus der Oberseite der Abdeckung heraus Verwenden Sie daf r einen Kreuz schlitz Schraubendreher 4 Hebeln Sie die beiden Sei...

Page 23: ...al 45 damit Sie auch das unte re T rscharnier umsetzen k nnen 10 Schrauben Sie die beiden vorderen Schraubf e heraus 11 Schrauben Sie die untere Schar nierplatte ab Verwenden Sie daf r einen 8er Schl...

Page 24: ...ch gewechselt K hlschrank ausrichten Der K hlschrank muss auf einem ebenen fes ten Untergrund stehen berpr fen Sie den Stand des K hlschranks am besten mit einer Wasserwaage Beim ffnen der T r darf si...

Page 25: ...DE 11 Gew nschte Temperatur ist erreicht Weiteres K hlen nicht erforderlich Wenn die Innentemperatur steigt schaltet sich der Kompressor selbstt tig ein Ger t k hlt zu stark Temperaturregler zu hoch e...

Page 26: ...emittel ie t durch die Rohre Klicken Kompressor schaltet ein oder aus St rende Ger usche Festen Stand berpr fen Gegenst nde vom Ger t entfernen Fremdk rper von der Ger ter ckseite ent fernen Unten im...

Page 27: ...verkehrbringen des letzten Exemplars des Modells zur Ver f gung T rdichtungen stehen f r einen Zeit raum von zehn Jahren zur Verf gung Kunden in Deutschland Wenden Sie sich bitte an unseren Technik Se...

Page 28: ...l besteht Brandgefahr Achten Sie darauf dass an einem K hlger t bis zur fachgerechten Ent sorgung keine K hlrippen oder Rohre besch digt werden Unser Beitrag zum Schutz der Ozonschicht In diesem Ger t...

Page 29: ...sche Daten Bestellnummer 34291655 62263144 Ger tebezeichnung K hlschrank Modellkennung HKS8555EW HKS8555EI Ger tema e H he Breite Tiefe 850 mm 550 mm 580 mm Leergewicht 27 kg K ltemittel R600a K ltemi...

Page 30: ...Umweltschutz Seite DE 30...

Page 31: ...Refrigerator User manual Manual version 2001 01023_EN_20200924 Order no 34291655 62263144 Reproduction even of excerpts is not permitted HKS8555EW HKS8555EI...

Page 32: ...ce to electricity EN 20 Changing the door hinges EN 22 Levelling the refrigerator EN 24 Troubleshooting table EN 25 Service EN 27 Advice complaints and orders EN 27 Repairs and spare parts EN 27 Envir...

Page 33: ...e packaging plastic profiles tape and foam padding 3 Check that the delivery is complete 4 Check whether the appliance was dam aged during transit 5 If the delivery is incomplete or the appli ance has...

Page 34: ...make any technical changes to the appliance Use the appliance exclusively as described in this user manual Any other use is deemed im proper and may result in damage to property or even personal inju...

Page 35: ...egory III must be connected to the house wiring with a contact gap of at least 3 mm consult a quali ed professional if necessary see Service on page EN 27 When positioning the appliance en sure the su...

Page 36: ...ot use electrical appliances in side the food storage compartments of the appliance unless they are of the type recommended by the man ufacturer Keep the appliance away from open ames and hot surfaces...

Page 37: ...re move the fridge and freezer drawers unscrew the door cover Risks for certain groups of people CAUTION Dangers for children and people with limited physical sensory or mental ca pacity This applian...

Page 38: ...d manufacturers The maximum storage time in the event of a fault is shown on the appli ance s type plate Health hazard The appliance may not operate proper ly if the ambient temperature exceeds or fal...

Page 39: ...ly be used to illuminate the interior of the appli ance It is not suitable for lighting a room When cleaning please note Never use harsh granular soda acid solvent based or abrasive cleaners These att...

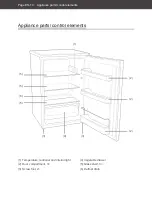
Page 40: ...control elements 1 Temperature controller and interior light 2 Door compartment 3 3 Screw foot 2 1 2 2 2 4 3 3 5 6 5 4 Vegetable drawer 5 Glass shelf 3 6 Defrost drain 5 Appliance parts control eleme...

Page 41: ...itched off The ap pliance doesn t refrigerate The interior light continues to function 2 To switch the appliance off completely pull out the mains plug 3 If the appliance is switched off leave the doo...

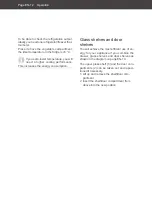
Page 42: ...reases the energy consumption Glass shelves and door shelves You will achieve the most efficient use of en ergy for your appliance if you combine the drawer glass shelves and door shelves as shown in...

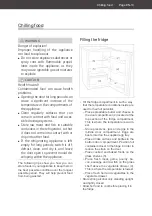
Page 43: ...iance to keep them in the best possible condition over the longest possible period They will help prevent food from being wasted Filling the fridge 5 5 5 5 4 4 2 2 2 2 2 5 5 5 5 Fill the fridge compar...

Page 44: ...flavour and freshness of food in the fridge only place packaged food in the fridge Use special plastic con tainers for food or customary films Place the food in the fridge in a way that allows the air...

Page 45: ...tic parts are sen sitive to oil and grease Remove con taminants as quickly as possible Only use soft cloths Checking and cleaning door seals The door seals must be checked regularly so that no air can...

Page 46: ...3 Ensure that your food is kept cool enough 4 Remove the vegetable drawer 4 and the glass shelves 5 from the fridge compartment In order to remove the door compart ments 2 push them together slightly...

Page 47: ...terior light Do not attempt to replace the interi or light The interior light switches on automatically when you open the door and switches off when you close it Maintenance free LEDs are used to ligh...

Page 48: ...following a leak in the refrigeration circuit the installa tion space must have a minimum size of 1 m per 8 g of refrigerant in com pliance with standard EN 378 The amount of refrigerant contained in...

Page 49: ...plate between the appliances If underfloor heating is installed at the set up location place the cooling appliance on an insulation plate made from solid mate rial About climate categories Always ensu...

Page 50: ...appliance should not move when opening the doors Cleaning before use In order to remove the odour which is present in all new appliances wipe the interior with diluted vinegar prior to first use Then...

Page 51: ...cant from the com pressor may get into the cooling circuit Allow the appliance to stand upright for approx 2 hours after transport and before connecting This allows the lubricant enough time to ow bac...

Page 52: ...head screwdriver 3 Unscrew the two screws on the left and right from the top of the cover To do this use a cross head screwdriver 4 Lever out the two sides of the cover on the front slightly and lift...

Page 53: ...adjust the lower door hinge also 10 Unscrew both front screw feet 11 Unscrew the lower hinge plate To do this use an 8 mm spanner or a cross head screwdriver 12 Remove the door 13 Remove the plastic i...

Page 54: ...door hinges Levelling the refrigerator The refrigerator must be positioned on level firm surface Check the position of the refrig erator with a spirit level The refrigerator must not move when the doo...

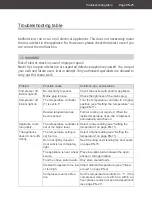
Page 55: ...temperature on page EN 11 Desired temperature has been reached Further cooling not required When the inside temperature rises the compressor automatically switches on Appliance cools too quickly The...

Page 56: ...frigerant is flowing through the pipes Clicking Compressor is switching on or off Disturbing noises Check that it is stable Remove any objects from the appliance Remove any foreign matter from the bac...

Page 57: ...for a minimum peri od of seven years after the final version of the model has been placed on the market Door seals are available for a period of ten years Customers in Germany Please contact our tech...

Page 58: ...osed of Refrigerant leakage may cause a re hazard Until the point of proper disposal en sure that none of the cooling ns or tubes on a refrigerating appliance are damaged Our contribution to protectin...

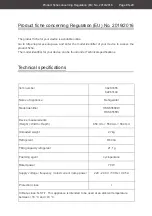
Page 59: ...34291655 62263144 Name of appliance Refrigerator Model identifier HKS8555EW HKS8555EI Device measurements Height Width Depth 850 mm 550 mm 580 mm Unloaded weight 27 kg Refrigerant R600a Filling capac...

Page 60: ......
Reviews: