


4
Important!
The fitting must be installed, flushed
and tested after the valid norms!
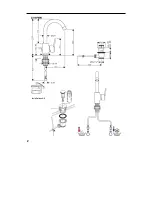
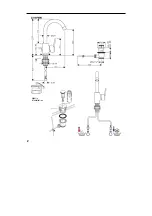
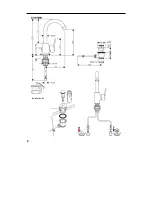
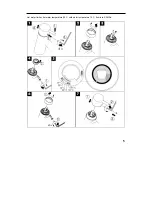
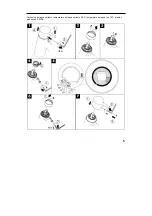
Assembly
1
Flush through the supply pipes.
2
Place the mixer including the sealing
washer in position on the basin / bidet.
3
Slide the fixation piece including the washer
over the threaded pins and tighten the nuts.
4
Connect the supply pipes to the isolation
valves; cold right - hot left.
5
Connect the pull rod to the pop-up waste.
The hot and cold supplies must be of equal
pressures.
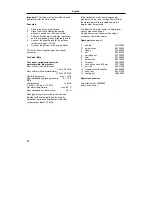
Technical Data
This mixer series-produced with
waterdimmer® (flow limiter).
Rate of flow with waterdimmer:
7 l/min 0,3 MPa
Rate of flow without waterdimmer:
17 l/min 0,3 MPa
Operating pressure:
max. 1 MPa
Recommended operating pressure:
0,1 – 0,5
MPa
Test pressure:
1,6 MPa
(1 MPa = 10 bars = 147 PSI)
Hot water temperature:
max. 80° C
Recommended hot water temp.:
65° C
Hansgrohe single lever mixers can be used
together with hydraulically and thermically
controlled continuous flow heaters if the flow
pressure is at least 0,15 MPa.
If the continuous water heater causes any
problems or there is not enough flow of water,
the waterdimmer® (6a) located behind the
aerator must be removed.
To adjust the hot water limiter on single lever
mixers, please see page 5.
No adjustment is necessary when using a
continuous flow water heater.
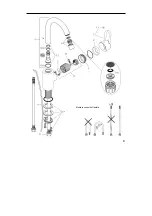
Spare parts
see page 3
1 handle
33092000
1.1 screw
cover
96338000
2 flange
96468000
3 nut
96461000
4 cartridge
cpl.
92730000
5 seal
95008000
6 aerator
cpl.
94010000
7 fixing
set
95049000
8
connection hose 450 mm
97372000
9 pull
rod
96657000
10 locking screw for handle
96059000
11 spout
cpl.
96521000
12 sealing
set
92646000
Special accessories
X special tool set 58085000
(order as an extra)
English
Summary of Contents for Talis C
Page 1: ...1 Deutsch Montageanleitung...
Page 2: ...2 Installationskitt...
Page 3: ...3 Montage Anschlussschlauch...
Page 5: ...5 Warmwasserbegrenzung Warmwassertemperatur 60 C Kaltwassertemperatur 10 C Flie druck 0 3 MPa...
Page 7: ...1 Fran ais Instructions de montage...
Page 8: ...2 Mastic d installation...
Page 9: ...3 Montage flexible de raccordement...
Page 13: ...1 English assembly instructions...
Page 14: ...2 Installation kit...
Page 15: ...3 Assembly connecting hoses...
Page 17: ...5 Hot water limiter hot water temperature 60 C cold water temperature 10 C flow rate 0 3 MPa...
Page 19: ...1 Italiano Istruzioni per Installazione...
Page 20: ...2 Mastice d installazione...
Page 21: ...3 Montaggio flessibile...
Page 25: ...1 Espa ol Instrucciones de montaje...
Page 26: ...2 Masilla...
Page 27: ...3 Montaje conexi n flexible...
Page 31: ...1 Nederlands Handleiding...
Page 32: ...2 Kit...
Page 33: ...3 Montage aansluitslangen...
Page 35: ...5 Warmwaterbegrenzing Warmwatertemperatuur 60 C Koudwatertemperatuur 10 C stroomdruk 0 3 MPa...
Page 37: ...1 Dansk Monteringsvejledning...
Page 38: ...2 Kitt...
Page 39: ...3 Montering tilslutingslangerne...
Page 41: ...5 Varmtvandsbegr nsning Varmtvandstemperatur 60o C koldtvandstemperatur 10o C vandtryk 0 3 MPa...
Page 43: ...1 Portugu s Manual de Instalaci n...
Page 44: ...2 M stique...
Page 45: ...3 Montagem tubo flex vel...
Page 49: ...1 Polski Instrukcja monta u...
Page 50: ...2 Kit instalatorski...
Page 51: ...3 Monta w a przy czeniowego...
Page 55: ...1 esky Mont n n vod...
Page 56: ...2 Instala n kit...
Page 57: ...3 Mont p ipojovac hadi ky...
Page 59: ...5 Omezen tepl vody teplota vody tepl 60 C teplota studen vody 10 C tlak proudu 0 3 MPa...
Page 61: ...1 Slovensky Mont ny n vod...
Page 62: ...2 In tala n s prava...
Page 63: ...3 Mont pripojovacej hadi ky...
Page 65: ...5 Obmedzenie teplej vody teplota teplej vody 60 C teplota studen vody 10 C tlak pr du 0 3 MPa...
Page 67: ...1...
Page 68: ...2...
Page 69: ...3...
Page 71: ...5 60 C 10 C 3...
Page 73: ...1...
Page 74: ...2...
Page 75: ...3...
Page 77: ...5 60 10 0 3 MPa...
Page 79: ...1 Magyar Szerel si tmutat...
Page 80: ...2 szaniter szilikon...
Page 81: ...3 bek t cs sszeszerel se...
Page 83: ...5 Melegv z korl toz s melegv z h m rs klet 60 C hidegv z h m rs klet 10 C v znyom s 0 3 MPa...
Page 85: ...1 Suomi Asennusohje...
Page 86: ...2 Asennussarja...
Page 87: ...3 Liit nt letkun asennus...
Page 91: ...1 Svenska Monteringsanvisning...
Page 92: ...2 Installationskitt...
Page 93: ...3 Montering anslutningsslang...
Page 95: ...5 Varmvattenreglering Varmvattentemperatur 60 C Kallvattentemperatur 10 C fl destryck 0 3 MPa...
Page 97: ...1 Lietuvi kai Montavimo instrukcijos...
Page 98: ...2 Montavimo rinkinys...
Page 99: ...3 Prijungimo arn montavimas...
Page 101: ...5 Kar to vandens ribotuvas kar to vandens temperat ra 60 alto vandens 10 sl gis 0 3 MPa...
Page 103: ...1 Hrvatski Uputstva za instalaciju...
Page 104: ...2 Instalaterski kit...
Page 105: ...3 monta a priklju ne cijevi...
Page 107: ...5 Limiter vru e vode temperatura vru e vode 60 C temperatura hladne vode 10 C tlak 0 3 MPa...
Page 109: ...1 T rk e Montaj k lavuzu...
Page 110: ...2 Montaj silikonu...
Page 111: ...3 Ba lant hortumunun montaj...
Page 113: ...5 S cak su s n rlamas S cak su s cakl 60 C so uk su s cakl 10 C akma bas nc 0 3 MPa...
Page 115: ...1 Rom n Instruc iuni de montare...
Page 116: ...2 Chit de instalare...
Page 117: ...3 Montarea furtunului de racord...
Page 121: ...1...
Page 122: ...2...
Page 123: ...3...
Page 125: ...5 60 C 10 C 0 3 MPa...
Page 127: ...1...
Page 128: ...2...
Page 129: ...3...
Page 131: ...5 60 10 3...
Page 133: ...1 Slovenski Navodila za monta o...
Page 134: ...2 Komplet za monta o...
Page 135: ...3 Monta a priklju ne gibke cevi...
Page 139: ...1 Estonia Paigaldusjuhend...
Page 140: ...2 Paigalduskomplekt...
Page 141: ...3 hendusvooliku paigaldamine...
Page 143: ...5 Kuuma vee piiraja kuum vesi 60 C k lm vesi 10 C r hk 0 3 MPa...
Page 145: ...1 Latviski Mont as instrukcija...
Page 146: ...2 Instal cijas piederumi...
Page 147: ...3 Piesl guma tenes mont a...
Page 151: ...1 Srpski Uputstvo za monta u...
Page 152: ...2 Instalaterski komplet...
Page 153: ...3 Monta a priklju ne cevi...
Page 157: ...1 Norsk Montasjeveiledning...
Page 158: ...2 Installasjonskitt...
Page 159: ...3 Montasje tilkoblingsslange...
Page 163: ...1...
Page 164: ...2...
Page 165: ...3...
Page 167: ...5 60 C 10 C 0 3 MPa...
Page 169: ...1 Shqib Stuko p r instalim...
Page 170: ...2 Stuko p r instalim...
Page 171: ...3 Montimi i zorr s s lidhjes...