Hans Grohe PuraVida 15070 1 Series Installation/User Instructions/Warranty Download Page 18

18

When warranty service is completed, any repaired or replacement product or part will be returned to you postage prepaid.

EXCLUSIONS AND LIMITATIONS

REPAIR OR REPLACEMENT (OR, IN LIMITED CIRCUMSTANCES, REFUND OF THE PURCHASE PRICE) AS 
PROVIDED UNDER THIS WARRANTY IS THE EXCLUSIVE REMEDY OF THE PURCHASER. HANSGROHE 
NEITHER ASSUMES NOR AUTHORIZES ANY PERSON TO CREATE FOR IT ANY OTHER OBLIGATION OR 
LIABILITY IN CONNECTION WITH THIS PRODUCT. HANSGROHE SHALL NOT BE LIABLE TO PURCHASER 
OR ANY OTHER PERSON FOR ANY INCIDENTAL, SPECIAL OR CONSEQUENTIAL DAMAGES, ARISING OUT 
OF BREACH OF THIS WARRANTY OR ANY IMPLIED WARRANTY (INCLUDING BUT NOT LIMITED TO ANY 
IMPLIED WARRANTY OF MERCHANTABILITY).

Some States do not allow the exclusion or limitation of incidental or consequential damages, so the above limitation or 
exclusion may not apply to you. This warranty gives you specific legal rights, and you may also have other rights that vary 
from state to state.

TO THE EXTENT PERMITTED BY LAW, ANY IMPLIED WARRANTIES OF MERCHANTABILITY AND FITNESS 
FOR A PARTICULAR PURPOSE, ARE LIMITED TO THE DURATION OF THE EXPRESS WARRANTY.

Some states do not allow limitations on how long an implied warranty may last, so the above limitations may not apply to 
you. You may be required by law to give us a reasonable opportunity to correct or cure any failure to comply before you 
can bring any action in court against us under the Magnuson-Moss Warranty Act.

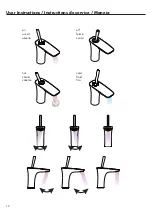
PRODUCT INSTRUCTIONS AND QUESTIONS

Upon purchase or prior to installation, please carefully inspect your Hansgrohe product for any damage or visible defect. 
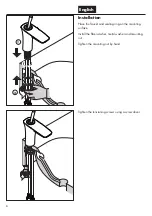
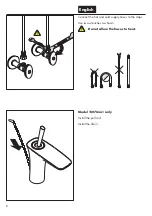
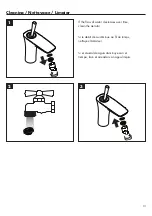
Prior to installing, always carefully study the enclosed instructions on the proper installation and the care and maintenance of 
this product. If you have questions at any time about the use, installation or performance of your Hansgrohe product, or this 
warranty, please write us or call us toll-free at 800-334-0455.

Summary of Contents for PuraVida 15070 1 Series

Page 1: ...EN Installation User Instructions Warranty FR Instructions de montage Mode d emploi Garantie ES Instrucciones de montaje Manejo Garant a PuraVida 15072xx1 PuraVida 15070xx1 15074xx1 PuraVida 15081xx1...

Page 2: ...ontinuous flow water heater if the flow pressure is at least 20 PSI Keep this booklet and the receipt or other proof of date and place of purchase for this product in a safe place The receipt is requi...

Page 3: ...talaci n Modelos 15070xx1 15081xx1 y 15072xx1 no incluyen un tap n elevable ni un tirador Este grifo se puede usar con un calentador de agua de flujo continuo si la presi n del flujo es 20 PSI como m...

Page 4: ...4 15070xx1 15072xx1 15074xx1 15081xx1 9 13 10 7 9 27 max 1 1 2 1 7 11 8 5 1 1 7 16 max 1 19 8 8 2...

Page 5: ...couleurs acabados 00 chrome 40 white chrome 30x1 5 SW 27 95287000 95288000 97157000 96339000 95282000 95141001 17 95372001 35 13961000 96657xx0 94159xx0 15074xx1 only seulement s lo 98164000 33x1 5 9...

Page 6: ...nstallation Place the faucet and sealing ring on the mounting surface Install the fiber washer metal washer and mounting nut Tighten the mounting nut by hand Tighten the tensioning screws using a scre...

Page 7: ...et l crou de montage Serrez l crou de montage la main Instalaci n Coloque el grifo y el aro de sellado sobre la superfi cie de montaje Instale la arandela de fibra la arandela met lica y la tuerca de...

Page 8: ...8 English Connect the hot and cold supply hoses to the stops Use two wrenches as shown Do not allow the hoses to twist Model 15074xx1 only Install the pull rod Install the drain...

Page 9: ...z vous que les tuyaux ne s entortillent pas Conecte las mangueras de suministro de agua cali ente y fr a a los topes Use las dos llaves fijas como se ilustra No permita las mangueras se retuerzan Mod...

Page 10: ...gasket friction ring and retainer nut on the flange Install the tee and tailpiece on the flange Tighten the retainer nut Place the plunger in the drain Install the ball rod so that the end goes throug...

Page 11: ...mit de la tirette Testez l obturateur Le cas ch ant modifiez la posi tion du raccord pivotant Serrez les vis du raccord pivotant Instale el tap n elevable Retire el mbolo Desenrosque la brida del tub...

Page 12: ...12 User Instructions Instructions de service Manejo on ouvert abierto hot chaud caliente off ferm cerrar cold froid fr o...

Page 13: ...water decreases over time clean the aerator Cleaning Nettoyage Limpiar Si le d bit d eau diminue au fil du temps nettoyez l a rateur Si el caudal de agua disminuye con el tiempo lave el aireador con...

Page 14: ...eaners No rinse cleaning agents Always follow the instructions provided by the manufacturer of the cleaning agent Do not mix cleaning agents unless directed by the manufacturer Do not spray cleaners d...

Page 15: ...e nettoyage pour robinetteries et douches Veuillez suivre les instructions du fabricant de produits articles de nettoyage De plus tenez compte des conseils suivants Nettoyez vos produits de robinetter...

Page 16: ...e los detergentes La limpieza tiene que ser realizada seg n la dosificaci n y el tiempo de actuaci n en funci n del objeto y ajustada a las necesidades espec ficas del mismo Gracias a una limpieza per...

Page 17: ...t to Hansgrohe Commercial products and ii for 5 years with respect to Axor products THIS WARRANTY DOES NOT COVER AND HANSGROHE WILL NOT PAY FOR A Conditions malfunctions or damage not resulting from d...

Page 18: ...y gives you specific legal rights and you may also have other rights that vary from state to state TO THE EXTENT PERMITTED BY LAW ANY IMPLIED WARRANTIES OF MERCHANTABILITY AND FITNESS FOR A PARTICULAR...

Page 19: ...19...

Page 20: ...Hansgrohe Inc 1490 Bluegrass Lakes Parkway Alpharetta GA 30004 Tel 770 360 9880 Fax 770 360 9887 www hansgrohe usa com US Installation Instructions Part No 90485725 Revised 8 2011...

Reviews: