background image

2

English

Français

Technical Information

Recommended water pressure 

15 - 75 PSI

Max. water pressure 

145 PSI

Recommended hot water temp.  120° - 140° F*

Max. hot water temp 

176°F*

Flow rate @ 44 PSI 

6.0 GPM

*  Please know and follow all applicable local plumb-

ing codes when setting the temperature on the water 
heater.

Installation Considerations

• For  best  results,  Hansgrohe  recommends  that 

this unit be installed by a licensed, professional 

plumber.

• Please  read  over  these  instructions  thoroughly 

before  beginning  installation.    Make  sure  that 

you  have  all  tools  and  supplies  needed  to 

complete the installation.

• This trim is for use with iBox Universal Plus model 

01850181 (not included).

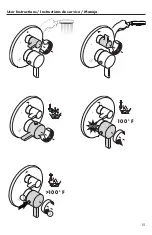
• To  prevent  scald  injury,  the  maximum  output 

temperature  of  the  shower  valve  must  be  no 

higher  than  120°F.  In  Massachusetts,  the 

maximum output temperature can be no higher 

than 112°  F.

• Inspect the check valves and filters at least once 

per year.  Replace if dirty or worn.

• Should the volume of water decrease over time, 

inspect and clean the filters on the thermostatic 

cartridge.    After  reassembly,  set  the  high 

temperature limit stop and justify the handle.  

• To prolong the life of the themostatic cartridge, 

regularly  run  it  through  its  full  range  of 

temperatures.

• Keep this booklet and the receipt (or other proof 

of date and place of purchase) for this product in 

a safe place.  The receipt is required should it be 

necessary to request warranty parts.  

Données techniques 

Pression d’eau recommandée 

15 - 75 PSI

Pression d’eau maximum 

145 PSI

Température recommandée  

120° - 140° F*

  d'eau chaude 

Température maximum d'eau chaude 

176°F*

Capacité nominale @ 44 PSI 

6.0 GPM

*  Vous devez connaître et respecter tous les codes de 

plomberie locaux applicables pour le réglage de la 
température du chauffe-eau.    

À prendre en considération pour 

l’installation

• Pour  de  meilleurs  résultats,  Hansgrohe 

recommande que ce produit soit installé par un 

plombier professionnel licencié.

• Veuillez lire attentivement ces instructions avant 

de  procéder  à  l’installation.    Assurez-vous 

de  disposer  de  tous  les  outils  et  du  matériel 

nécessaires pour l’installation.  

• Ce  dispositif  requiert  une  pièce  intérieure 

01850181.  

• Pour empêcher des blessures par ébouillantement, 

la  température  de  sortie  maximale  du  robinet 

de  douche  ne  doit  pas  excéder  120°F.  Au 

Massachusetts,  la  température  de  sortie 

maximale  du  robinet  de  douche  ne  doit  pas 

excéder 112°F.

• Les  clapets  anti-retour  doivent  être  examinés 

régulièrement. 

• Contrôler par la même occasion les filtres qui se 

trouvent sur la cartouche thermostatique. Après 

le  montage  de  la  cartouche  thermostatique 

vérifier obligatoirement la température au point 

de vidange.

• Pour  assurer  le  mouvement  facile  de  l´élément 

thermostatique, le thermostat devrait être placé 

de temps en temps en position très chaude et très 

froide.

• Conservez  ce  livret  et  le  reçu  (ou  une  autre 

preuve sur laquelle figurent la date et l’endroit 

de l’achat) pour ce produit dans un endroit sûr.  

Le reçu est requis si vous commandez des pièces 

sous garantie.

Summary of Contents for E 04352 0 Series

Page 1: ...Metris C 15752xx1 E 04352xx0 EN Installation User Instructions Warranty FR Instructions de montage Mode d emploi Garantie ES Instrucciones de montaje Manejo Garant a...

Page 2: ...to request warranty parts Donn es techniques Pression d eau recommand e 15 75 PSI Pression d eau maximum 145 PSI Temp rature recommand e 120 140 F d eau chaude Temp rature maximum d eau chaude 176 F...

Page 3: ...lvula de la ducha no debe exceder los 112 F Las v lvulas anti retorno tienen que ser controladas regularmente Conviene comprobar al mismo tiempo el filtro del termoelemento Despu s de poner el termoe...

Page 4: ...4 15752xx1 04352xx0 Service Stops But es d arr t d isolation Cierres de servicio 2 3 2 3 6 2 1 1 2 3 4 6 2 2 3 1 2 2 3 2 3 closed ferme cerrado open ouvert abierto 4 mm...

Page 5: ...nco minutos Cierre el paso del agua fr a Retire el inserto de lavado G relo 90 y reinst lelo Abra el paso del agua caliente en el cierre de servicio Lave el suministro de agua cali ente para por lo me...

Page 6: ...lla la pared pueden producirse da os por acci n del agua Retire el inserto de lavado y las juntas Close the stops Cut the plaster shield so that it extends from the finished wall surface Installation...

Page 7: ...all the function block using the M5x20 screws Measure the distance from the front of the plaster shield to one of the screw in flanges X Mesurez la distance entre la surface du mur et la bride du vis...

Page 8: ...la longueur X Add to this measurement Cut each screw so that it is X long Open the stops Install the carrier plate so that the notch is at the bottom Ouvrez l eau les but es d arr t d isolation Insta...

Page 9: ...ici n de 12 00 Instale el casquillo del llave de paso Instale el flor n Slide on the thermostatic mixer sleeve so that the indexing mark is at the 12 00 position Screw on the volume control sleeve Ins...

Page 10: ...e de 3 mm Installe le poign e d arr t Serrez la vis l aide d une cl hexagonale de 2 mm Installez la poign e thermo statique de fa on ce que le bouton de surpassement de la but e de s curit soit la pos...

Page 11: ...an be no higher than 112 F Pour emp cher des blessures par bouillante ment la temp rature de sortie maximale du robinet de douche ne doit pas exc der 120 F Au Massachusetts la temp rature de sortie ma...

Page 12: ...12 Justify the handle R glez la poign e Ajuste la manija 1 2 3 2 5 mm 2 5 mm 1 2 1 2 1 2...

Page 13: ...ckel 83 Polished Nickel 92 Rubbed Bronze Metris C 15752xx1 98133000 13595000 not included pas d inclus no incluidos 94073000 94074000 96525000 94009000 98793000 29x3 48x3 95550xx0 96446xx0 96451000 96...

Page 14: ...ished Nickel E 04352xx0 96551xx1 29x3 48x3 95550xx0 96446xx0 96451000 96435000 96454000 96447000 95181000 98133000 94073000 94074000 96525000 94009000 94282000 95037000 13595000 not included pas d inc...

Page 15: ...15 User Instructions Instructions de service Manejo 100 F 100 F 1 2...

Page 16: ...16 Cleaning Nettoyage Limpieza 4 mm 24 mm 24 mm 1 2 3 4 5 6 4 mm 4 mm...

Page 17: ...ture marked on handle Handle not justified Justify the handle Water heater set too low Increase the hot water temperature Safety stop button not operating Button and or spring are dirty or worn Clean...

Page 18: ...u d fectueux R glez le thermostat Le r glage de la temp rature n est pas possible L l ment thermostatique est encrass ou entartr Nettoyez l l ment ther mostatique ou le changez ventuellement La pi ce...

Page 19: ...r v lvula Temperatura del agua no cor responde a lo marcado termostato no ha sido ajustado ajustar termostato No es posible regular la tempera tura termoelemento sucio lleno de cal limpiar cambiar ter...

Page 20: ...ucets and fittings Immediately rinse any overspray from the Hansgrohe product Damage to the product caused by improper care or the use of improper cleaning agents is not covered by the warranty If a c...

Page 21: ...ieza dise ado espec ficamente para el tipo de producto No use estos tipos de limpiadores ya que causar n da o a su producto Hansgrohe Agentes limpiadores que contengan cido clorh drico f rmico ac tico...

Page 22: ...espect to Axor products THIS WARRANTY DOES NOT COVER AND HANSGROHE WILL NOT PAY FOR A Conditions malfunctions or damage not resulting from defects in material or workmanship B Conditions malfunctions...

Page 23: ...r rights that vary from state to state TO THE EXTENT PERMITTED BY LAW ANY IMPLIED WARRANTIES OF MERCHANTABILITY AND FITNESS FOR A PARTICULAR PURPOSE ARE LIMITED TO THE DURATION OF THE EXPRESS WARRANTY...

Page 24: ...24 Hansgrohe Inc 1490 Bluegrass Lakes Parkway Alpharetta GA 30004 Tel 800 334 0455 Fax 770 889 1783 www hansgrohe usa com US Installation Instructions Part No 90161801 Revised 11 2016...

Reviews: