HANNspree ST23-10A1 User Manual Download Page 29


27

Connecting the Power Adapter
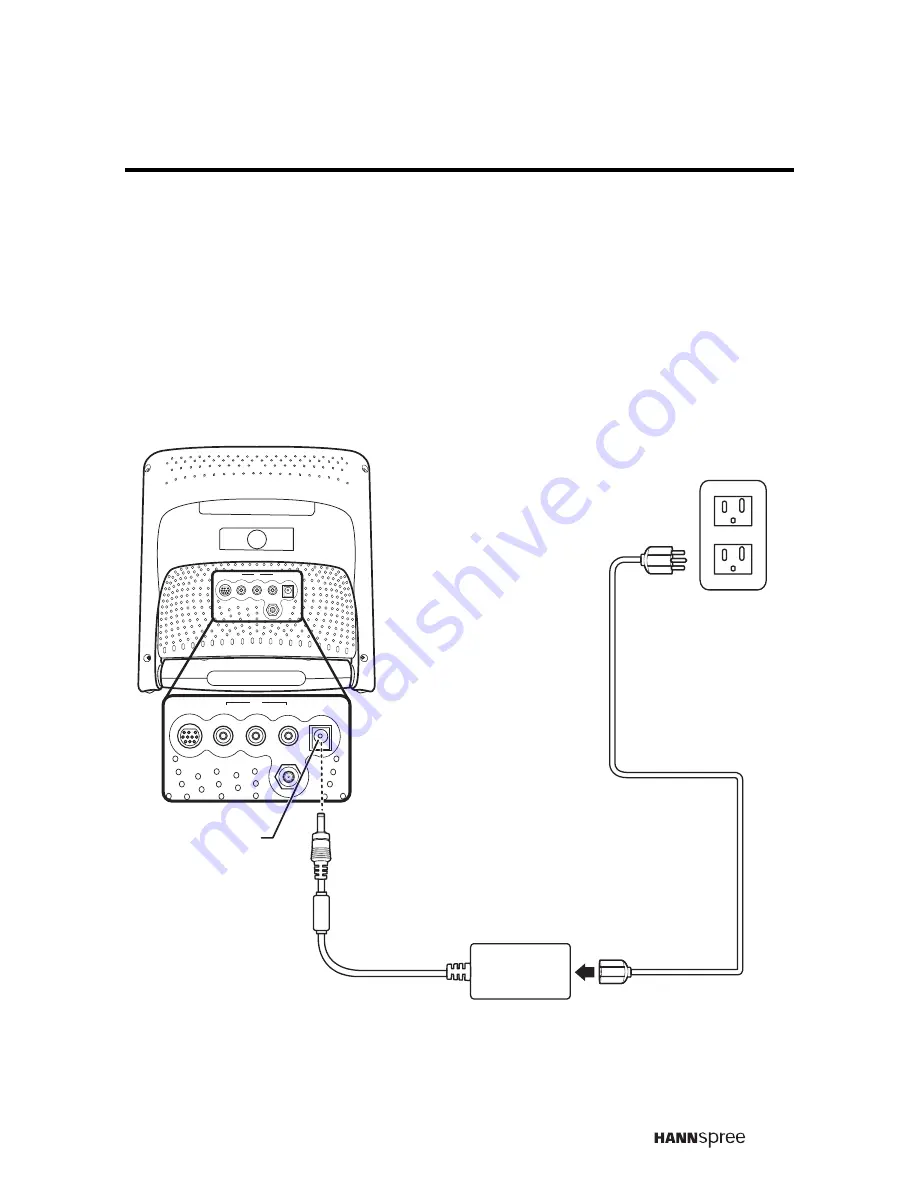
1

Connect the power cord to the power adapter as illustrated.

2

Plug the power adapter connector into the DC-IN on the rear panel of 
the TV.

3

Plug the three-pronged plug at the other end of the power cord into a 
power outlet.

AV2

R

L

AV1

VIDEO

DC-IN

ANT

AV2

R

L

AV1

VIDEO

DC-IN

ANT

Power cord

DC-IN

Power outlet

Power adapter

Three-pronged
plug

Summary of Contents for ST23-10A1

Page 1: ...VTWEN1203 MAC 001084 User s Manual 9 6 Liquid Crystal Display Television ST23 10A1 2F No 362 Jui Kuang Rd Neihu District Taipei City 114 Taiwan R O C TEL 886 2 87520000 FAX 886 2 87527092 www hannspre...

Page 2: ......

Page 3: ...18 Front View 18 Input and Output Ports 20 9 Getting Started 22 Setting up the TV 22 Connecting to an Antenna or Cable TV 23 Connecting to AV Devices 24 Connecting to a VCR VCD or DVD Player 24 Connec...

Page 4: ...Sharpness 35 Hue 36 Saturation 37 Color 38 Preset 39 Audio Setting 40 Treble 41 Bass 42 Balance 43 Enhance 44 Preset 44 TV Setting 45 TV CATV 46 Channel Add Erase 47 Auto Program 48 Customize Setting...

Page 5: ...one year limited service from the date the product is received as shown on the Warranty and Service Manual please refer to the Warranty and Service Manual for the detailed warranty information Hannspr...

Page 6: ...on in this document is subject to change without notice Copyright Copyright 2003 Hannspree Inc All rights reserved This product and related documentation are pro tected by copyright and are distribute...

Page 7: ...ling operating and cleaning the product In addition read the following Safety Notices carefully before using the product to ensure that your TV is safe and long lasting Warning This symbol is used to...

Page 8: ...r mainte nance 4 To avoid fire or electric shocks do not overload electric power outlets Installation Safety Notes Antenna We suggest that you use an outdoor antenna to get the best signal possible un...

Page 9: ...and warning label instructions 4 Any changes or modifications that do not follow the instructions in this manual will void this product s warranty Warning To reduce the risk of fire or electric shock...

Page 10: ...8 Optimal Viewing Area 102 cm 1 1...

Page 11: ...install near any heat sources such as radiators heat registers stoves or other apparatus including amplifiers that produce heat 9 Do not defeat the safety purpose of the polarized or grounding type p...

Page 12: ...mbination to avoid injury from tip over 12 Only use attachments accessories specified by the manufacturer 13 Unplug this apparatus during lightning storms or when unused for long periods of time 14 Re...

Page 13: ...to avoid an elec tric shock or a fire If the TV is dropped falls down or is otherwise damaged unplug the power cord immediately and notify a qualified service technician If any fluid is sprayed or dro...

Page 14: ...ce the TV on a bed sofa carpet or in a sealed cabinet to avoid blocking the product s vents Install the outdoor antenna far from power trans mission lines to avoid possible danger Remove the power cor...

Page 15: ...e techni cian if you cannot plug it in correctly If there is any problem that cannot be resolved according to the instructions given in this man ual notify a qualified service technician immedi ately...

Page 16: ...ipment does cause harmful interference to radio or television reception which can be deter mined by turning the equipment off and on the user is encouraged to try to correct the interference by one or...

Page 17: ...h Canada ICES 003 Class B CE Conformity Statement2 This device complies with the requirements set out in the Council Direc tive on the approximation of the Laws of the Member States relating to Electr...

Page 18: ...on the front panel let you change channels adjust the volume and change display settings through an easy to use on screen menu system The TV speakers provide full rich stereo sound and a convenient au...

Page 19: ...g is missing or damaged TV User s Manual Quick Start Guide Warranty and Service Manual Wire Material Package Power Cord Power Adapter 4 in 1 Cable User s Manual Quick Start Guide Warranty and service...

Page 20: ...and off 2 Select channel Channel up S Increases the channel number Channel down T Decreases the channel number 3 Power Turns the TV on and off 4 Adjust volume Volume up Increases the volume Volume do...

Page 21: ...source to be displayed TV AV1 or AV2 6 Power LED Green LED indicates power on 7 Signal sensor Point the remote control at this sensor 8 Headphone line out Connects to headphones 9 Speakers Output audi...

Page 22: ...luded 4 IN 1 Audio Video cable to connect external devices such as a VCR VCD or DVD player Audio Input AV connectors white and red audio cables Video Input AV connector video yellow or S Video cables...

Page 23: ...R or a VCD or DVD player Audio Input AV connector white and red audio cables Video Input AV connector video yellow cable 3 Antenna cable TV line in Connects to an antenna or CATV cable television line...

Page 24: ...22 Getting Started 9 Setting up the TV A B Open the TV A Set the TV on its stand as shown B...

Page 25: ...t the other end of the VHF UHF Antenna or CATV cable to the Antenna or CATV socket Note If you cannot receive channels after connecting to an antenna or cable TV line try scanning for channels See Aut...

Page 26: ...ere shows you how to connect your TV to a VCR VCD or DVD player Actual connections may vary according to the make and model of your device Refer to the user s manual included with the AV device for mo...

Page 27: ...to the user s manual included with the camcorder for more detailed instructions AV2 R L AV1 VIDEO DC IN ANT AV2 R L AV1 VIDEO DC IN ANT WB S R W Y B 4 in 1 cable S Video Cables and connectors are col...

Page 28: ...instead of using the built in speakers Connect headphones to the headphone line out port as illustrated Notes Headphones are not included with the product The internal TV speakers will not output soun...

Page 29: ...rated 2 Plug the power adapter connector into the DC IN on the rear panel of the TV 3 Plug the three pronged plug at the other end of the power cord into a power outlet AV2 R L AV1 VIDEO DC IN ANT AV2...

Page 30: ...s use the remote control within a distance of 5 meters 16 feet from the front of the TV s signal sensor Do not exceed an angle of 30 degrees when pointing at the signal sensor Refer to the following i...

Page 31: ...LED changes from green to red indicating that the TV is in standby off mode Selecting Channels 1 Press the CH UP button to increase the channel number by one 2 Press the CH DOWN button to decrease the...

Page 32: ...e signal type automatically and gives priority to S video when two signals are detected at the same time Adjusting the Volume 1 Press the VOL UP button to increase the volume 2 Press the VOL DOWN butt...

Page 33: ...nel control You can also use the arrow buttons on the remote control to adjust settings Note Press the menu button to exit the OSD menus and submenus at any time Repeatedly press the MENU button to ex...

Page 34: ...either the remote control or the front panel control Picture Setting Press MENU to enter the OSD Main Menu screen Press the VOL UP button to enter the PICTURE Menu MENU SEL SEL ENTER ENTER MENU MENU...

Page 35: ...the brightness 4 Press MENU to confirm the setting and return to the Picture Menu SEL SEL PRESET COLOR HUE SHARPNESS CONTRAST BRIGHTNESS BRIGHTNESS PICTURE MENU 0 0 0 0 NEUTRAL 30 SATURATION ENTER EN...

Page 36: ...tton to decrease the contrast 5 Press MENU to confirm the setting and return to the Picture Menu SEL SEL SEL SEL PRESET HUE SHARPNESS CONTRAST BRIGHTNESS PICTURE MENU 0 0 0 0 30 SATURATION ENTER ENTER...

Page 37: ...utton to decrease the sharpness 5 Press MENU to confirm the setting and return to the Picture Menu SEL SEL SEL SEL PRESET HUE SHARPNESS CONTRAST BRIGHTNESS PICTURE MENU 0 0 0 0 30 SATURATION ENTER ENT...

Page 38: ...DOWN button to decrease the hue toward the red end of the spectrum The image becomes more red 5 Press MENU to confirm the setting and return to the Picture Menu SEL SEL SEL SEL PRESET HUE SHARPNESS CO...

Page 39: ...tton to decrease the saturation 5 Press MENU to confirm the setting and return to the Picture Menu SEL SEL SEL PRESET HUE SHARPNESS CONTRAST BRIGHTNESS PICTURE MENU 0 0 0 0 30 SATURATION ENTER ENTER E...

Page 40: ...D then press MENU COLD appears in the brackets ADJ ADJ PRESET COLOR HUE SHARPNESS CONTRAST BRIGHTNESS PICTURE MENU 0 0 0 0 NEUTRAL 30 SATURATION MENU MENU ADJ ADJ PRESET COLOR HUE SHARPNESS CONTRAST B...

Page 41: ...brackets All picture settings are returned to the factory set default values SEL SEL SEL SEL PRESET HUE SHARPNESS CONTRAST BRIGHTNESS PICTURE MENU 0 0 0 0 30 SATURATION ENTER ENTER ENTER ENTER MENU ME...

Page 42: ...nt panel control Audio Setting Press MENU to enter the OSD Main Menu screen 1 Press the CH UP DOWN button to select AUDIO 2 Press the VOL UP button to enter the Audio Menu MENU MAIN AUDIO TV CUSTOMIZE...

Page 43: ...ton to decrease the treble 4 Press MENU to confirm the setting and return to the Audio Menu SEL SEL SEL SEL ENTER ENTER ENTER ENTER MENU MENU MENU MENU BALANCE PRESET BASS TREBLE AUDIO MENU 0 0 0 ON E...

Page 44: ...4 Press the VOL DOWN button to decrease the bass 5 Press MENU to confirm the setting and return to the Audio Menu SEL SEL SEL SEL ENTER ENTER ENTER ENTER MENU MENU MENU MENU BALANCE BASS TREBLE AUDIO...

Page 45: ...ress the VOL UP button to shift the balance to the right speaker 5 Press MENU to confirm the setting and return to the Audio Menu SEL SEL SEL SEL ENTER ENTER ENTER ENTER MENU MENU MENU MENU BALANCE BA...

Page 46: ...brackets All audio settings are returned to the factory set default values SEL SEL SEL SEL ENTER ENTER ENTER ENTER MENU MENU MENU MENU BALANCE ENHANCE BASS TREBLE AUDIO MENU 0 0 0 ON PRESET Note Turni...

Page 47: ...control or the front panel control TV Setting Press MENU to enter the OSD Main Menu screen 1 Press the CH UP DOWN button to select TV 2 Press the VOL UP button to enter the TV Menu MENU SEL SEL ENTER...

Page 48: ...appears in the brackets Receiving Broadcast TV Press the VOL UP button to select TV then press MENU TV appears in the brackets TV TV CATV CH AUTO PROGRAM ADD ERASE MENU SEL SEL ENTER ENTER MENU MENU C...

Page 49: ...number changes from yellow into green after adding the channel Erase Channel Then press the VOL DOWN button on the front panel to erase the selected channel The channel number changes from green into...

Page 50: ...gin auto programming The screen displays channels incrementally as the TV scans for available channels TV TV CATV CH AUTO PROGRAM ADD ERASE MENU SEL SEL ENTER ENTER MENU MENU CATV AUTO PROGRAM TV 44 N...

Page 51: ...el control Customize Setting Press MENU to enter the OSD Main Menu screen 1 Press the CH UP DOWN button to select CUSTOMIZE 2 Press the VOL UP button to enter the Customize Menu MENU MAIN AUDIO TV CUS...

Page 52: ...he remote control to select 30 60 90 or 120 minutes The setting appears on the TV screen The remaining time is updated every 10 minutes on the display During the last minute the sleep timer flashes SE...

Page 53: ...or 60 seconds 4 Press MENU to confirm your choice 1 Press the CH DOWN button to select LANGUAGE 2 Press the VOL UP button The current setting appears flashing in the brackets 3 Press the VOL UP butto...

Page 54: ...a dry soft cloth and use neutral cleaning fluids If your model has leather components wipe the leather parts with a dry cloth and keep the area dry Place the TV far from sources of steam to avoid maki...

Page 55: ...cable connec tions Adjust the brightness in the OSD menus See Brightness on page 33 Picture is not in color Adjust the saturation in the OSD menus See Saturation on page 37 Picture is OK no sound Pres...

Page 56: ...the volume to a higher level Make sure the audio cable is con nected securely Turn the mute off Screen image turns over Make sure the video signal cable is connected properly Snow appears on the scre...

Page 57: ...Video RCA jack yellow AV2 mini DIN 10 pin Composite S Video Audio System AV1 L R RCA jacks audio input AV2 mini DIN 10 pin L R RCA jacks audio input 3 5 mm headphone jacks audio output Built in stereo...

Page 58: ...echnology that uses rod shaped molecules liquid crystals that flow like liquid and bend light MAIN is the default audio signal belonging to a particular channel MTS Multi channel Television Sound Enab...

Reviews: