background image

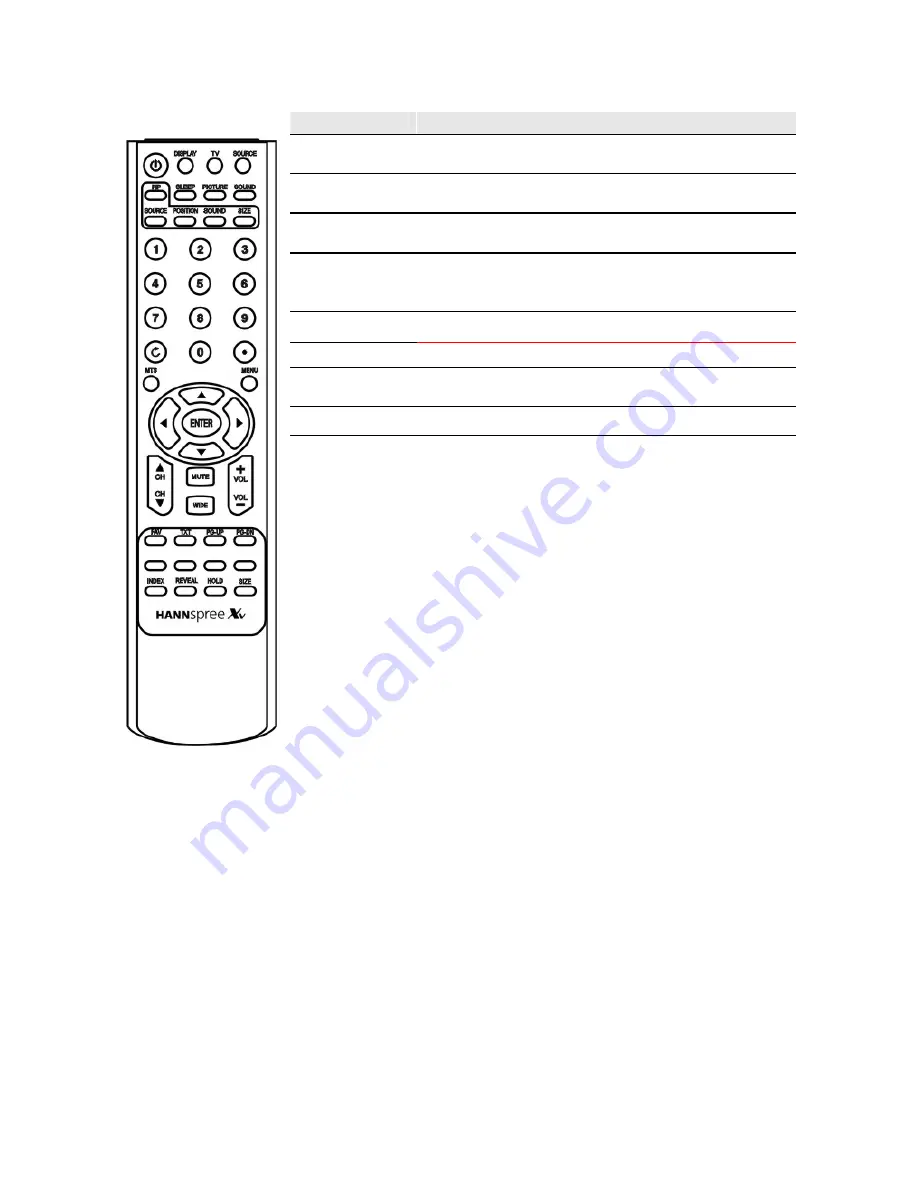
Button 

Description 

FAV  

LIST all of the channels.  Then you can rearrange 
the order of the channels. 

TXT 

Select Teletext mode in turn: real teletext mode, 
mixed mode, closing teletext. 

PG-UP, PG-DN 

Page Up / Page Down the Teletext Pages 

RED, GREEN,  


YELLOW, BLUE 

Execute Red function, Green function, Yellow 
function, Blue function in Teletext mode. 

INDEX 

Go to the teletext index page in teletext window  

REVEAL 

Switch on/off the hide information in teletext page 

HOLD 

Hold the teletext info and stop the automatic page 
change 

SIZE 

Switch on/off enlarging of teletext window 


Summary of Contents for LT32

Page 1: ...nly They might be different from the model you purchased DANGEROUS VOLTAGE The lightning flash with arrowhead symbol within on equilateral triangle is intended to alert the user to the presence of uninsulated dangerous voltage within the product s enclosure that may be of sufficient magnitude to constitute a risk of electrical shock to persons INSTRUCTION The exclamation paint within on equilatera...

Page 2: ...xpose you to dangerous voltages and other hazards Refer all servicing to qualified service personnel Do not touch your LCD Display and antenna during thunderstorms Unplug the LCD Display during thunderstorms or if it is not going to be used for an extended period Failure to do so may result in electric shock or fire ATTENTION Unplug the Display from the wall socket before cleaning Use a damp cloth...

Page 3: ...rt apparatus combination to avoid injury from tip over 10 Unplug this apparatus during lightening storms or when unused for long periods of time 11 Refer all servicing to qualified service personnel Servicing is required when the apparatus has been spilled or objects have fallen into the apparatus apparatus has been exposed to rain or moisture does not operate normally or has been dropped 12 Excep...

Page 4: ...w and Bottom View 3 Using the Remote Control 4 Installing the LCD TV 6 Basic Connections 6 Quick Installation 7 Channel Search 7 Using the LCD TV 8 Basic Operations 8 OSD Menu Settings 8 Picture Menu 9 Sound Menu 9 Tuning Menu TV mode Only 10 System Menu 11 Calibration Menu 12 TeleText 13 Troubleshooting 14 Other Information 15 Supporting Operation Modes 15 Product Specifications 15 ...

Page 5: ...al user friendly OSD menu Plug and Play PnP Conforms to the VESA standards and supports the DDC2B specifications Getting Started Package Contents Please prepare a suitable workspace before unpacking your LCD TV A steady level and clean surface near an electrical wall outlet is required Set the LCD TV box in an upright position and open from the top of the box before removing the right left cushion...

Page 6: ...RCE Press to go through all the available input sources 3 ENTER Press to select an item exit a function in the OSD menu or confirm a setting 4 5 VOLf e Press to adjust the volume select an OSD item and adjusts the settings 6 7 CH c d Press to select the channel or select an item in the OSD menu 8 MENU Press to open the OSD menu ...

Page 7: ...he S Video terminal cable from the video output device here 7 AV S Video Audio AV Connect to the Audio output terminal cable from the audio output device here Connect to AV source here 8 PC Audio Connect to the sound output terminal from the PC 9 RS232 Upgrade port only for your dealer or service center 10 D SUB Connect to D Sub 15 pin analog output connector of the PC display card here 11 HDMI Co...

Page 8: ...Music Cinema Voice or Personal PIP PIP Start the PIP function only valid in VGA HDMI or YPbPr Mode Source Select the sub picture source Position Select the sub picture position Sound Select the sound source Size Select the sub picture size Number buttons 0 9 Press the number buttons to enter the channel number directly Press the number buttons in corresponding menu items Press the number buttons i...

Page 9: ... PG UP PG DN Page Up Page Down the Teletext Pages RED GREEN YELLOW BLUE Execute Red function Green function Yellow function Blue function in Teletext mode INDEX Go to the teletext index page in teletext window REVEAL Switch on off the hide information in teletext page HOLD Hold the teletext info and stop the automatic page change SIZE Switch on off enlarging of teletext window ...

Page 10: ...s Use the antenna or coaxial cable to connect with the TV tuner socket situated at the back of the LCD TV Antenna or coaxial cable Step 3 Connecting the power cable Plug the power cord into the wall socket and turn on the power switch Step 4 Remote control Insert the two AAA UM4 type batteries supplied and make sure that the ends are properly connected Step 5 Setting up the TV Follow the instructi...

Page 11: ... DK Denmark FIN Finland NL Netherlands PL Poland IRL Ireland A Austria CH Switzerland B Belgium S Sweden N Norway GR Greece TR Turkey Available language English French German Italian Spanish Portuguese Czech Danish Finish Dutch Polish Russian Swedish Select the System Submenu then do the Reset Do Search to do the channel searching The LCD TV will then start scanning for available and viewable chan...

Page 12: ...c CHd on the remote control or on the front panel to browse through the channels Press CHc to go to the next channel or CHd to go to the previous channel User may enter the channel number directly using number buttons on the remote control List Press FAV on the remote control to go in the channel 01 99 list The left side is the channel number the right side is the channel name If you want to rearr...

Page 13: ...ast Adjust to a higher value to create higher contrast The default setting is 18 Color Adjust the color intensity The default setting is 24 Sharpness Adjust to a higher value to make the colors more sharp The default setting is 2 Color Temperature Tone Select from Standard Warm or Cold Format Form Select picture ratio from 16 9 panorama 4 3 or 4 3 Expanded Note YPbPr VGA and HDMI modes can only su...

Page 14: ...nel Television Sound TV audio system from Mono Stereo Dual I or Dual II Tuning Menu TV mode Only TV settings Programme Enter the number to select the TV programme you want it to locate The default value is 01 Name Set the current programme name by entering the number or up down buttons Channel Enter the number to select the channel by frequency C01 C92 S00 S58 The default value is C02 Frequency Se...

Page 15: ...mally transparent Backlight Adjust the Panel backlight by value 0 16 Noise Reduction TV signal dynamic noise reduction switch Child Lock 1 Before Setting Lock New password for entering a new 4 digit number password Confirm password for entering the password again for confirmation Lock for defining the range you lock No means to lock nothing All means to lock all signal sources TV means to lock TV ...

Page 16: ...aulted setting is 16 PIP settings VGA HDMI YPbPr mode only Active To select whether activate PIP or not The defaulted setting is off Sources Select PIP signal source from TV AV S Scart1 or Scart2 Positions Select 4 positions for PIP 0 for top left hand 1 for top right hand 2 for bottom right hand 3 for bottom left hand The defaulted setting is 0 PIP Size Select 3 kinds of PIP size Small Medium and...

Page 17: ...age Enter the number of the page required using the 0 to 9 or PG UP PG DOWN If the counter continues to search this means that page is not transmitted Select another number Direct access to the items Colored areas R G Y B are displayed at the button of the screen The 4 colored keys are used to access the items or corresponding pages Temporary stop Press Hold for temporary stop This used to tempora...

Page 18: ...play is too dark or too bright Lower the Contrast and Brightness of the LCD TV or the input source Image does not center on the display Adjust the Image Position in the OSD menu Display vibration Check if the power voltage is acceptable to specification of the TV Check if the signal cables are properly connected An after image remains after the TV is turned off This is a characteristic of a liquid...

Page 19: ... KHz 56 Hz SVGA 800 x 600 37 9 KHz 60 Hz XGA 1024 x 768 48 4 KHz 60 Hz VESA SXGA 1280 x 1024 64 0 KHz 60 Hz Supported HDMI Timing Analog Display Mode Horizontal Frequency Vertical Frequency VGA 640 x 480 31 5 KHz 60 Hz 35 1 KHz 56 Hz SVGA 800 x 600 37 9 KHz 60 Hz VESA XGA 1024 x 768 48 4 KHz 60 Hz Supported YPbPr Mode SDTV 480i EDTV 480p HDTV 720p 1080i 50 60Hz ...

Page 20: ... I LL DK TV Support Display SDTV 480i 576i EDTV 480p 576p HDTV 1080i 720p 50 60Hz Dual Display PIP Main VGA HDMI YPbPr Sub TV RCA Scart S Optional 3 sizes 4 locations Optional Sound from PIP TV Audio System Stereo Mono Dual I Dual II Remote Control IR Remote Controller TV FUNCTION TV OSD Control Brightness Contrast Volume Sharpness Tint Color Source select Language English German French Italian Sp...

Page 21: ...DK TV Support Display SDTV 480i 576i EDTV 480p 576p HDTV 1080i 720p 50 60Hz Dual Display PIP Main VGA HDMI YPbPr Sub TV RCA Scart S Optional 3 sizes 4 locations Optional Sound from PIP TV Audio System Stereo Mono Dual I Dual II Remote Control IR Remote Controller TV FUNCTION TV OSD Control Brightness Contrast Volume Sharpness Tint Color Source select Language English German French Italian Spanish ...

Reviews: