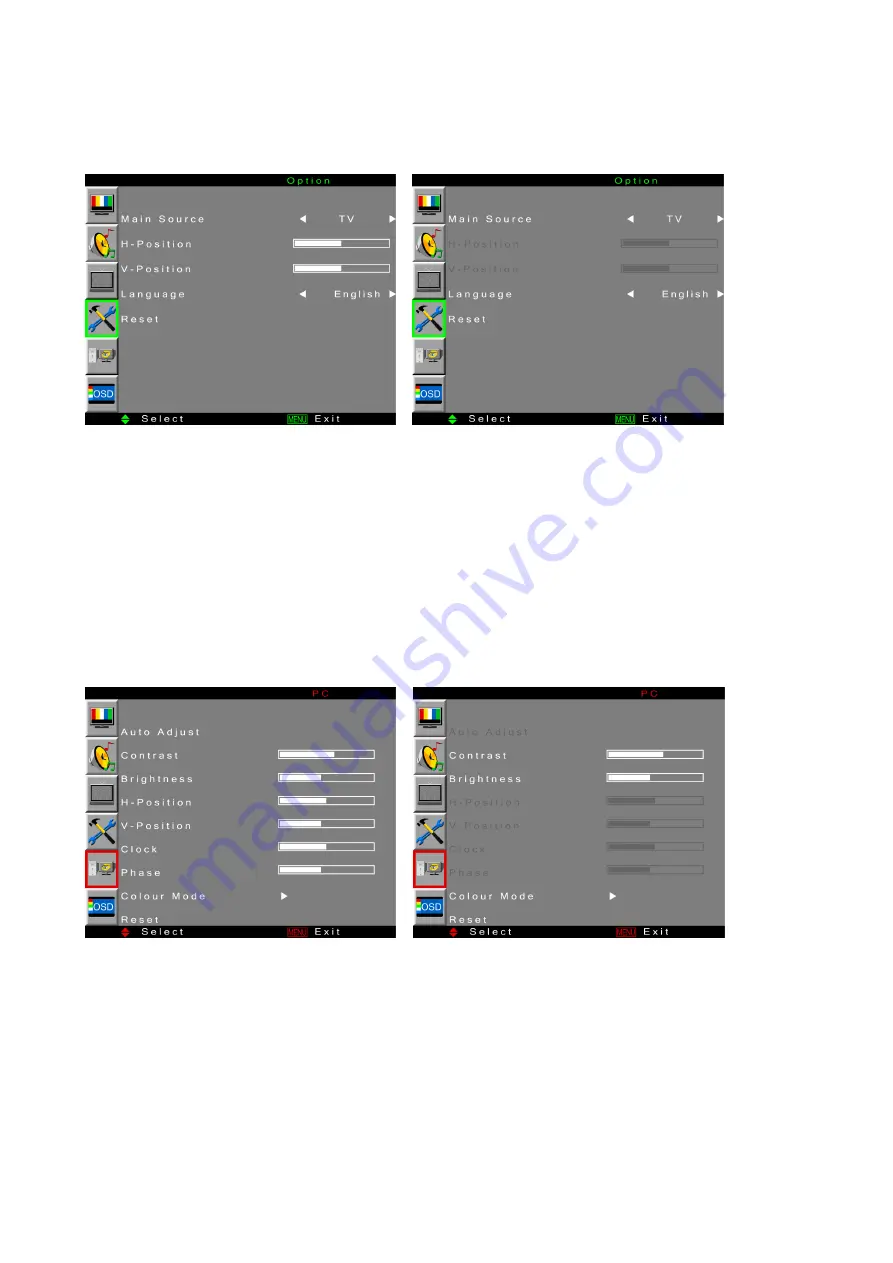
background image

 18

Option Menu 

When input source is TV/ AV/ SV/ HD/            When input source is D-SUB/ HDMI(PC): 

SCART1/ SCART2/ SCART2-SV/   

HDMI(HDCP): 


Main Source:

 To select the input source for main screen between TV, AV, SV, HD, SCART1, 

SCART2, SCART2-SV, D-SUB, and HDMI with 

◄►

.


H-Position: 

To adjust the horizontal position of the video with 

◄►

.


V-Position: 

To adjust the vertical position of the video with 

◄►

.


Language: 

To select the OSD language between English, French, German, Spanish, Italian, 

Finland, Dutch, and Swedish with 

◄►

.  

Reset:

 Press 

ENTER


to reset all the settings in Option page. 

 
PC Menu 
—to Adjust for PC 

It is only active in D-SUB and HDMI (support PC mode). 

When input source is D-SUB:              When input source is HDMI (PC):


Auto Adjust: 

Auto adjust picture’s horizontal position, vertical position, fine tune, and H-Size with 

◄►

.  

Contrast:

 To adjust foreground luminance of video. 

Brightness:

 To adjust background luminance of video. 

H-Position: 

To adjust horizontal position of video.


V-Position: 

To adjust vertical position of video.


Clock: 

To adjust delay time of clock in order to reduce the noise of picture.


Phase: 

To adjust delay time of phase in order to reduce the noise of picture.


Summary of Contents for JT02-37S1-000G

Page 1: ...user serviceable parts inside 10 Do not defeat the safety purpose of the polarized or grounding type plug A polarized plug has two blades with one wider than the other A grounding type plug has two b...

Page 2: ...ve 89 336 EEC as amended by 92 31 EEC and 93 68 EEC Art 5 with regard to Electromagnetic compatibility and 73 23 EEC as amended by 93 68 EEC Art 13 with regard to Safety Antenna Installation Instructi...

Page 3: ...er Lines An outside antenna system should not be located in the vicinity of overhead power lines or other electric light or power circuits or where it can fall into such power lines or circuits When i...

Page 4: ...HDMI 11 Connecting to a Computer with HDMI DVI cable 11 Connecting with the power cord 11 BASIC OPERATION 12 Turning on the LCD TV 12 Power On Off 12 Select input source 12 Volume Adjusting 12 Channel...

Page 5: ...ES Thank you for purchasing this LCD TV This LCD TV package comes with LCD TV User s Manual Quick Start Guide Warranty Card Remote control Battery AA x 2 Power Cord PC Audio Cable VGA Cable SCART to R...

Page 6: ...2 FRONT PANEL BUTTONS Volume Down Volume Up On Screen Display Menu On Off Channel Down Scroll Down Channel Up Scroll Up Enter Power ON OFF Power LED Indicator Remote Control Receiver X Y Z _...

Page 7: ...E Audio Input for VGA F Headphone Jack G YPbPr HD Component Video Input H Composite Video input I Audio Input for YPbPr HD components left right J Audio Input for AV or S Video Components left right...

Page 8: ...4 REMOTE CONTROL...

Page 9: ...letex function change from current page to selected page In Name function erase desired channels 19 BLUE In Teletex function go out from CURSOR Mode In Name function confirm edited name 20 VOL UP DOWN...

Page 10: ...ess this button you force the Teletext to LIST Mode It means that row 24 bottom row of Teletext will not have transmitting information only the pages that you have previously stored in the memory Pres...

Page 11: ...enlarge the top half of the page Press this button again to enlarge the bottom half of the page Press this button again to return to the normal display LANGUAGE button Press this button to select the...

Page 12: ...e TV system without a cable connecter box See page 16 Connecting to External Stereo System to Listen to LCD TV Sound Connect the audio output terminal of the LCD TV to audio in terminal of the stereo...

Page 13: ...Source SCART1 AV RGB TV only SCART2 AV RGB All CVBS signal SCART2 SV S Video All CVBS signal S Video Cable Not included VCR or DVD Player Audio in Cable Not included YPbPr Cable not included VCR or D...

Page 14: ...f your LCD TV Computer up to 1360 x 768 is the preferred resolution Connecting to the Headphone Connect the headphone to the headphone output terminal of the LCD TV Headphone sold separately HDMI Cabl...

Page 15: ...ble Connect the HDMI DVI cable from DVI output of computer to the HDMI terminal input of the LCD TV Connecting with the power cord Connect the power cord to the power cord connector on the back of you...

Page 16: ...election press ENTER Volume Adjusting Press VOL to adjust volume To silence volume press MUTE If you want to restore volume press MUTE again or press VOL directly Channel Select Press number keys PROG...

Page 17: ...to adjust volume of sub screen Select Program for Sub screen Press P and P to select the program of sub screen Sound Sound Mode Select Continue to press SMART S to select the sound mode between Movie...

Page 18: ...You are able to use On Screen Display OSD menus to adjust various settings by using your remote control or menu button on the top of the LCD TV The basic operation is as following Press MENU to displ...

Page 19: ...kin Colour Temp To select colour Temp by pressing warm redder normal neutral or cool bluer Reset Press ENTER to reset all the settings in Picture page Sound Menu To adjust sound It is active in all in...

Page 20: ...ing your TV for the first time Note After auto scan all the channels you need not to do it again when turning on your TV next time Manual Store The function is to give a minute search for possible exi...

Page 21: ...yellow key to erase the channel or press green key to add it When using PROGRAM key the channels you erased will be passed over You may press green key to add the erased channels or use Auto Scan func...

Page 22: ...and Swedish with Reset Press ENTER to reset all the settings in Option page PC Menu to Adjust for PC It is only active in D SUB and HDMI support PC mode When input source is D SUB When input source is...

Page 23: ...s in PC page OSD Menu To setup OSD window It is active in all input sources except the HDMI source which supports HDCP mode H Position To adjust the OSD horizontal position with V Position To adjust t...

Page 24: ...Output 1 pair of RCA L R stereo jack Power Voltage 100 240 VAC 50 60 Hz auto switch Display area Full Scan 826 6 mm H x 467 8 mm V 32 5 H x 18 4 V Temperature 32 F to 104 F 0 C to 40 C Humanity 20 to...

Page 25: ...epaired by a qualified technician Do not remove the LCD TV cabinet There is high voltage parts inside that may cause electric shock even when the power cord is disconnected Stop using the LCD TV if th...

Page 26: ...shock to human bodies Never try to repair your LCD TV yourself Always call your service center or a qualified technician to fix it TROUBLESHOOTING No power Make sure A C power cord is securely connect...

Reviews: