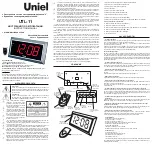
QUICK REFERENCE
1. CLK / MEM
•
Use this button to set the clock
•
Use this button to store radio stations in the memory.
•
Use this button to select the stored radio stations in the memory.
2. MIN /
•
Use this button to adjust the minute in CLOCK or ALARM time
•
Use this button to search the radio station in backward direction.
3. HOUR /
•
Use this button to adjust the hour in CLOCK or ALARM time.
•
Use this button to search the radio station in forward direction.
4. DIMMER (
Use this button to adjust the brightness of the display.)
5. AL2 / − (VOLUME)
•
Use this button to set the alarm time in ALARM 2
•
Use this button to decrease the volume.
6. AL1 / + (VOLUME)
•
Use this button to set the alarm time in ALARM 1
•
Use this button to increase the volume.
7. SOURCE / AL. OFF /
•
Use this button to turn on the unit.
•
Use this button to select AM, FM or AUX mode
•
Use this button to turn the ALARM off after Alarm activates.
8. SNOOZE (SLEEP)
•
Use this button to temporarily suspend the ALARM for a short period.
•
Use this button to set the sleep time.
9. PM INDICATOR
10. ALARM 1 BUZZER INDICATOR (
This indicator shows that the unit is in ALARM 1 buzzer mode.)
11. ALARM 1 RADIO INDICATOR(
This indicator shows that the unit is in ALARM 1 radio mode.)
12. ALARM 2 BUZZER INDICATOR (
This indicator shows that the unit is in ALARM 2 buzzer mode.)
13. ALARM 2 RADIO INDICATOR (
This indicator shows that the unit is in ALARM 2 radio mode.)
14. LED DISPLAY
15. DC JACK (
Connect the unit to the AC/DC adaptor.)
16. FM WIRE ANTENNA (
Extent this wire antenna to obtain better FM broadcasting.)
17. BATTERY COMPARTMENT (
Compartment for the back-up battery.)
-2-