background image


36 

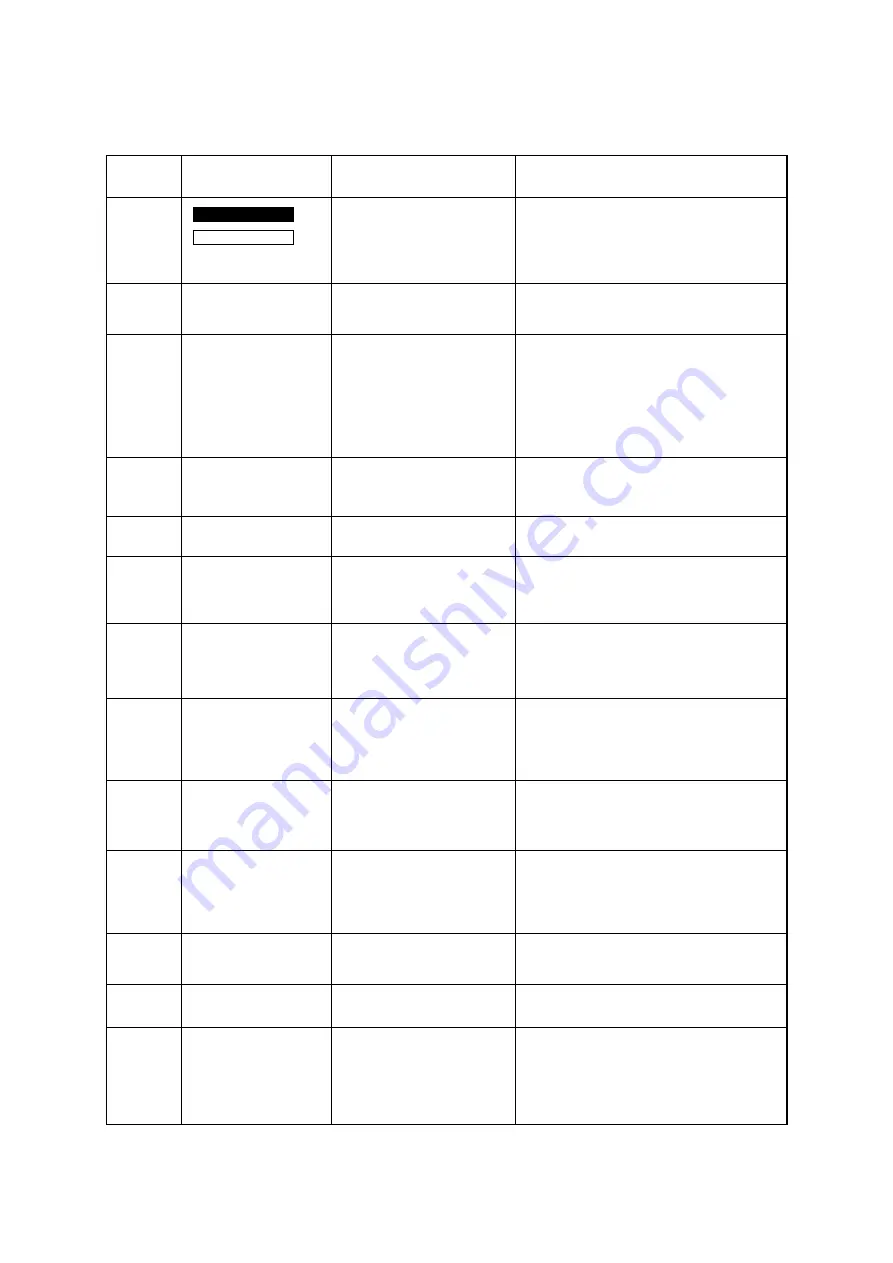
Fault table of lift (oil pump) controller 
 

LED 

code   

PROGRAMMER 

LCD DISPLAY   

EXPLANATION 

POSSIBLE CAUSE 

off 

On 


NO  voltage  or  controller 

is  not  working,  error  (such 

as MCII defective) 


0,1 

■ ¤


controller  work  normally, 

no error 


1,1 

¤ ¤


EEPROM defective 

1.


EEPROM miss data 

2.


EEPROM  data  check  error

use   

programmer  1311  to  change  any 

parameter can delete the error. 

1,2 

¤ ¤¤


Hardware defective 

1.


MOSFET short down. 

2.


Motor circuit is an open circuit. 

2,1 

¤¤ ¤


Low voltage 

Battery voltage is too low. 

2,2 

¤¤ ¤¤


Lifting lock. 

The  function  of  lifting  lock  of  the 

controller is touch off. 

2,3 

¤¤ ¤¤¤


Order 

fault

Startup 

lockout


Any  switch  of  SS1-SS4  closes  earlier 

than KSI or INTERLOCK. 

3,2 

¤¤¤ ¤¤


Contact err 

1.


Main contact bonded


2.


The  set  of  parameter 

―CONTACT 

CNTRL‖

 is wrong. 

3,3 

¤¤¤ ¤¤¤


Pre-charge fault 

1.


Pre-charge circuit work with err. 

2.


Motor short down. 

3,4 

¤¤¤ ¤¤¤¤


Contact has not been 

installed or is not close. 

1.


The  connection  of  main  contact 

coil loose. 

2.


Main contact works abnormally. 

4,1 

¤¤¤¤ ¤


Low -voltage protect. 

The voltage of battery is lower than the 

set value of 

―LOVOLT CUTBACK‖


4,2 

¤¤¤¤ ¤¤


Over-voltage protect. 

The battery voltage is too high. 

4,3 

¤¤¤¤ ¤¤¤


temperature 

protect

over-/under-temp


1.


The  temperature  of  controller  is 

too high or too low. 

2.


Temperature 

sensor 

works 

abnormal. 


Summary of Contents for CPD10J

Page 1: ...8 20 25 30J D1 CPD10 15 18 20 25 30 35J C1 CPD10 15 18 20 25 30 35J C2 CPD40 45 50J D1 CPD40 45 50J C2 1 5t J Series Counterbalanced Battery Forklift Truck SERVICE MANUAL Original Instruction HANGCHA GROUP CO LTD Dec 2010 3rd edition ...

Page 2: ......

Page 3: ... you haven t been trained Our product design will update and perform better so the content in this manual may be not the same as the forklift you owned If you have any questions please keep touches with HANGCHA GROUP CO LTD sales department or let the agents know The meanings of model Truck model Tow electric control Rise electric control Rated capacity t load centre distance mm CPD10 15 18 20 25 ...

Page 4: ......

Page 5: ...1 MASTER CYLINDER 19 3 2 FOOT BRAKE 20 3 3 HAND BRAKE DEVICE 22 4 HYDRAULIC SYSTEM 23 5 LIFTING SYSTEM 27 5 1 DATA 27 5 2 FAULT 28 5 3 MAST 30 5 4 LIFTING CYLINDER 32 5 5 TILTING CYLINDER 32 6 ELECTRICAL SYSTEM 33 6 1 CPD10 15 20 25 30J FORK 33 6 2 CPD10 15 20 25 30 35J C1 CPD10 15 18 20 25 30 35J C2 CPD40 45 50J C2 FORK 37 6 3 CPD10 15 20 25 30J D1 FORK 44 7 MAINTENANCE RECORD 57 ...

Page 6: ......

Page 7: ...ark XQ 5 3A 5 3 45 139 1700 3200 separate excitation F IC01 IP20 60 95 tow XQD 8 2 3D 8 2 45 172 8 1600 3200 series excitation F IC01 IP20 5 65 work CPD20 25J Model Rated Power kw Rated Voltage V Rated Current A Rated speed r m Max Speed r m Excitations Mode Insulation Grade Cooling Mode Protecting Grade Ration m Weight Kg Remark XQ 7A 7 45 180 1200 2400 separate excitation F IC01 IP20 60 112 tow ...

Page 8: ...ated Voltage V Rated Current A Rated speed r m Max Speed r m Excitations Mode Insulation Grade Cooling Mode Protecting Grade Ration m Weight Kg Remark YDQ11 75 4HC 10 6 51 180 1200 AC F IC01 IP20 60 110 tow XQD 10 3D 10 75 161 6 2000 series excitation F IC01 IP20 15 83 work CPD10 15 18J C2 Model Rated Power kw Rated Voltage V Rated Current A Rated speed r m Max Speed r m Excitations Mode Insulatio...

Page 9: ...speed r m Max Speed r m Excitations Mode Insulation Grade Cooling Mode Protecting Grade Ration m Weight Kg Remark TSP180 4 180 48V 10 5 31 280 1200 2000 AC F IC01 IP20 60 135 tow TSW112 4 195 T 48V 11 31 285 2000 3200 AC F IC01 IP20 15 83 work CPD20 25J D1 Model Rated Power kw Rated Voltage V Rated Current A Rated speed r m Max Speed r m Excitations Mode Insulation Grade Cooling Mode Protecting Gr...

Page 10: ...emperature Until on the surface of motor dew 100 Cooling air Must not contain volatile gas most work current of the motor Tractor motor Three times of rated current admit time is one minute Lifting motor steering motor One point eight times of rated current admit time is one minute Admit temperature Rolling bearing Environment temperature not exceed 400 C 950 C From brush box catadrome side to sur...

Page 11: ...ween brush and box is bigger working surface distance between the box and commutator is bigger mice between parts of commutator extrude material of the brush is bad trademark of the brush is wrong Sparkle strong motor overload commutator is unholy commutator is rough or out of round mica or parts of commutator extrude brush seat grinding is bad the pressure of brush is not enough big trademark of ...

Page 12: ...r armature s head A2 motor armature s end F1 Separated Excitation excitation s head F2 Separated Excitation excitation s end Connection mode Series excitation motor Separate excitation motor series excitation motor A1 motor armature s head A2 motor armature s end D1 shunt excitation s head D2 shunt excitation s end ...

Page 13: ...f must make out marker can become flexible bolt When the brush s shelf reposition aim at marker line screw down bolt in order to keep brush in the former neutral location winding isolating resistance should check of fix a date when near work s temperature under rule data otherwise should put up dry fix a date open window shutter check inside part whether transmutation and reverse partial circs whe...

Page 14: ...one grade planet gear So the gear box is very small Trouble Probably cause Method of troubleshooting When traveling or change direction Gear clearance is too big Too much worn of gear Adjust Replace Too much noise when traveling Oil level is low Gear clearance is too big Too much worn of gear Add oil Adjust Replace 1 Box 2 Bearing pedestal 3 Bolt 4 Bearing pedestal 5 O joint ring 8 Dual articulate...

Page 15: ...ight Kg 125 130 195 198 202 208 350 380 1 3 2 Trouble diagnoses and corrections condition Probable cause Corrective action Abnormal noises loose driving axle and body connecting blots loose wheel nut worn or damaged wheel hub bearing wheel hub bearing not properly adjusted worn axle shaft spliner insufficient lubrication Tighten Tighten Replace Adjust Replace Lubricate Unstable driving loose wheel...

Page 16: ...earing 15 Adjusting nut 16 Lock nut 17 Pin 18 Paper shim 19 Oil seal 20 Axle case 21 Supporter Tighten torque N m 1 1 8t 2 3t 4 5t Axle shaft bolt A 44 58 73 5 88 3 105 156 Trig soleplate bolt B 76 107 118 147 157 176 nut connecting brake drum and hub C 260 347 324 373 324 373 Bolt and nut connecting support plate and truck body D 260 347 324 373 324 373 Tyre nut E 157 176 441 588 441 588 ...

Page 17: ...device 10 Remove bolts securing axle mounting bracket to frame see fig 5 2 11 Remove nuts securing axle case to differential gear carrier see fig 5 3 12 Remove driving axle assemble Fig 1 1 Fig 1 2 Fig 1 3 13 Remove brake drum remove wheel hub 14 Remove axle mounting bracket and brake component from axle tube 15 Remove oil seal from axle tube 16 To install driving axle assemble in the reverse orde...

Page 18: ... contract brake shoe lining refer to Fig 5 5 b evenly tapping on brake drum with brass bar or wooden mallet Fig 1 4 Fig 1 5 5 Remove wheel hub be careful not to drop bearing inner race 6 Remove oil seal and inner bearing as an assembly by evenly tapping on periphery of seal with a wooden mallet and brass bar 7 Remove bearing outer race from wheel hub by evenly tapping on its periphery with a woode...

Page 19: ...lock nut until it can no longer be rotated with one hand then turn back approx 600 6 Install snap ring and settles down felt ring install lock washer so as to set its hole in the pin of snap ring Screw lock nut 7 Turn wheel hub back and forth two or three rotations to see if rotation starting torque is within specifications Rotation starting force 10 29N refer to Fig 1 6 8 Measure axial play of wh...

Page 20: ...gs steering gear priority valve clamp bolt and hydraulic switch etc You can adjust the steering angle forward and backward by yourself Refer to fig 2 1 1 Steering wheel 3 Upside steering column 8 Gimbal 10 Down side steering axle 12 Bearing 13 Snap ring 14 Down side steering column 17 Steering gear 18 Priority valve 19 Clamp bolt 22 Clamp lever 26 Hydraulic switch Fig 2 1 Steering device ...

Page 21: ...loose 1 8 1 6 rotations Kingpin adjusting washer thickness mm Part No Or wheel hub rotation starting torque at hub blot 10 29 8N 0 10 0 30 0 70 N163 220012 000 Axial play mm Less than 0 10 Truck type 1 1 8t 2 2 5t 3 3 5t 4 5 t weight Kg 66 68 96 99 98 100 135 150 2 2 2 Trouble diagnoses corrections condition Probable cause Corrective action Unstable driving loose wheel nut wheel bearing out of adj...

Page 22: ...16 ...

Page 23: ...2 2 4 Kingpin and steering spindle 1 Remove rod 2 Loose lock bolts See fig 2 2 3 Remove grease nipples on kingpin 4 Remove kingpin Caution Hold kingpin to prevent it from dropping See fig 2 3 5 Take off spindle thrust bearing and shim Fig 2 2 Fig 2 3 INSPECTION 1 Replace spindle if cracked 2 Replace bearing if its rollers or roller surfaces are rusted or nicked 3 Replace steel sleeve if it distort...

Page 24: ...r of roller bearing also apply grease between lip and groove of seal tape 5 pack all grease nipple with a sufficient 2 2 5 Wheel bearing adjustment 1 Slowly rotate hub Tighten steering spindle nut until it can no longer be rotated with one hand 2 From that position turn back steering spindle nut 1 6 1 4 rotation Measure hub bolt force is 10 30N 3 Make sure that hub rotates smoothly and that its ax...

Page 25: ...ed outwards This brings the brake shoes into contact with the wheel drum and slows or stops the lift truck Meanwhile the cavity caused behind the piston is filled with brake fluid led through the return port and inlet port to lubricate the piston When the brake pedal is released the piston is forced back by the return spring At the same time the brake fluid in each wheel cylinder is pressurized by...

Page 26: ... Cylinder return spring 4 Rubber cap 5 Piston 6 Cylinder dust cover 7 Push rod 8 Air bleeder cap 9 Air bleeder screw 10 Brake shoe assemble front 11 Brake shoe assemble rear 12 Guider 13 Adjuster cable 14 Adjusting bolt 15 Pawl 16 Spring 17 Brake shoe return spring 18 Return spring 19 Parking brake rod 20 Strut level 21 Spring 22 Bolt 23 Washer 24 Snap ring 25 Guider 26 Spring support rod 27 Sprin...

Page 27: ...nd frame 8 Stop engine 9 Remove wheel tire nuts and brake drum 10 Replace brake shoes with new ones 11 Install brake drum 12 Adjust shoe to drum clearance Remove adjusting hole plug on the bottom of the brake assemble Insert a flat blade screwdriver to adjusting hole turn adjusting ratchet wheel downward to expand the brake shoes until wheel hub can not be turned by hand Move the ratchet wheel 2 3...

Page 28: ...n use hand brake to stop the truck condition Probable cause Corrective action Insufficient brake force Oil leakage in brake lines Air in brake lines Improper functioning of master cylinder or wheel cylinder Clogged oil lines Correct and replenish Bleed air Correct or replace Clean Brake dragging No free play of brake pedal Faulty piston cup Weak or broken return springs Clogged master cylinder ret...

Page 29: ...essure line so as to make mast tilt forward or backward Main pump Trouble Probable cause Corrective action No oil from oil pump Low oil level in tank Add oil to specified level Clogged suction pipe or strainer Clean oil line and tank If oil is dirty change Low discharge pressure on oil pump Worn bearing damaged backup ring and O ring Replace faulty parts Maladjusted relief valve Readjust to specif...

Page 30: ... tilt relief valve assembly Lowering distance of mast is big when spool valve is in the centre Valve body and spool valve is worn and clearance between them is too great Replace spool valve with specified clearance Spool valve is not in centre Keep being in the centre Cylinder seal abated Examine and repair cylinder Taper valve is worn or blocked by dirt Replace or clean taper valve Spool valve is...

Page 31: ...e main relieve valve is all right Otherwise adjust it as step 3 3 If the forklift can t work enhance the pressure main relieve valve remove the front soleplate loosen the tightening nut of the main relieve valve screw the adjusting nut clockwise to enhance the pressure of the main relieve valve If the height of lift is higher than 300mm screw the adjust nut anti clockwise to reduce the pressure 4 ...

Page 32: ...onnage Items 1 3t 1 5t 1 8 3 5t 4 5t The max input pressure of redirector 16MPa 16MPa 16MPa 16MPa Main safety valve pressure of multi spool control valve 12 MPa 15 MPa 17 5 MPa 18 5 MPa Rated pressure of gear pump 20 MPa 20 MPa 20 MPa 20 MPa ...

Page 33: ...l or Lifting capacity N m Lift chain lock nut 1 1 5t 127 157 M16 245 314 M20 single chain 2 3t 176 216 M18 245 314 M20 Mast support cap blot 1 1 5t 89 118 M14 2 3t 176 216 M18 Tilt cylinder lock nut 1 1 5t 89 118 M14 2 3t Lift cylinder bolt head 1 3t 76 107 M12 Lift cylinder bolt toe 1 1 5t 22 29 M8 2 3 5t 44 58 M10 Lift cylinder fixing bolt U type 1 1 5t 14 18 M8 2 3t 29 39 M10 Weight of basal ma...

Page 34: ...nd mast Adjust clearance with rollers 3 Biting foreign materials between moving part Remove foreign materials 4 Insufficient lubrication Apply grease on contact surfaces of sliding parts butter 5 Bent carriage bracket assembly Repair or replace Forks are lifted unevenly 1 Lift chains out of adjustable Adjust lift chains Lift roller does not rotate 1 Grease stiffened or dirt accumulated on lift rol...

Page 35: ...e hydraulic control valve resulting in excessive oil leaks Replace 5 Oil leaks occur between the hydraulic control valve sections Dismantle for regrinding the joint surfaces and reassemble the valve 6 Leakage occurs in the hydraulic pipe Tighten the joint nuts and inspect the seal for damage 7 The hydraulic oil temperature is too high Oil viscosity is too low and the rate is insufficient Change th...

Page 36: ...view 1 Outer mast 2 Inner mast 3 Back rest 4 Fork arm carrier 5 Fork 6 Chain 7 Left lifting cylinder 8 Right lifting cylinder 9 Tilting cylinder 10 Idler wheel Fig5 2 Double full free lift mast 1 Outer mast 2 Inner mast 3 Chain 4 Free lifting cylinder 5 Fork arm carrier 6 Fork 7 Left lifting cylinder 8 Right lifting cylinder 9 Fork arms 10 Tilt cylinder ...

Page 37: ... 6 Fork 7 Sideway cylinder 8 Left rise cylinder 9 Right rise cylinder 10 Fork arms 11 Tilt cylinder Fig 5 4 Triple full free lift mast 1 Outer mast 2 Inner mast 3 Chain 4 Free lifting cylinder 5 Fork arm carrier 6 Fork 7 Sideway cylinder 8 Left rise cylinder 9 Right rise cylinder 10 Fork arms 11 Tilt cylinder ...

Page 38: ...port ring 14 Back up rings 15 OSI ring 16 Valve guide 17 Snap ring 18 Steel axletree 19 Blowout patch 20 Adjusting washer 5 5 Tilting cylinder Fig 5 6 Tilting cylinder 1 Retaining ring 2 Knuckle bearing 3 Support 4 Lubrication nipple 5 Nut 6 Bolt 7 dust proof 8 Cylinder 9 Guide 10 U ring 11 O ring 12 Piston rod 13 O ring 14 Thimble 15 U ring 16 Piston 17 Cylinder body 18 Washer 19 Nut 20 Pin 21 bo...

Page 39: ...ontrollers the 1244 offers superior operator control of the vehicle s motor drive speed Features include _ Full bridge field and half bridge armature power MOSFET design providing Infinitely variable forward reverse drive and brake control Silent high frequency operation High efficiency _ Regenerative braking providing longer operation on a single battery charge and reducing motor brush wear and m...

Page 40: ...n each mode _ Continuous diagnostics during operation with microprocessor power on self test _ Internal and external watchdog circuits ensure proper software operation _ Programmable coil drivers provide adjustable contactor pull in and holding voltages _ Hour meter enable output is active whenever the controller is providing motor current _ Optional Electromagnetic Brake Driver provides automatic...

Page 41: ...nputs 2 Wrong START LOCKOUT type selected 3 Misadjusted throttle pot 4 Sequencing delay too short 3 1 CONT DRVR OC cont driver output over current 1 Contactor coil shorted 3 2 MAIN CONT WELDED welded main contactor 1 Main contactor stuck closed 2 Main contactor driver shorted 3 3 PRECHARGE FAULT internal voltage too low at startup 1 Controller defective 2 External short or leakage path to B on ext...

Page 42: ... lifting lock of the controller is touch off 2 3 Order fault Startup lockout Any switch of SS1 SS4 closes earlier than KSI or INTERLOCK 3 2 Contact err 1 Main contact bonded 2 The set of parameter CONTACT CNTRL is wrong 3 3 Pre charge fault 1 Pre charge circuit work with err 2 Motor short down 3 4 Contact has not been installed or is not close 1 The connection of main contact coil loose 2 Main con...

Page 43: ...OTECTION FEATURES Reverse Polarity of the battery Connection errors All inputs are protected against connections errors Current overload protection it have detecting element control peak current Thermal protection If the controller temperature exceeds 85 C the maximum current reduces in proportion to the thermal increase The temperature can never exceed 115 C If the electric machinery temperature ...

Page 44: ...ity drive reclaim part of electric energy prolong work time of every time control speed during downgrade speed lie on accelerator if speed exceed set point controller may automatic braking this give optimal ramp Notice 1 Maintain electric control must first cut off electrical source then hold 10 100ohmic resistance join controller anode and cathode release residual voltage in the capacitor or else...

Page 45: ...connection stud that prevents the capacitor bank from charging 2 See 1311 menu Monitor Battery Capacitor Voltage 1 5 Controller Severe Undertemp 1 Controller is operating in an extreme environment 2 See 1311 menu Monitor Controller Temperature 1 6 Controller Severe Overtemp 1 Controller is operating in an extreme environment 2 Excessive load on vehicle 3 Improper mounting of controller 4 See 1311 ...

Page 46: ...nce too high for given regen current 4 Battery disconnected while regen braking 5 See 1311 menu Monitor Battery Capacitor Voltage 2 5 5V Supply Failure 1 External load impedance on the 5V supply pin 26 is too low 2 See 1311 menu Monitor outputs 5 Volts and Ext Supply Current 2 6 Digital Out 6 Overcurrent 1 External load impedance on Digital Output 6 driver pin 19 is too low 2 7 Digital Out 7 Overc...

Page 47: ... short on driver load 2 Dirty connector pins 3 Bad crimps or faulty wiring 3 5 PD Open Short 1 Open or short on driver load 2 Dirty connector pins 3 Bad crimps or faulty wiring 3 6 Encoder Fault 1 Motor encoder failure 2 Bad crimps or faulty wiring 3 See 1311 menu Monitor Motor Motor RPM 3 7 Motor Open 1 Motor phase is open 2 Bad crimps or faulty wiring 3 8 Main Contactor Welded 1 Main contactor t...

Page 48: ...sequence 2 Faulty wiring crimps or switches at KSI interlock direction or throttle inputs 3 See 1311 menu Monitor Inputs 4 7 Emer Rev HPD 1 Emergency Reverse operation has concluded but the throttle forward and reverse inputs and interlock have not been returned to neutral 4 9 Parameter Change Fault 1 This is a safety fault caused by a change in certain 1311 parameter settings so that the vehicle ...

Page 49: ...type parameter value is out of range 9 2 EM Brake Failed to Set 1 Vehicle movement sensed after the EM Brake has been commanded to set 2 EM Brake will not hold the motor from rotating 9 3 Limited Operating Strategy LOS 1 Limited Operating Strategy LOS control mode has been activated as a result of either an Encoder Fault Code 36 or a Stall Detect Fault Code 73 2 Motor encoder failure 3 Bad crimps ...

Page 50: ...ent overload protection It have detecting element control peak current Thermal protection If the controller temperature exceeds 85 C the maximum current reduces in proportion to the thermal increase The temperature can never exceed 115 C If the electric machinery temperature exceeds 145 C the maximum current reduces in proportion to the thermal increase The temperature can never exceed 165 C Low B...

Page 51: ... speed during downgrade speed lie on accelerator if speed exceed set point controller may automatic braking this give optimal ramp Notice 1 Maintain electric control must first cut off electrical source then hold 10 100ohmic resistance join controller anode and cathode release residual voltage in the capacitor or else you may meet tip and run danger 2 Magnetic and radiation have some effect to inv...

Page 52: ...Less than 24 8V 8s KEY ON OFF OFF KEY OFF Detected by VMC20 not by ACS 108 ACS under voltage Voltage limit Parameter for more than 0 8sec KEY ON OFF OFF KEY OFF Detected by VMC20 not by ACS 109 Battery over voltage More than 65V 0 8s KEY ON OFF OFF KEY OFF Detected by VMC20 not by ACS 110 ACS over voltage Voltage limit Parameter for more than 0 8sec KEY ON OFF OFF KEY OFF Detected by VMC20 not by ...

Page 53: ...se ACS does not respond at startup KEY ON OFF ON ON KEY OFF Check CAN bus wiring 257 ACS PDO timeout ACS CAN open timeout detected by VMC20 KEY ON OFF ON ON KEY OFF Check CAN bus wiring 258 ACS SDO error ACS SDO error wrong SW version KEY ON OFF ON ON KEY OFF Check SW version 259 CANopen timeout ACS CAN open timeout detected by VMC20 KEY ON OFF ON ON KEY OFF Check CAN bus wiring 260 ACS low voltag...

Page 54: ...or Speed feedback sensor not connected short circuit KEY ON ON ON ON KEY OFF or sensor connected ACS can not control speed correctly No driving allowed 208 ACS high voltage warning ACS voltage 68V KEY ON ON ON ON KEY OFF or voltage back to normal Lowest Accel will be used 209 ACS low voltage warning ACS voltage 22 5V KEY ON ON ON ON KEY OFF or voltage back to normal Lowest Accel will be used 210 A...

Page 55: ...out detected by VMC20 KEY ON OFF ON ON KEY OFF Check CAN bus wiring 358 ACS SDO error ACS SDO error wrong SW version KEY ON OFF ON ON KEY OFF Check SW version 359 CANopen timeout ACS CAN open timeout detected by VMC20 KEY ON OFF ON ON KEY OFF Check CAN bus wiring 360 ACS low voltage trip ACS voltage 15V KEY ON OFF ON ON KEY OFF Instantaneous voltage 361 ACS high voltage trip ACS voltage 68V softwa...

Page 56: ...owed 308 ACS high voltage warning ACS voltage 68V KEY ON ON ON ON KEY OFF or voltage back to normal Lowest Accel will be used 309 ACS low voltage warning ACS voltage 22 5V KEY ON ON ON ON KEY OFF or voltage back to normal Lowest Accel will be used 310 ACS default values loaded Default parameters are used in ACS KEY ON ON ON ON KEY OFF Turn the key switch off and on again 311 Power reduce Power is ...

Page 57: ...51 ...

Page 58: ...52 WIRING DIAGRAM OF CPD10 15 18 20 25 30J ...

Page 59: ...53 ...

Page 60: ...54 ELECTRICAL SYSTEM PRINCIPLE DIAGRAM OF CPD10 15 18 20 25 30 40 45 50J C2 ...

Page 61: ...55 ELECTRICAL SYSTEM PRINCIPLE DIAGRAM OF CPD10 15 18 20 25 30 40 45 50J D1 ...

Page 62: ...56 WIRING DIAGRAM OF CPD10 15 18 20 25 30J D1 E 1 S P h 8 m k 2 3 T B A D E 1 2 5 4 0 P WIRING DIAGRAM OF CPD10 15 18 20 25 30 40 45 50 J D1 ...

Page 63: ...57 7 Maintenance record Date Maintain content Maintainer ...

Page 64: ...acturing site 88 Donghuan Road LinAn Econimic Development zone Zhejiang P R China ZIP 311305 Registered Address 398 Shi Qiao Road Hangzhou P R China ZIP 310004 Fax 0086 571 88926789 0086 571 88132890 Web http www hcforklift com E mail sales hcforklift com ...

Reviews: