background image

CONTENTS

Warranty & Warranty Registration Card . . . . . . . . . . . . . . . . . . . . . . . . . . . . . . . . . . . . . . . . . . . . . . . .1-2

Manufacturers Statement . . . . . . . . . . . . . . . . . . . . . . . . . . . . . . . . . . . . . . . . . . . . . . . . . . . . . . . . . . . . . 2

Dealer Pre-Delivery Checklist . . . . . . . . . . . . . . . . . . . . . . . . . . . . . . . . . . . . . . . . . . . . . . . . . . . . . . . 3-4

Dealer Delivery Checklist . . . . . . . . . . . . . . . . . . . . . . . . . . . . . . . . . . . . . . . . . . . . . . . . . . . . . . . . . . . 5-6

Safety Information - Be Alert Symbol . . . . . . . . . . . . . . . . . . . . . . . . . . . . . . . . . . . . . . . . . . . . . . . . . . . . 7

Safety Information - Explanation of Safety Signs . . . . . . . . . . . . . . . . . . . . . . . . . . . . . . . . . . . . . . . . . . 8

Safety Decals . . . . . . . . . . . . . . . . . . . . . . . . . . . . . . . . . . . . . . . . . . . . . . . . . . . . . . . . . . . . . . . . . . . . 9-10

Safety Information - Warning - Owner Must Read and Understand . . . . . . . . . . . . . . . . . . . . . . . . . . . 11

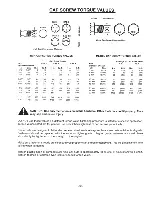
Cap Screw Torque Values . . . . . . . . . . . . . . . . . . . . . . . . . . . . . . . . . . . . . . . . . . . . . . . . . . . . . . . . . . . . 12

Set-Up & Assembly . . . . . . . . . . . . . . . . . . . . . . . . . . . . . . . . .  . . . . . . . . . . . . . . . . . . . . . . . . . . . . . . . 13

Transporting . . . . . . . . . . . . . . . . . . . . . . . . . . . . . . . . . . . . . . . . . . . . . . . . . . . . . . . . . . . . . . . . . . . . . . . . 13

Preparing for Operation . . . . . . . . . . . . . . . . . . . . . . . . . . . . . . . . . . . . . . . . . . . . . . . . . . . . . . . . . . . . . . 14

Operation . . . . . . . . . . . . . . . . . . . . . . . . . . . . . . . . . . . . . . . . . . . . . . . . . . . . . . . . . . . . . . . . . . . . . . 15-16

Adjustments . . . . . . . . . . . . . . . . . . . . . . . . . . . . . . . . . . . . . . . . . . . . . . . . . . . . . . . . . . . . . . . . . . . 17-18

Service . . . . . . . . . . . .  . . . . . . . . . . . . . . . . . . . . . . . . . . . . . . . . . . . . . . . . . . . . . . . . . . . . . . . . . . . . . . . . 19

Optional Equipment . . . . . . . . . . . . . . . . . . . . . . . . . . . . . . . . . . . . . . . . . . . . . . . . . . . . . . . . . . . . . . 20-21

Lubrication Guide . . . . . . . . . . . . . . . . . . . . . . . . . . . . . . . . . . . . . . . . . . . . . . . . . . . . . . . . . . . . . . . . 22-23

Trouble Shooting . . . . . . . . . . . . . . . . . . . . . . . . . . . . . . . . . . . . . . . . . . . . . . . . . . . . . . . . . . . . . . . . . . . . 24

Decal Location . . . . . . . . . . . . . . . . . . . . . . . . . . . . . . . . . . . . . . . . . . . . . . . . . . . . . . . . . . . . . . . . . . 25-27

Service Notes . . . . . . . . . . . . . . . . . . . . . . . . . . . . . . . . . . . . . . . . . . . . . . . . . . . . . . . . . . . . . . . . . . . . . . . 28

Specifications . . . . . . . . . . . . . . . . . . . . . . . . . . . . . . . . . . . . . . . . . . . . . . . . . . . . . . . . . . . . Inside Back Cover

Summary of Contents for 3131

Page 1: ...RATION OR MAINTENANCE OF THIS EQUIPMENT CAN RESULT IN SERIOUS INJURY OR DEATH HSMFG1215 Part 75898 3131 3137 3143 3131 3137 3143 3131 3137 3143 3131 3137 3143 3131 3137 3143 OPERA OPERA OPERA OPERA OP...

Page 2: ...ation Explanation of Safety Signs 8 Safety Decals 9 10 Safety Information Warning Owner Must Read and Understand 11 Cap Screw Torque Values 12 Set Up Assembly 13 Transporting 13 Preparing for Operatio...

Page 3: ......

Page 4: ......

Page 5: ...s See Lubrication Chapter of this manual for details Hoses and fittings if applicable are properly attached and there are no visible leaks All drive chains are adjusted to proper tension See Adjustmen...

Page 6: ...4 Intentionally Left Blank...

Page 7: ...delivery inspection was made Explain to the customer all the safety precautions they must exercise when operating this unit Explain recommended loads for different types of materials Explain to custom...

Page 8: ...6 Intentionally Left Blank...

Page 9: ...R YOUR PERSONAL SAFETY IS INVOLVED TAKE TIME TO BE CAREFUL REMEMBER THE CAREFUL OPERATOR IS THE BEST OPERATOR MOST ACCIDENTS ARE CAUSED BY HUMAN ERROR CERTAIN PRECAUTIONS MUST BE OBSERVED TO PREVENT T...

Page 10: ...ORMATION OBSERVE MAXIMUM TRANSPORT SPEED The maximum transport speed for this implement is 32 km h 20 m p h Some tractors are capable of operating at speeds that exceed the maximum transport speed of...

Page 11: ...9 SAFETY INFORMATION...

Page 12: ...10 SAFETY INFORMATION...

Page 13: ...ONNEL OTHER THAN THE QUALIFIED OPERATOR NEAR THE MACHINE Before starting tractor be sure PTO shields turn freely and PTO is securely locked to tractor DO NOT clean adjust or lubricate the machine when...

Page 14: ...12...

Page 15: ...Note Determine right and left side of spreader by viewing it from the rear If instructions or parts lists call for hardened bolts refer to Cap Screw Torque Value page to identify 13 PREPARING MANURE S...

Page 16: ...e the drawbar so that the hitch pin hole is directly below the power drive line TRACTOR CONNECTIONS If this implement is attached to a tractor with a clevis hitch hammer strap style drawbar the hammer...

Page 17: ...ise the hydraulic endgate 3 Engage the tractor PTO shaft slowly 4 Increased apron speed if desired can be accomplished by steadily pulling on the rope until it stops Speed select indicator should now...

Page 18: ...peed control valve on Manure Spreader 4 Control speed of apron by turning speed control handle clockwise to increase speed counter clockwise to decrease speed 5 When the Manure Spreader is almost empt...

Page 19: ...SPEED CLUTCH If clutch control yoke becomes worn it may be necessary to adjust the high speed clutch so it engages and disengages completely Adjustment to compensate for this wear is made by sliding s...

Page 20: ...with the ends of the bed The apron will be damaged if the machine is operated with one end of the apron slats running ahead of the opposite end Do not tighten the apron chains excessively 18 BEATER CL...

Page 21: ...mal apron speeds at 540 RPM are low speed 4 1 2 fpm high speed and clean out position 8 1 2 fpm If the apron is not moving at these speeds especially in high or clean out check and replace the high sp...

Page 22: ...e used with hydraulic endgate 2nd HYDRAULIC ENDGATE CYLINDER 3131 The H S 3131 manure spreader is equipped with brackets to accept an optional second cylinder to raise and lower the hydraulic endgate...

Page 23: ...E An optional hydraulic drive unit is available to convert from two speed to variable speed hydraulic drive Hydraulic drive may be used as a two or four hose tractor hook up Front Control Panel Hydrau...

Page 24: ...DRIVE CHAINS Lubricate the drive chains with a light machine oil Keep chains aligned with sprockets this will lengthen the life of the sprockets and chain Lubricate chains often GENERAL INFORMATION I...

Page 25: ...Chapter and tighten the castellated nut on the spindle to the point where there is no end play and a slight drag on the bearings Replace the cotter key with a new one of the correct size bend cotter p...

Page 26: ...Stay Clear of Beater 111593C 2 Warning Stay Clear of Endgate 12794 2 Warning Do Not Remove Shields 11211176 2 Shear Bolts 311 1 Patent Number 3187 1 Speed Indicator Only on if equipped with hydraulic...

Page 27: ...72106 S3137 S3143 1494K 111593A 12794 11593C 1494J DCAMB 71494A UNDER SHIELD 311 1494B 93466 1494L 71494A 82602 9194A 71188B 1494B 72097 1494J 11599 54033 9194B 72203A DCAMB 3187 HYDRAULIC DRIVE DECA...

Page 28: ...LOCATION DCRED 11211176 1494A 111593C 1494B 9194A 1494B DCAMB 72102 S3131 72105 S3137 S3143 3494A DCAMB 3494A 1494J 1494H 111593A 093020 1494A UNDER SHIELD 72114 3131 72107 3137 72108 3143 11211176 09...

Page 29: ...ot Turning Engage Tractor PTO Main Drive Shear Bolt Sheared Replace Main Drive Shear Bolt Front Drive Chain Off Broken Replace or Repair Front Drive Chain or Missing Apron Only Drives In Low High Spee...

Page 30: ...SERVICE NOTES 28...

Page 31: ...295 75R22 5 Tires 4190 Lbs 4920 Lbs N A Weight w 16 5 x 16 1 Tires 4200 Lbs 4930 Lbs 5220 Lbs Capacity Old Rating 310 Bu 370 Bu 430 Bu Capacity Cu Ft Struck Level 185 235 275 Rear Hydraulic Endgate S...

Page 32: ...H S MFG H S MFG H S MFG H S MFG H S MFG CO CO CO CO CO products approved for the FEMA FEMA FEMA FEMA FEMA SEAL OF Q SEAL OF Q SEAL OF Q SEAL OF Q SEAL OF QU U U U UALITY ALITY ALITY ALITY ALITY...

Reviews: