
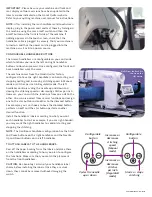

Cycles the needle
up or down
Configurable
button
Increases or
decreases
stitching
speed
(Manual
mode)
Increases or
decreases
stitches
per inch
(Regulated
mode)
Configurable
button
Starts or stops
stitching
IMPORTANT:
Please be sure your machine and front and
rear display software versions have been updated to the
latest versions indicated on the Handi Quilter website.
Refer to your quilting machine user manual for instructions.
NOTE:
After installing the rear handlebars and touchscreen
display, plug in the power cord and test them by turning on
the machine using the rear on/off switch and then the
on/off button on the front left side of the machine. If
nothing appears on the touch screen, check that the
handlebar cable is plugged in securely, that your machine is
turned on, and that the power cord is plugged into the
machine as well as into a power source.
The Amara handlebars are configurable so you can decide
which functions you want the left and right handlebar
buttons to do when pressed. Once configured, the front and
back handlebars work the same.
Install the handlebar labels according to what you want
each handlebar to do. For example, if you are right-handed,
you may want the right handlebar to control starting and
stopping the stitching.
NOTE:
The traditional handlebar configuration has the Start
and Pause buttons on the right handlebar and the Needle
Up and Down buttons on the left handlebar.
The machine comes from the Handi Quilter factory
configured to have the right handlebar control starting and
stopping quilting and increasing stitching speed in Manual
mode or stitches per inch in Regulated mode. The left
handlebar controls cycling the needle up and down and
slowing the stitching speed or decreasing stitches per inch.
However, you can switch the functions from one side to the
other. You can also select from several functions and assign
one to the star button and another to the diamond button.
For example, you can choose to have the diamond button
perform a tieoff and the star button perform another
desired function.
CONFIGURABLE HANDLEBAR BUTTONS
Quilt From the Back Kit
shown on the
HQ Amara
Peel off the paper backing from the labels and place them
on the handlebars according to how you plan to configure
the functions. Make sure that you match the placement
from the front handlebars.
CAUTION:
Be absolutely certain of your handlebar label
choice before installing the labels. Once they are stuck
down, they cannot be removed without damaging the
switch.
TO ATTACH LABELS TO THE HANDLEBARS
PART# QM29252-04 • 0718