background image

Dolphin® 7850 Series User’s Guide–
Preliminary

Rev (b)

5/15/2007

3 - 3

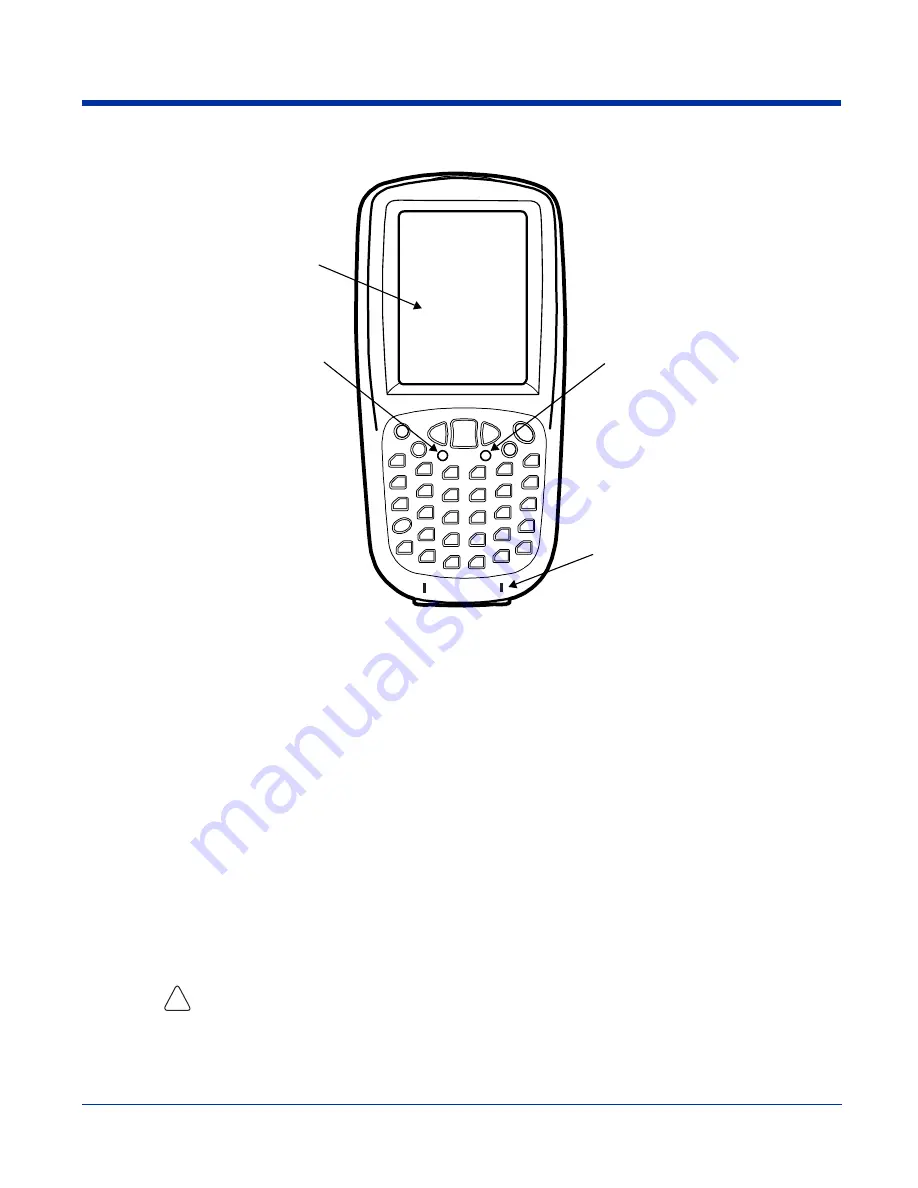
Front Panel Features

Decode and Scan LEDs

The Scan LED lights red when you press the Scan trigger in scanning applications.
The Decode LED lights green when a scanned bar code is successfully decoded.

For more information, see 

LEDs

 on page 

4-1.

Keyboard Protection Ribs

These ribs protect the keyboard and prevent keys from being pressed accidentally when the terminal is placed 
facedown on a flat surface. For a complete overview of each keyboard, see 

Using the Keyboards

 on page 

4-1.

Touch Panel Display

The 3.5 inch 1/4 VGA (Video Graphic Array) display is a 262-, 144-color, transflective LCD (Liquid Crystal Display) 
in TFT (Thin Film Transistor) color with a 240 x 320 resolution. The LCD is covered by an industrial touch screen 
lens for maximum durability and backlit for maximum viewability; see 

Backlight

 on page 

6-7.

Hand Held Products recommends using a screen protector with the touch panel. Screen protectors help prevent 
wear and damage and also protect the touch panel; especially when used with applications that require high-volume 
interfacing with the touch panel. We expect users to replace the screen protector at regular intervals when the 
screen protector is becoming worn or punctured. 

For touch panel input, use the stylus included with the terminal or your finger. The method you choose depends on 
which one is most appropriate for your application. While there is a great deal of variation in different applications, 
use of the supplied stylus provides greater touch screen accuracy; see 

Using the Stylus

 on page 

2-3.

Use of objects, such as paper clips, pencils, or ink pens on the touch screen can damage the touch panel 
and will void the warranty. 

Decode LED


Scan LED

3.5 inch 1/4 VGA Touch 
Panel Display

Keyboard Protection Ribs

!

Summary of Contents for Dolphin 7850 Series

Page 1: ...User s Guide Preliminary Dolphin 7850 Series Microsoft WindowsMobile 5 0 ...

Page 2: ...ment may be photocopied reproduced or translated into another language without the prior written consent of Hand Held Products 2007 Hand Held Products Inc All rights reserved Web Address www handheld com Trademarks Dolphin Dolphin RF HomeBase Mobile Base and QuadCharger are trademarks or registered trademarks of Hand Held Products Inc Microsoft Windows Windows Mobile Windows CE Windows NT Windows ...

Page 3: ...hanical Connector 3 8 Battery Power 3 9 Main Battery Pack 3 9 Internal Backup Battery 3 10 Resetting the Terminal 3 13 Soft Reset Warm Boot 3 13 Hard Reset Cold Boot 3 13 Suspend Mode 3 13 Dolphin 7850 Technical Specifications 3 14 Chapter 4 Using the Keyboards Overview 4 1 Using the Function Keys 4 2 Using the Navigation Keys 4 3 Using the Modifier Keys 4 3 24 Key Keyboard 4 4 Toggling Between Al...

Page 4: ...eSync 7 3 Connections Tab 7 6 Connecting the Terminal to a Wireless Network 7 7 Connecting the Terminal to an ISP 7 7 Adding Programs From the Internet 7 7 Using Infrared Communication 7 8 Connections Manager 7 10 Network Cards 7 12 Radio Manager 7 13 USB to PC 7 14 Chapter 8 Wireless LAN Communication with 802 11g Overview 8 1 Enabling the 802 11g Radio 8 1 Configuring the 802 11g Radio 8 1 Openi...

Page 5: ...arging the Main Battery 10 6 ActiveSync Communication 10 7 RS 232 Cables 10 8 Mounting the Dolphin HomeBase 10 9 Chapter 11 Dolphin QuadCharger Overview 11 1 Front Panel 11 1 Back Panel 11 2 Inserting and Removing Battery Packs 11 2 Supplying Power to the QuadCharger 11 3 Charging Batteries in the QuadCharger 11 3 Recommendations for Storing Batteries 11 3 Using the Battery Analyzer 11 4 Bottom Pa...

Page 6: ...7850 Series User s Guide Preliminary Technical Assistance 13 1 Online Technical Assistance 13 1 For Further Information 13 1 Product Service and Repair 13 2 Online Product Service and Repair Assistance 13 2 Limited Warranty 13 3 ...

Page 7: ...n tested in accordance with and complies with EN60825 1 1993 A1 A2 and 21 CFR 1040 10 and 1040 11 except for deviations pursuant to Laser Notice No 50 dated July 26 2001 LASER LIGHT DO NOT STARE INTO BEAM CLASS 2 LASER PRODUCT 1 0 mW MAX OUTPUT 650nM Caution use of controls or adjustments or performance of procedures other than those specified herein may result in hazardous radiation exposure LED ...

Page 8: ... 23 EEC and 93 68 EEC Low Voltage Directive For further information please contact Hand Held Products Inc Nijverheidsweg 9 5627 BT Eindhoven The Netherlands Hand Held Products shall not be liable for use of our product with equipment i e power supplies personal computers etc that is not CE marked and does not comply with the Low Voltage Directive Parameter Specification U S A Canada European Commu...

Page 9: ... a circuit different from that to which the receiver is connected Consult the dealer or an experienced radio TV technician for help If necessary the user should consult the dealer or an experienced radio television technician for additional suggestions The user may find the following booklet helpful Something About Interference This is available at FCC local regional offices Our company is not res...

Page 10: ...s that could impact health and the environment if not properly disposed In order to avoid the dissemination of those substances in our environment and to diminish the pressure on the natural resources we encourage you to use the appropriate take back systems for product disposal Those systems will reuse or recycle most of the materials of the product you are disposing in a sound way The crossed ou...

Page 11: ...ry door The Dolphin 7850 contains a mechanical switch under the battery door that prevents the terminal from initializing unless the battery door is closed Step 3 Charge the Batteries There are two types of battery power the main battery pack and the backup battery located inside the terminal The main battery pack powers the terminal and charges the internal backup battery Dolphin terminals ship w...

Page 12: ...oth status and keyboard status icons Command Bar Located at the bottom of application screens the Command bar includes application menus buttons and provides access to the Soft Input Panel SIP The contents of the Command bar changes according to the open application Tap to adjust the volume Tap to change the date and time Tap to access the Start menu These are icons of programs running in the back...

Page 13: ... page 3 3 Selecting Programs The Start menu does not fit all installed programs To see additional programs tap Start Programs To open a program tap once on the icon Pop Up Menus With pop up menus you can quickly choose an action for an item 1 Tap and hold the stylus on the item name The pop up menu appears 2 Lift the stylus and tap the action you want to perform The contents of pop up menus depend...

Page 14: ...2 4 Rev b 5 15 2007 Dolphin 7850 Series User s Guide Preliminary ...

Page 15: ...ator style numeric with scrolling alpha or 38 key calculator style numeric with full alpha 3 5 in 1 4 VGA 240 x 320 TFT color display with hard coat industrial touch panel 5300 or 5100 Standard Range SR image engine 802 11g radio WLAN Bluetooth radio Configuration Options The Dolphin 7850 Series offers you a number of configuration options to customize the Dolphin 7850 terminal to your business ne...

Page 16: ...each battery in less than four hours The fourth slot features a battery analyzer that completely resets and re calibrates a battery then displays remaining capacity For more information see Dolphin QuadCharger on page 11 1 Dolphin Cables The Dolphin 7850 Series includes a number of cable kits that enable you to charge and communicate with other devices For more information see Dolphin Cables on pa...

Page 17: ...ximum durability and backlit for maximum viewability see Backlight on page 6 7 Hand Held Products recommends using a screen protector with the touch panel Screen protectors help prevent wear and damage and also protect the touch panel especially when used with applications that require high volume interfacing with the touch panel We expect users to replace the screen protector at regular intervals...

Page 18: ...ume operation For more information see Installing the Main Battery Pack on page 3 9 DC Power Jack Located on the bottom of the pistol grip handle the 9 5V DC power jack receives external power from the Dolphin Power Cable When connected to the Dolphin Power Cable the terminal is powered and the main battery pack is charging For more information see Using the Dolphin Power Cable on page 12 2 Tether...

Page 19: ...rted Bar Code Symbologies on page 5 2 In addition the engine captures images like a digital camera The image engine points straight out the image engine window simply point and scan There are several image engine configurations available for details on each see Available Image Engines on page 5 1 Integrated Pistol Grip The pistol grip handle is integrated into the terminal and is not removable whi...

Page 20: ...ndle Stores the stylus in this slot when you re not using it For more information about the stylus see Using the Stylus on page 2 3 Fastener This hole through the bottom of the pistol grip handle is used as a fastener to attach certain hardware accessories to the terminal Stylus Tether The optional stylus tether is a coiled elastic cord with two ends one end hooks onto the end of the stylus and th...

Page 21: ...e bottom front of the pistol grip handle Rubber bumpers enable you to set the terminal down on a flat surface with easy access to the handle so you can pick up and put down the terminal with ease Front Rubber Bumpers The front rubber bumpers enable you to rest the terminal on a flat surface without damaging the image engine window Front Rubber Bumpers Pistol Grip Rubber Bumpers ...

Page 22: ...ector powers the terminal charges the main battery and facilitates communication with a host workstation via Microsoft ActiveSync The mechanical connector supports RS 232 up to 115 Kbps and USB up to 12 Mbps For more information about ActiveSync communication see Using ActiveSync on page 7 3 The pins on the mechanical connector are as follows Note Signals referenced are for a DTE device Mechanical...

Page 23: ...ery is designed to operate in a temperature range of 10 to 50 C 14 to 122 F Installing the Main Battery Pack Put the terminal in Suspend Mode see page 3 13 before installing a new battery Press Blue Backlight keys The battery door contains a mechanical switch under the battery door that automatically suspends terminal operation while open Because of this switch the terminal will not resume normal ...

Page 24: ...the Dolphin terminal Keep the Dolphin terminal connected to a power source when the terminal is not in use Managing Battery Power Data and files saved on the Dolphin terminal may be stored in RAM memory therefore maintain a continuous power supply to the terminal to help prevent data loss When you remove a battery pack insert another charged battery pack in the Dolphin If the main battery pack is ...

Page 25: ...h is available for download at www handheld com Checking Battery Power Tap Start Settings System tab Power The Battery tab opens displaying the charge status of the main battery pack For more information see Power on page 6 11 Storage Guidelines To maintain optimal battery performance follow these storage guidelines Avoid storing batteries outside the specified range of 4 to 104 F 20 to 40 C or in...

Page 26: ...e and cause severe personal injury Excessive discharge damages a battery Recharge the battery when your terminal indicates low battery power Although your battery can be recharged many times it will eventually be depleted Replace it after the battery is unable to hold an adequate charge If you are not sure the battery or charger is working properly please send it to Hand Held Products or an author...

Page 27: ...re ending on the Today screen Set the time and date after each hard reset to ensure that the system clock is real time Tap the date on the Today screen to open the Clock and set the time and date Suspend Mode Suspend mode suspends terminal operation The terminal appears to be off when in suspend mode The terminal is programmed to go into suspend mode automatically when inactive for a specific peri...

Page 28: ...aser scanner future option ALR Advanced Long Range Laser scanner future option Keyboards 24 key calculator style numeric with scrolling alpha 38 key calculator style numeric with full alpha Communications 100K duty cycle plugable dockable RS232 USB connector IrDA Audio beeper Power Battery Type Lithium ion 7 4V 14 1 Watt hour hot swappable battery pack Capacity 14 1 Watt hours Run Time WLAN 11 hou...

Page 29: ... integrated rubber over molded handle Structural 5 ft 1 5m multiple drops to concrete all surfaces across operating temperature range Exceeds 2 000 3 ft 1m tumbles Environmental IP64 rated for blown dust water intrusion Dimensions Main housing 7 1 in Long X 3 3 in Wide X 1 4 in Deep 18 cm Long X 8 4 cm Wide X 3 6 cm Deep Handle 4 6 in Long X 1 6 in Wide X 1 in Deep 12 cm Long X 4 1 cm Wide x 2 5 c...

Page 30: ...3 16 Rev b 5 15 2007 Dolphin 7850 Series User s Guide Preliminary ...

Page 31: ...d bar code is successfully decoded Note Both LEDs are user programmable For more information see Using the Image Engine on page 5 1 Color Coding Keyboard overlays are color coded to indicate the functions performed or characters typed when the color coded key is pressed with the red or blue modifier key Keyboard Mode Indicator Dolphin terminals have a Keyboard Status Power Tool Start Power Tools K...

Page 32: ...e press Red left arrow Backspace moves the cursor back one space and deletes each time the key combination is pressed If you are typing text a character is deleted each time you backspace Backtab BKTAB To backtab press the Blue TAB Backtab moves the cursor back to the previous tab stop or field on a form or application window Delete DEL To delete press Blue ESC Deletes the next character forward O...

Page 33: ...ifier Keys Modifier keys modify the next key pressed to perform functions or type special characters The Dolphin 7850 has Blue and Red modifier keys with a color coded overlay so you can see what the key combination does Press To Move the cursor up one row or line Move the cursor down one row or line Move the cursor one character to the right Move the cursor one character to the left Name Key Func...

Page 34: ...ode you must use the same multi press method you would use when typing letters on a phone keypad Each key press types the next letter in the sequence as displayed by the alpha indicator You can still use the Blue modifier key for regular Blue key combinations in alpha mode just press the Blue modifier key and the next key For combinations see 24 Key Blue Key Combinations on page 4 6 Shift Function...

Page 35: ...d Light Keyboard Light Keyboard Light Keyboard Light Suspend Left Left Left Left Backspace Up Up Up Up Page Up Vol Down Vol Right Right Right Space Insert OK OK OK OK OK OK Tab Tab Tab Tab Hard Reset Backtab Period Comma 0 0 F10 1 1 PQRS pqrs F7 pqrs or PQRS 2 2 TUV tuv F8 tuv or TUV 3 3 WXYZ wxyz F9 wxyz or WXYZ 4 4 GHI ghi F4 ghi or GHI 5 5 JKL jkl F5 jkl or JKL 6 6 MNO mno F6 mno or MNO 7 8 9 S...

Page 36: ...ter Lower case Character Upper case SFT once for the next key SFT twice for caps lock 8 abc ABC 9 def DEF 4 ghi GHI 5 jkl JKL 6 mno MNO 1 pqrs PQRS 2 tuv TUV 3 wxyz WXYZ Key Combination Function Blue Backlight Suspend Blue ESC Delete Blue Tab Backtab Blue Up Arrow Volume up Blue Down Arrow Volume down Blue Right Arrow Insert ...

Page 37: ...y Combination Function Special Character Red Left Arrow Backspace Red Right Arrow Space Red Up Arrow Page up Red Down Arrow Page down Red ESC hold Soft reset warm boot Red TAB hold Hard reset cold boot Red 1 F7 Red 2 F8 Red 3 F9 Red 4 F4 Red 5 F5 Red 6 F6 Red 7 F1 Red 8 F2 Red 9 F3 Red 0 F10 Red ...

Page 38: ...ity in Alpha Mode The SFT key performs all the normal windows shift key functions in alpha mode including capitalizing one letter On the 38 key keyboard the SFT key also toggles caps lock on and off Single tap the SFT key to modify the next key pressed if this is a letter that letter is capitalized Double tap the SFT key to toggle caps lock on and off in alpha mode Note Check the mode indicator se...

Page 39: ...Keyboard Light Suspend Left Left Left Left Back space Up Up Up Page Up Vol Down Vol Right Right Right Space Insert OK OK OK OK OK OK Tab Tab Tab Tab Hard Reset Backtab Period Comma 0 0 Q q 0 0 1 1 K k 1 1 2 2 L l 2 2 3 3 M m 3 3 4 4 F f 4 4 5 5 G g 5 5 6 6 H h 6 6 7 7 A a 7 7 8 8 B b 8 8 9 9 C c 9 9 N n F1 F2 v F2 asterisk F3 W w F3 F4 X x F4 F5 Y y F5 F5 F6 Z z F6 F6 F7 T t F7 F7 F8 O o F8 F8 F9 ...

Page 40: ... Alpha Mode Keys Key Character Lower case Character Upper case SFT once for the next key SFT twice for caps lock 7 a A 8 b B 9 c C d D F10 e E 4 f F 5 g G 6 h H i I F9 j J 1 k K 2 l L 3 m M n N F8 o O p P 0 q Q r R s S F7 t T F1 u U F2 v V F3 w W F4 x X F5 y Y F6 z Z ...

Page 41: ...ion Function Blue Backlight Suspend Resume Blue ESC Delete Blue Right Arrow Insert Blue Up Arrow Volume up Blue Down Arrow Volume down Blue ALPH Start menu Blue Tab Backtab Blue F2 Blue F3 Blue F4 Key Combination Function Red Left Arrow Backspace Red Right Arrow Space Red ESC hold Soft reset warm boot Red TAB hold Hard reset cold boot ...

Page 42: ...4 12 Rev b 5 15 2007 Dolphin 7850 Series User s Guide Preliminary ...

Page 43: ...th one of the following laser engines 5100 Standard Range 5100SR 5300 Standard Range 5300SR 8 3 mil Linear 10 mil PDF417 13 mil UPC 15 mil Data Matrix 15 mil QR 35 mil MaxiCode Working Range 020cm 025cm 033cm 038cm 038cm 089cm Near 3 5 in 8 9cm 3 1 in 7 9cm 2 1 in 5 3cm 2 3 in 5 8cm 3 1 in 7 9cm 2 0 in 5 1cm Far 7 6 in 19 3cm 9 in 22 9cm 13 2 in 33 5cm 10 2 in 25 9cm 8 8 in 22 4cm 13 0 in 33cm Hig...

Page 44: ... GS1 Databar Interleaved 2 or 5 Matrix 2 of 5 Plessey PosiCode Straight 2 of 5 IATA Straight 2 of 5 Industrial Telepen Trioptic Code UCC EAN 128 UPC and UPC A 2D Symbologies Aztec Code 16K Composite Data Matrix GS1 Databar MaxiCode OCR PDF417 QR Code Composite Codes Aztec Mesa Codablock F EAN UCC GS1 Databar 14 OCR OCR US Money Font MICR E 13 B and SEMI Font OCR A OCR B Postal Codes Postnet and mo...

Page 45: ...er of both keyboards for location see LEDs on page 4 1 light when using the image engine Scan LED The LED on the right lights red when you press the scan trigger in scanning applications Decode LED The LED on the left lights green when a scanned bar code is successfully decoded Decoding The Dolphin terminal supports two types of image decoding full area imaging and Advanced Linear Decoding ALD Ful...

Page 46: ...the terminal beeps Sample Bar Codes You can use the following bar codes to verify decoding Omni Directional Scanning Positions The high vis aiming pattern frames the bar code to provide you with the best scanning performance Note To achieve the best read the aiming beam should be centered horizontally across the bar code The aiming pattern is smaller when the terminal is held closer to the code an...

Page 47: ... by the software application used to take the image The average size of the image file is approximately 4 8K However the size of the image depends on image content the more complex the content the larger the file size Taking an Image 1 Tap Start Demos Image Demo 2 Point the Dolphin 7850 terminal at the object 3 Press the scan trigger to activate the engine The screen displays a preview of the obje...

Page 48: ...5 6 Rev b 5 15 2007 Dolphin 7850 Series User s Guide Preliminary ...

Page 49: ...escription Personal The Personal tab provides access to personal configuration programs For details see Personal Settings on page 6 2 System The Systems tab provides action to programs that monitor and adjust major system functions For details see System Settings on page 6 7 Connections The Connections tab provides access to most of the terminal s communication options For details see the Connecti...

Page 50: ...ations or execute commands see Buttons on page 6 3 Input Customizes the SIP For details see Input Panel Options on page 6 4 Lock Provides password protection for certain programs on the terminal Menus Customizes what appears on the Start and New menus see Menus Modifying the Start Menu on page 6 4 Owner Information Stores your contact information This information will appear on the Today screen So...

Page 51: ...ts 1 After HotKeys is enabled tap Start Settings Personal tab Buttons Note The buttons that appear on this window are the only buttons that can be programmed via the Buttons setting You cannot add hardware buttons to this window 2 Tap on the name of the application in the Assignment column and select a program or command in the Assign a program drop down list 3 Tap OK to save Available Programs Th...

Page 52: ...enu three ways directly by using the Menus setting or creating and pasting shortcuts in File Explorer on the terminal or the workstation and using ActiveSync to transfer to the shortcut to the terminal Note Only seven applications total are allowed on the Start menu Using the Menu System Setting 1 Tap Start Settings Personal tab Menus Start Menu tab 2 Tap the check box for the program you want to ...

Page 53: ...s by accident Using Copy and Paste Shortcut as opposed to Cut Copy and Paste ensures that the program files remain where they need to be for the system to find them to perform system functions 1 Tap Start Programs File Explorer and navigate to the program File Explorer opens to My Documents by default to see a list of all folders tap the folder name and then My Device 2 In File Explorer navigate t...

Page 54: ...tails using Explore in ActiveSync see Exploring the Terminal from the Workstation on page 7 4 1 Using a Dolphin peripheral connect the terminal to the workstation via ActiveSync 2 On the workstation when ActiveSync opens after connecting tap Explore Windows Explorer opens to the files on the terminal 3 Navigate to the program 4 Right click on the program and select Create Shortcut 5 Select the sho...

Page 55: ...when the terminal is running on battery power The External tab determines display backlight settings when the terminal is powered by an external source such as a Hand Held Products cable Tab Description Version Tab Displays the information about the software operating system and processor of the terminal The processor for the Dolphin 7850 is an Intel XScale PXA 270 520MHz processor Device ID Tab D...

Page 56: ...s important to verify that the operating system acknowledges your certificate If the certificate does not appear on one of these tabs the operating system does see it and it will not function properly during the network authentication process For more information see Certificates on page 8 12 Clock Alarms Clock Alarms sets the system clock Appointments scheduled events and any function on a schedu...

Page 57: ...memory is non volatile data and programs stored in IPSM are not affected when power is removed or a cold boot launched For this reason default programs and files for Dolphin terminals such as Autoinstall are stored in IPSM Secure Digital SD Card Hand Held Products offers 64MB 128MB and 256MB SD cards that can be installed at the factory The SD memory interface is not user accessible or field repla...

Page 58: ... all running programs Anytime you stop a running program it frees up volatile memory Be advised that when you stop a program here any unsaved data in that program is lost To free up memory without risking data loss return to the running program save your data and close the application Field Description Total storage card The total MB of memory capacity of the selected memory In use The MB currentl...

Page 59: ...see Battery Power on page 3 9 Advanced Tab Determines the amount of time that elapses before the terminal automatically goes into suspend mode see Suspend Mode on page 3 13 You have the option of selecting time periods for both battery and external power Field Description On battery power Select the number of minutes of inactivity you want to pass before the terminal goes into suspend mode when ru...

Page 60: ...ettings or change a specific setting tap on one of the tabs make the change and tap OK to save it You need to show reboot the terminal for the changes take effect Remove Programs The Remove Programs settings enables you to remove programs installed on the terminal Use this setting to troubleshoot when you receive messages that the device is out of memory The programs removed in the Remove Programs...

Page 61: ... a Microsoft technology that dramatically increases the readability of text on LCD displays To enable ClearType font rendering select Enable ClearType and tap OK For more information about ClearType font rendering visit www microsoft com typography cleartype what htm fname 20 fsize Text Size Tab Adjusts font scaling within certain views of the Today screen Contacts Calendar Messaging and Tasks Thi...

Page 62: ...6 14 Rev b 5 15 2007 Dolphin 7850 Series User s Guide Preliminary ...

Page 63: ...be equipped with an 802 11g and or Bluetooth radio When the terminal s radios are enabled you can connect the terminal to a wireless network for communication For more information about enabling the radios see Radio Manager on page 7 13 Software Communication Programs Dolphin terminals are shipped with the following communication software programs installed Microsoft ActiveSync v4 1 or Higher Micr...

Page 64: ...rams verify that the program and version of the program are designed for the Windows Mobile 5 0 and the terminal s processor You can verify your processor by tapping Start Settings System tab About Version tab Make a note of the information in the Processor field To install additional software you can use the communication options described in this chapter See Adding Programs via ActiveSync page 7...

Page 65: ...led Note The HomeBase does not support Windows NT when using a USB connection because Windows NT does not support USB Windows 98 Second Edition provides full USB support Setting Up the Host Workstation To sync successfully ActiveSync must be configured for same communication type on the host workstation and the Dolphin terminal ActiveSync must be setup on your desktop computer before you initiate ...

Page 66: ...sion of the program are designed for Windows Mobile 5 0 and your processor You can verify your processor by tapping Start Settings System tab About Version tab Make a note of the information in the Processor field Generally software for Windows Mobile devices must be installed to the host workstation first then transferred to the Dolphin terminal 1 Download the program to the workstation from eith...

Page 67: ... files to the Program Files folder on the terminal If you want the program to be part of the Autoinstall that occurs after every hard reset place the program file in the Autoinstall folder IPSM AutoInstall 3 On the terminal tap Start Programs File Explorer and navigate to the folder where the program is located 4 Tap on the program file to install it If you copied the file to the Autoinstall folde...

Page 68: ...ration Program Icon Description Beam Controls infrared communication See Using Infrared Communication on page 7 8 Connections Accesses Microsoft s connection manager to set up modem connections See Connections Manager on page 7 10 Network Cards Opens Microsoft s Network Adapters tool See Network Cards on page 7 12 Radio Manager Enables and disables installed radio drivers See Radio Manager on page...

Page 69: ...tablished a network connection via modem or wireless radio you can access the Internet and download additional software programs When selecting programs verify that the program and version of the program are designed for the Windows Mobile 5 0 and the terminal s processor 1 Verify the terminal s processor by tapping Start Settings System tab About Version tab Make a note of the information in the ...

Page 70: ...eive all incoming beams must be checked for the terminal to receive infrared data from another device Sending Data You can send and receive information via infrared including software programs exe files To send or receive the IrDA ports of both devices must be aligned with each other and within a close range The maximum data transfer speed is 115 Kbps 1 Align the IrDA ports of both devices When se...

Page 71: ...e other device send the information to you via infrared 4 Your terminal automatically begins receiving it Adding Programs via Infrared Select a program on one terminal and beam it to another to load additional software programs to Dolphin terminals Troubleshooting If the Beam Settings are not set to receive or you ve aligned two IrDA ports and the terminal is still not receiving tap Start Programs...

Page 72: ...ng a modem Select an item in this list and then complete the setup screens that follow with the appropriate information for your network My ISP The links under this heading enables you to add and manage modem connections to an ISP To complete the setup screens obtain the following information from your ISP ISP dial up access telephone number Username Password TCP IP settings My Work Network These ...

Page 73: ... the setup screens You will usually be walked through the same setup screens used to establish the connection Advanced Tab The Advanced tab enables you to select the default network dialing rules and IP address exceptions for modem connections Note You should not need to change Advanced settings because most ISPs now use DHCP addresses Online Help For more information about modem connection setup ...

Page 74: ...signed IP addresses use DHCP 3 If you make a change on one of these tabs tap OK to confirm the changes The following message appears 4 You must perform a soft reset to update the registry entries see Soft Reset Warm Boot on page 3 13 During the soft reset the new registry entries are created and can be read by the applications that need them Do NOT perform a Hard Reset Cold Boot see page 3 13 afte...

Page 75: ...mation about Autoinstall refer to the Dolphin Power Tools User s Guide which is available for download at www handheld com Enabling the Radios The terminal enables the 802 11g radio after each hard reset by default Verify the status of the radio before attempting to establish or change network connection settings 1 Tap Start Settings Connections tab Radio Manager The Radio Manager appears identify...

Page 76: ... USB and Serial USB communication Dolphin 7850 terminals default to Serial USB Hand Held Products recommends using Serial USB To change this setting tap Start Settings Connections tab USB to PC The enable option is not selected which indicates Serial USB To switch to RNDIS USB select Enable advanced network functionality and tap OK to save Wait as the terminal makes the change ...

Page 77: ...equipment wired or wireless that supports the 802 1X authentication standard The Client is interoperable with 802 1X capable wireless APs and authentication servers including Microsoft s IAS and Cisco s ACS The Client uses public key authentication and encryption between Wireless APs WAP and roaming stations to exchange dynamic Wired Equivalent Privacy WEP keys In addition network managers can con...

Page 78: ...802 1x aware device Gray The port is not in use or is disabled Either the Client isn t running or the port is not bound to the 802 1x protocol Orange The port is associated but there is no response to 802 11g packets If using WEP without 802 1x authentication this will be the final state when the connection is complete If using 802 1x authentication it is either a transient condition or can indica...

Page 79: ... 8 2 Client Menu On the main window tap the Client menu Menu Item Description Close Closes the Client s interface while leaving the client running Start Stop Starts or stops 802 1X authentication After you finish the initial configuration tap the network interface and tap Start If the port is already active tap Stop first then Start to force the program to read the new configuration file Restart S...

Page 80: ...er The Event Log is a text file that contains system information each entry is listed sequentially with a time date stamp and text message Tap Refresh to query the system again and update the log file while you are reading it If the file gets too large old entries are automatically deleted Logging parameters are set on the System Tab see page 8 8 Menu Item Description Enable Disable These commands...

Page 81: ... b 5 15 2007 8 5 Status Bar The status bar indicates the connection status between the network card and the AP Depending on the status of connectivity the status bar displays one of the following Not Associated AP AP s SSID MAC AP s BSSID Status Bar ...

Page 82: ...ed here Note Fields will be grayed out if not relevant to the selected protocol On the main window tap Client menu Configure Complete the following tabs User Tab see page 8 6 to establish user authentication parameters System Tab see page 8 8 to set logging parameters Server Tab see page 8 9 to determine certificate and server parameters User Tab Enter the credentials used to authenticate a user F...

Page 83: ...lient certificate displayed in the field is the one that is passed to the server for verification To select a client certificate tap Change and select the certificate from the list that appears To appear in this list certificates must be installed in the system see Certificates on page 8 18 The Issued to column should match the Identity field and the user ID on the authentication server used by th...

Page 84: ...ns are logged Warnings Less severe conditions are logged Information All errors warnings and information events are logged This is the default setting Debugging Creates a log message each time the Client detects or reacts to an event Be advised that log entries fill memory quickly if the Debugging level is chosen Do not use the Debugging option for a significant length of time because most interna...

Page 85: ...ate authority used during TLS TTLS PEAP message exchange Any Trusted CA is the default selection and means that any certificate authority can be used during authentication Both trusted intermediate certificate authorities and root authorities whose certificates exist in the system store are available for selection in the drop down list Allow intermediate certificates This option is selected by def...

Page 86: ...hat the device uses to connect to a network default This is the default network configuration that installs when the Client installs This network profile associates with any network and is already configured with standard settings You can modify this setting to match your desired connection If you are in a location with only one AP or more than one AP that attaches to the same network the default ...

Page 87: ...supplicant state machine obtain its 802 11x protocol specification The parameters are Authentication Timeout The period of time the Client remains in the authenticating or acquired state without receiving a response from the AP or switch 30 seconds is the default Held Timeout The period of time the Client remains in the held state after failing authentication 60 seconds is the default Start Timeou...

Page 88: ...the SSID has changed The result is that renewal should not occur upon re authentication but does occur at boot or when connecting to a different network If you have a slow authenticator you may wish to enable this option when configuring the service because a slow authenticator may prevent you from getting a DHCP assigned IP address upon boot up This option is ignored if the given adapter has a st...

Page 89: ...PA Settings Tab on page 8 16 Information from the AP autofills some fields on these tabs Note The settings on these tab windows are interrelated This means that selecting one may disable access to others Profile Info Tab Field Description Network Profile If you are configuring a network from the list the name that appears in this field is the same as the name in the Configured Networks list and by...

Page 90: ...orted in this mode Associate with any available network Select to associate with any available network Do active scan Select this option whenever the AP or client for ad hoc mode is not broadcasting its SSID Note This option is not available when Associate with any available network is selected Authentication Profile Select the authentication profile associated with this network and tap View The d...

Page 91: ...ecked Open checked Shared Open means the only authentication performed is to check that a client s SSID setting matches the SSID of the AP Shared means that the Client authenticates with the AP via a challenge response mechanism Key In this field enter the WEP key to use for data encryption or authentication to the AP ASCII 5 or 13 characters Hexadecimal 10 or 26 characters When the key entered is...

Page 92: ...ared Key PSK information entered in the field below This mode is used if the 802 1x protocol is not being used for authentication Encryption Select the desired encryption WEP The least secure of the encryption methods WEP uses a single encryption key of either 40 or 104 bits WPA uses a 256 bit Pre shared key TKIP Uses the standard WEP format but changes the key with every frame for improved securi...

Page 93: ...s event Associating With Open APs To associate with open APs means to set up the 802 11g radio without authentication or encryption 1 Double tap the Client icon on the command bar 2 On the Main Window see page 8 3 tap on the port and select Configure on the popup menu 3 On the Wireless Networks Tab see page 8 10 tap Add in the Configured Networks section 4 On the Profile Info Tab see page 8 13 ent...

Page 94: ...his value in the Certificate Pass Phrase field This value will be encrypted when the configuration is saved However on some systems there may not be a certificate Note Client or CA certificates can be imported from cer same as der p7b or pfx files Installing Certificates with CertAdd CertAdd is a separate utility that allows certificates to be selected and installed on the device for the Meetingho...

Page 95: ...tart Settings System tab Certificates Root tab This opens the Certificates window which displays all the certificates the operating system recognizes 1 Scroll through this list until you see the certificate you installed 2 After you have identified your certificate in the list tap OK to close 3 To use the certificate in a network profile single tap the Client icon in the command bar 4 Tap on a por...

Page 96: ...Tunneled authentication section My AP does not broadcast its SSID Even though I have manually configured an AP with that name the Client won t associate with it Make sure that the Network Name field contains the AP s SSID Verify that Do Active Scan is selected on the Profile Info tab see Do active scan on page 8 14 Otherwise the Client will not attempt to find the AP I am authenticated but I don t...

Page 97: ...ll as available services The services supported by the local device include OBEX File transfer OBEX object push Dial up networking FAX LAN access Serial port communication Pairing security and encryption settings can be configured for the local device In addition to the configuration options available any of the supported services may be added to or removed from the local device Enabling the Bluet...

Page 98: ... connect to 1 On the Today screen tap the Bluetooth icon and select Show BTExplorer The Connection Wizard opens 2 Select the action you would like to perform in the drop down list and click Next BTExplorer scans for other Bluetooth devices in range and displays the search results 3 Select a device and click Next 4 Depending on the item selected on the New Connection window you ll be asked to enter...

Page 99: ...es on Remote Device See files on a remote device A working Bluetooth connection with the remote device Connect to Internet using Access Point Connect to the Internet using LAN or a network gateway A Bluetooth compatible access point Connect to Internet using Phone Modem Connect to the Interne using a mobile phone or mobile phone modem using dial up networking Dial up account information Connect to...

Page 100: ...ooth Devices Select another device type in the list View Options Discovered Devices appear with an icon indicating what type of device it is and the Device ID By default the discovered devices screen appears in the Large icon view The Details menu offers you alternate view options When you select the Details menu its name changes to View Large Icons Displays large icons in the viewing area List Di...

Page 101: ...scription Discover Devices Scans for Bluetooth devices Discover Names Scans for device names View Opens a side menu that offers you sorting options for the discovered devices list All Devices Shows all devices in the vicinity Trusted Devices Only Removes untrusted devices from the display Untrusted Devices Only Removes trusted devices from the display Note These options affect only what appears on...

Page 102: ...th devices need to be paired with each other before attempting a connection the first time Paired devices remain paired even if One of the devices is not powered A service connection is interrupted or stopped One or both devices are rebooted Passkey Paired devices share a unique passkey both devices use to authenticate when connecting The passkey can be alphanumeric numbers or letters and must con...

Page 103: ... of the terminal well Intelligent Battery Charging The HomeBase completes a full charge of the main battery pack in less than four hours In addition to charging the HomeBase powers the intelligent battery charging system in the terminal that protects the battery from being damaged by overcharging The terminal senses when a battery pack is fully charged and automatically switches to a trickle charg...

Page 104: ...n Red Serial data is being sent from the host device to the HomeBase Green Serial data is being sent from the HomeBase to the host device Orange Serial data is being sent at high data rates If using a USB port connection Green A USB connection is established with the host workstation DOCK LED Turns solid green when the terminal is properly seated in the HomeBase When this light is on the terminal ...

Page 105: ...s ActiveSync 4 1 or higher Using a USB cable you can connect the HomeBase to a USB compliant device When the HomeBase is connected to that device the terminal is connected to the device when seated in the terminal well The HomeBase acts as a USB device by interfacing the USB signals of the terminal to the USB signals of the host workstation see ActiveSync Communication on page 10 7 Charging a Spar...

Page 106: ...10 4 Rev b 5 15 2007 Dolphin 7850 Series User s Guide Preliminary Bottom Panel Dimensions 136 3 mm 5 37 in 78 mm 3 1 in 162 2 mm 6 4 in 106 mm 4 2 in 108 mm 4 25 in 62 mm 2 4 in ...

Page 107: ...is now powered When a terminal is properly seated in the terminal well the HomeBase powers the terminal charges the terminal s main battery pack and launches ActiveSync communication see ActiveSync Communication on page 10 7 Hand Held Products recommends that you leave the HomeBase connected to its power source at all times so that it is always ready to use RS 232 Serial Connector The following di...

Page 108: ...current and voltage Inserting a Terminal 1 Install the battery pack in the terminal see Install the Main Battery Pack on page 2 1 2 Power the HomeBase see Powering the HomeBase on page 10 5 3 Slide the terminal into the terminal well until the Dock LED lights green to indicate that the terminal is properly seated 4 The battery pack begins charging The intelligent battery charging system in the ter...

Page 109: ...munication software Maximum data transfer rate is 115 Kbps Communicating with the Dolphin Terminal 1 Insert the terminal into the terminal well of the HomeBase The DOCK LED lights green If not make sure that the terminal is properly seated You may need to remove and re insert the terminal The terminal activates If not verify that the Hand Held Products power supply is properly connected to the DC ...

Page 110: ...E device use either a null modem adapter in line with a standard RS 232 cable or a null modem serial cable To communicate with a DTE device such as a computer use a standard or straight through RS 232 cable You can make your own cables by following the pin configuration in the chart below To do so you must determine if your host RS 232 device is 9 pin or 25 pin and whether it is configured as a DC...

Page 111: ... easy access to the auxiliary battery well and the serial and USB ports as well as the power jack face straight out of the rear panel and you will most likely want easy access to them in the future Desk Mounting Dolphin charging communication cradles have a DIN rail 7 5 mm high X 35 mm wide slot on the bottom to allow for secure desk attachment of the unit if desired 1 Slide the DIN rail slot alon...

Page 112: ...hen resting on a flat surface Those rubber feet should be removed with pliers before wall mounting the HomeBase 1 Secure screws to the bottom panel by sliding them into the available slots 2 Attach the bottom panel to the mounting bracket matching the holes to the secured screws 3 Fasten the screws to secure the HomeBase to the mounting bracket 4 Turn the secured HomeBase right side up 5 Using the...

Page 113: ...ducts will void the warranty and may damage the terminal Use only the Li ion battery packs provided by Hand Held Products The use of any battery pack not sold manufactured by Hand Held Products in a Dolphin terminal will void your warranty and may result in damage to the Dolphin terminal or battery Front Panel Charging Slots The QuadCharger contains four charging slots Each slot holds one battery ...

Page 114: ...ng the most recent charge cycle Back Panel Power Supply Connector Use this connector to attach the power supply to the QuadCharger The universal power supply accepts input voltages between 90 265 volts Power Switch Toggle the power switch to turn the QuadCharger on and off Inserting and Removing Battery Packs To insert a battery pack place the end of the battery without the locking tab into the bo...

Page 115: ...er For best results battery packs should be at room temperature before recharging them because temperature impacts charging The recommended temperature range is 50 to 95 F 10 to 35 C 1 Supply the QuadCharger with power and turn the power switch on 2 Insert batteries into the appropriate slots The Status LED for each slot turns orange to indicate that the battery has begun a charge cycle 3 When the...

Page 116: ...where each LED equals 10 battery capacity At the end of the Analyze cycle these LEDs display the maximum charge level the battery can now hold Status LED The Charge Analyze slot also contains a standard status LED in the upper left corner of the slot When this slot is used for regular charging this LED operates in the usual manner see Status LEDs on page 11 2 When this slot is being used to analyz...

Page 117: ...mm slot on the bottom panel to enable secure mounting To mount the QuadCharger you slide the DIN Rail into the slot on the bottom panel Then using the appropriate nuts and bolts secure the DIN rail to the desk or wall REV MFG WK YR ITEM S N 7850 QCE SC000001 Tested to Comply With FCC Standards This Class B Digital apparatus complies with FOR HOME OR OFFICE USE Canadian ICES 003 Cet appariel numeri...

Page 118: ...r make sure the POWER switch is ON and the battery pack is properly seated The Status LED lights red during charging Try to charge the battery in one of the other charging slots If the Status LED lights red again then the problem is associated with the battery pack The Status LED lights red and stays on without a battery in the charging slot An error occurred during the self diagnostic test for th...

Page 119: ...perature 4 to 158 F 20 to 70 C Charge 32 to 113 F 0 to 45 C Electrical Static Discharge 8 KVA immunity on all surfaces Humidity 90 relative humidity non condensing Power Supply Input Universal 90 265V 47 63Hz Output 12 Volts DC 3 A Input Connection 2 Position IEC 320 C8 Charging Standard Charge Completes 100 charge in four hours Status LED See Status LEDs on page 11 2 Battery Analyzer See Using th...

Page 120: ...11 8 Rev b 5 15 2007 Dolphin 7850 Series User s Guide Preliminary ...

Page 121: ... 9 5 volts DC which is the maximum voltage the terminal can receive Cables There are several cables in the Dolphin 7850 Series Use only the peripherals power cables and power adapters from Hand Held Products Use of peripherals cables or power adapters not sold manufactured by Hand Held Products will void the warranty and may damage the terminal Cable Description For more information see Dolphin Po...

Page 122: ...m the power source to 9 5 volts DC which is the maximum voltage the terminal can receive Using the Dolphin Power Cable 1 Set the terminal down on its rubber bumpers see Rubber Bumpers on page 3 7 2 Pull back the flap of the DC power jack and plug the power cable into the jack 3 Plug the power adapter into a standard power outlet 4 The terminal switches to external power and the main battery begins...

Page 123: ...e Power Adapter The vehicle power adapter plugs into a standard vehicle power source and converts voltage to the 9 5 volts DC required by the terminal Using the Dolphin Mobile Charger Inside a Vehicle Using the Dolphin Mobile Charger in combination with the Dolphin Mobile Mount powers and secures the terminal inside a vehicle 1 Insert the terminal into the Mobile Mount 2 Install the Mobile Mount i...

Page 124: ...crews The jackscrews secure the terminal connector to the mechanical connector on the terminal Once the terminal connector is plugged into the mechanical connector on the bottom panel of the terminal turn both jackscrews to the right to secure the connection Power Cable Connector The power cable connector connects the charge cable to the power cable The power cable powers the terminal and charges ...

Page 125: ...tablish the ActiveSync Communication see page 12 5 ActiveSync Communication After the terminal is connected to a power source and the host workstation you need to set up both the terminal and the host workstation for ActiveSync communication Setting up ActiveSync for the charge comm cable is the same as for the HomeBase which also has a USB and an RS 232 version For details see Using ActiveSync on...

Page 126: ...12 6 Rev b 5 15 2007 Dolphin 7850 Series User s Guide Preliminary ...

Page 127: ... 55 21 2178 0500 Fax 55 21 2178 0505 E mail brsuporte handheld com Mexico Telephone 803 835 8000 E mail latechsupport handheld com Europe Middle East and Africa Telephone 31 0 40 7999 393 Fax 31 0 40 2425 672 E mail eurosupport handheld com Asia Pacific Telephone Hong Kong 852 3188 3485 or 2511 3050 Telephone China 86 21 6361 3818 E mail aptechsupport handheld com Japan Telephone 813 5770 6312 E m...

Page 128: ... 8012 E mail naservice handheld com Latin America Telephone 803 835 8000 Telephone 800 782 4263 Fax 239 263 9689 E mail laservice handheld com Brazil Telephone 55 21 2178 0500 Fax 55 21 2178 0505 E mail brservice handheld com Mexico Telephone 52 55 5203 2100 Fax 52 55 5531 3672 E mail mxservice handheld com Europe Middle East and Africa Telephone 31 0 40 2901 633 Fax 31 0 40 2901 631 E mail euserv...

Page 129: ...SHALL HAND HELD PRODUCTS BE LIABLE FOR INDIRECT INCIDENTAL OR CONSEQUENTIAL DAMAGES AND IN NO EVENT SHALL ANY LIABILITY OF HAND HELD PRODUCTS ARISING IN CONNECTION WITH ANY PRODUCT SOLD HEREUNDER WHETHER SUCH LIABILITY ARISES FROM A CLAIM BASED ON CONTRACT WARRANTY TORT OR OTHERWISE EXCEED THE ACTUAL AMOUNT PAID TO HAND HELD PRODUCTS FOR THE PRODUCT THESE LIMITATIONS ON LIABILITY SHALL REMAIN IN F...

Page 130: ...13 4 Rev b 5 15 2007 Dolphin 7850 Series User s Guide Preliminary ...

Page 131: ......

Page 132: ... Hand Held Products Inc 700 Visions Drive P O Box 208 Skaneateles Falls NY 13153 0208 7850 UG Rev b 5 21 2007 ...

Reviews: