background image

Editing

32

1

Press ENTER button after selecting “Play
title” by using      or      button.
It starts to play back from the selected title.

1

Press ENTER button after selecting “Edit
title” by using      or      button.
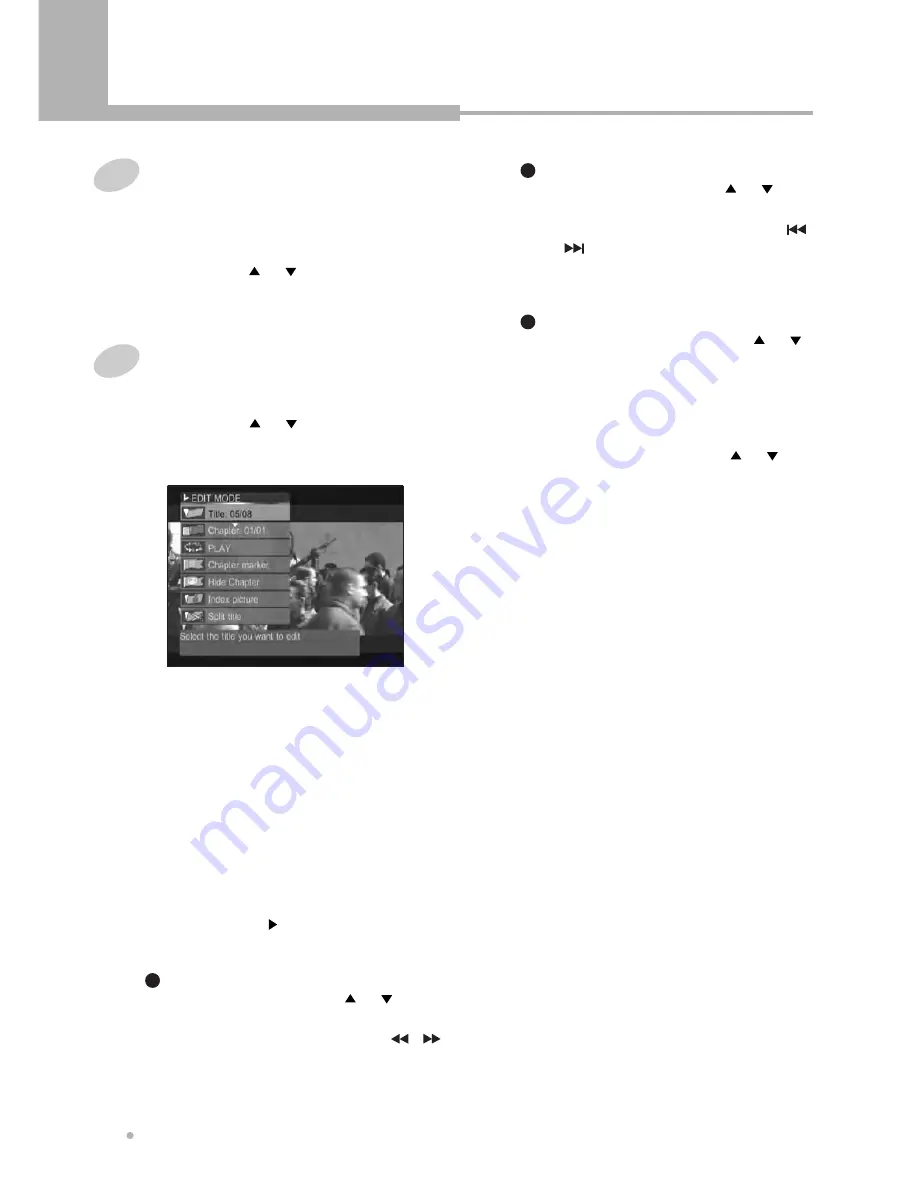
It starts to play back and the pop-up menu
will show on the screen.

• Select an available title

Select to choose an available title by
inputting numbers. 

• Select an available chapter

Select to choose an available chapter by
inputting numbers.

• Play

Control playback by various setting such as
Fast forward, Fast reverse, Slow, etc.

• Chapter marker

You can insert a chapter or delete it.
Press ENTER or     button, the pop-up
menu will show on the screen.

• This is a useful function

It is a useful function to hide commercials.
Select “Hide chapter” by using      or
button, and press ENTER button.
If current chapter is the hidden chapter,
“Unhide chapter” is displayed on the menu
instead of “Hide chapter”. In this case, you
can unhide the chapter by pressing ENTER
button after selecting “Unhide chapter”.

• Index picture

You can change the thumbnail for the
selected title.
Press ENTER button at the point where you
prefer to be the thumbnail.

• Split title

You can divide the current title to 2 titles.
Press ENTER button at the point where you
would like to divide. It takes a few minutes
to divide the title.

• T-Elapsed

You can see the elapsed time.

Play title (DVD+RW/DVD+R)

You can play back the selected title.

Edit title (DVD+RW/DVD+R)

2

Press STOP button after finishing to edit
the title.
It takes a few minutes to update the disc.

To insert a new chapter marker, select
“Insert marker” by using      or
button.
You can search a scene by using        ,
or PLAY button.
Press ENTER button at the point where
you would like to insert a new chapter.

1

To delete all chapter markers, select
“Delete all markers” by using      or
button.

Press ENTER button to confirm it.

3

To delete a chapter marker, select
“Delete marker” by using      or
button.

You can search the chapter by using
or         button.
Press ENTER button at the chapter
where you would like to delete.

2

Editing

Summary of Contents for DRX-430

Page 1: ......

Page 2: ...H LIQUIDS SUCH AS VASES SHALL BE PLACED ON THE APPARATUS CAUTION This product satisfies FCC regulations when shielded cables and connectors are used to connect the unit to other equipment To prevent e...

Page 3: ...likely to be walked on or pinched by items placed upon or against them paying particular attention to cords at plugs convenience receptacles and the point where they exit from the product OUTDOOR ANT...

Page 4: ...ting Subtitles DVD only 20 Selecting Audio Languages DVD only 21 Repeating a Title Chapter 21 A B Repeat DVD only 22 ZOOM Screen 22 Switching the Camera Angle DVD only 23 Direct Search DVD VCD 23 Usin...

Page 5: ...azards such as leakage and bursting Please observe the following Don t mix new and old batteries together Don t use different kinds of batteries together although they may look similar different batte...

Page 6: ...4 1 or 48kHz fixed bit rate Incompatible files will not play Compatible with variable bit rate VBR files This player is compatible with multi session discs Audio encoded at 128Kbps should sound close...

Page 7: ...tion to DV camcorder only It is not compatible with other digital equipments 3 PLAY PAUSE Press to start or pause a disc playing 4 STOP Press to stop a disc playing 5 RECORD Press to start a disc reco...

Page 8: ...e A B disc all respectively 2 ANGLE Indicates the current disc being played is viewed as multi angle This function only works for discs having scenes recorded at different angles 5 TITLE Indicator Tit...

Page 9: ...monitor S Video provides better picture quality than composite video 5 AUDIO OUT Connect to Audio Inputs of TV 6 COMPONENT VIDEO OUT Connect to Component Video Inputs of TV 8 ANT IN Connect to externa...

Page 10: ...io and video input to use for recording DISPLAY To view the Title Chapter Track information or Subtitle Language Audio Language Repeat mode DV IN To select a digital A V input from a DV camcorder C CH...

Page 11: ...emove chapter Hide chapter ENTER Used to select the menu item G GOTO To move to a specific time in a track or title P PAUSE When you press this button during playback you can view the still picture Ea...

Page 12: ...ture and sound from DVD disc TV MODE Set up TV type according to type supported by user s TV Each time you press this button repeatedly the TV type will change among NTSC PAL and progressive scan S SE...

Page 13: ...Euro AV connector The audio transmitted on the Euro AV is stereo sound S Video Output The S Video output can be connected to the TV equipped with an S Video input The S Video jack on TV may be labeled...

Page 14: ...ion for A V Input Terminals You can record programs from AV system such as VCR DVD player Camcorder etc Audio Input Connect the Audio Input to the Audio Output of AV system Video Input Connect the Com...

Page 15: ...d a DVD RW or DVD R disc The menu screen is displayed automatically 3 Press ENTER button to start playback Press POWER button to turn on your DVD Recorder 2 Select the desired program by using or butt...

Page 16: ...is played in order automatically after loading a JPEG file from USB memory It takes a few minutes to load the data depending on the data volume in USB memory Playing JPEG files from USB memory 2 Press...

Page 17: ...layback 17 BasicPlayback 1 Load a MPEG4 disc Playing MPEG4 Movie 2 Press Enter button after selecting the desired movie using button Some of MPEG4 movie could not be played depending on encoding metho...

Page 18: ...chapter or track 2 Press PLAY button to resume normal playback 2 Each time you press SLOW button playback speed changes as below Slow Forward DVD VCD 1 Press SLOW button during play mode The disc con...

Page 19: ...turn off the DVD recorder 4 Repeat step 2 3 to build up a program list To delete a track from the program list select the track you want to delete in program list then press PROGRAM button Audio CD MP...

Page 20: ...This operation works only with discs on which multiple subtitle languages are recorded If the loaded disc supports multiple subtitles you can select the subtitle language 2 Press DISPLAY button again...

Page 21: ...m the one selected at the initial settings This operation works only with discs on which multiple audio languages are recorded If the loaded disc supports multiple audio languages you can select the a...

Page 22: ...ying state changes to normal Use this function to repeat playback of a selected segment This is very useful for studying foreign languages because it repeats the selected segment until canceled We rec...

Page 23: ...y Also you can move to a specific time in a track or title 1 Press GOTO button during playback The playback information appears on TV screen 2 Each time you press GOTO button the search mode is change...

Page 24: ...the record quality is changed 4 Press REC button to start your recording Press PAUSE button if you want to stop the recording for a short while Press REC button again to continue recording 5 Press STO...

Page 25: ...f you selected the Once recording press button and press ENTER button Enter the date by using 0 to 9 button If you selected the Weekly recording press button and press ENTER button Enter the day of we...

Page 26: ...tings by using or the number buttons 0 to 9 When you have made all the changes press ENTER button Timer review changing and erasing record settings 1 Press TIMER REC button 5 Press TIMER REC button to...

Page 27: ...sing the remote control supplied with this recorder NOTE 2 Press DV IN button 6 Press STOP button to stop your recording 3 Press REC MODE button to select the record quality 5 Press REC button to star...

Page 28: ...ng to the end 1 Press ENTER button after selecting Rename disc by using or button The keyboard will show on the screen 2 Select a letter which you want to input by using button and press ENTER button...

Page 29: ...ged from DVD mode to AV input mode 4 Press REC MODE button to select the record quality 6 Press STOP button to stop your recording 5 Press REC button to start your recording It starts to record on the...

Page 30: ...ck it in other DVD recorders NOTE 1 Press ENTER button after selecting Lock disc by using or button It takes 2 3 minutes to lock the disc If the disc is locked you can not make any changes any more ex...

Page 31: ...using button It takes a few minutes to finalize the disc The FINALIZE function only works once in DVD R disc If a DVD R has been finalized you can not record or edit the DVD R any more NOTE 1 Insert a...

Page 32: ...nhide the chapter by pressing ENTER button after selecting Unhide chapter Index picture You can change the thumbnail for the selected title Press ENTER button at the point where you prefer to be the t...

Page 33: ...trol bars of the last line in the keyboard is for edit command If the inputting of letters is finished press ENTER button after selecting OK Rename title DVD RW DVD R 1 Press ENTER button after select...

Page 34: ...to start your recording It starts to record from the beginning of the selected title Overwrite title DVD RW only 3 Press AV IN button to choose the A V input you want to record Every time this button...

Page 35: ...tup menu selections may not work properly NOTE The monitor screen of a projector or projection TV is easily burned out if a static picture is displayed for a long time Be careful not to allow the moni...

Page 36: ...LEVEL CHANGE PASSWORD This function is to disable the playing of specified DVD discs that are unsuitable for children There are a total of 8 levels If the level is 8 the contents of the disc are suit...

Page 37: ...output through the digital audio out connector LPCM The decoded audio stream is outputted through the digital audio out connector 1 AUTO CHAPTER MARKER When Auto Chapter Marker is ON chapters are cre...

Page 38: ...layed if the selected language is contained in the disc 4 PLAYBACK AUDIO Set this value to the preferred audio language If an audio language is selected whenever you start playing a new disc the selec...

Page 39: ...t command If the inputting of letters is finished press ENTER button after selecting OK 4 Editing the channel name Select Frequency by using or button 1 Select Fine tune by using or button 1 Press or...

Page 40: ...nd press ENTER button to save and return Press ENTER button after selecting SWAP by pressing or button 1 Select a preset station to swap using or button and press ENTER or button 2 4 CHANNEL SWAPPING...

Page 41: ...uctions SCART cable General Recording Timer Euro AV connectors 21 pin connector Audio characteristics Digital output Video Output Accessories Audio output DVD DVD R VCD SVCD CD DA CD MP3 CD R CD RW DV...

Page 42: ...stopped When the power is cut due to power failure or by unplugging the power cord settings will be canceled Incorrect video connections Check that connections are correct and that plugs are inserted...

Page 43: ...rent recording methods This is not a malfunction If this unit is connected to a non DTS compatible amplifier or decoder using a digital audio cable please connect to a DTS compatible amplifier or deco...

Page 44: ...arranty the product must be returned to the dealer that sold the product If any problems arise information on our authorized service centers is available the dealer who sold the product Terms of Warra...

Page 45: ......

Page 46: ...P N 72001021100...

Reviews: