background image

Be sure to fully charge the battery before using your device for the 
first time.

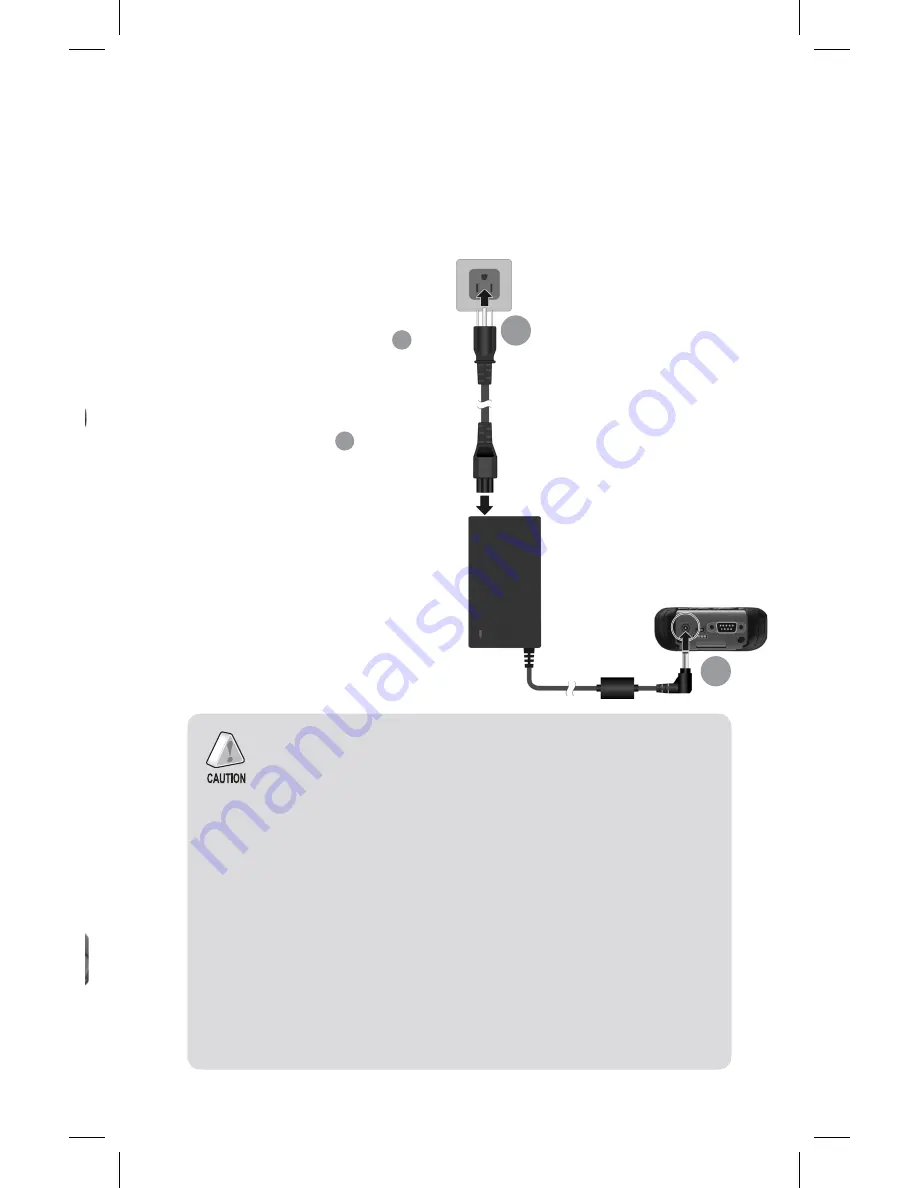
Getting Your Device Ready for Use

1.  Plug the DC cord of the 

AC adapter into  the power 

connector of the device (       ).

2.  Plug the female end of the AC 

power cord into the AC adapter 

and the male end into an 

electrical outlet (       ).  

3.  The charge indicator glows 

in amber when charging is in 

progress. Do not disconnect 

your device from AC power until 

the battery is fully charged, as 

indicated by the amber indicator 

turning into green. This will take 

a couple of hours.

1

1

2

2

Connecting to AC Power and Charging the Battery

CAUTION: For optimal performance of the lithium battery, take note of the 
following:
• Use the included AC adapter only.

• There is no need to fully discharge the battery before charging. You can charge the 
battery before it is discharged.
• Do not charge the battery where the temperature is high (e.g. in direct sunlight).
• As a protection against damage, your device stops charging when the battery’s 
temperature is extremely high or low. In high temperature conditions, the charging 
stops when the battery’s temperature gets above 70 °C (158 °F) and continues when 
the temperature lowers to 60 °C (140 F). In low temperature conditions, the charg-
ing stops when the temperature gets below -5 °C (23 °F) and continues when the 
temperature rises to 0 °C (32 °F).
• If you will not use the product for a long period of time, be sure to fully charge the 
battery at least once every two weeks. Over discharge of the battery can affect the 
charging performance.

Summary of Contents for NAUTIZ X7

Page 1: ...NAUTIZ X7 Quick Start Guide...

Page 2: ...Identifying Hardware Components Front components...

Page 3: ...ification Indicator Glows in amber to indicate that battery charging is in progress Glows in green to indicate that the battery is fully charged Glows in red to indicate that the battery power is crit...

Page 4: ...1 2 3 3 4 5 6 7 8 9 Identifying Hardware Components Keypad...

Page 5: ...cles to the lowest level after reaching the highest level SendKey Dials or answers a call select models only Left RightSoft Key Performs the command shown on the bottom left or right corner of the scr...

Page 6: ...device by tapping on the touch screen to make selections and enter information CameraLens Takes still pictures or records video clips Flash Provides extra light when taking pictures HandStrap Holders...

Page 7: ...over Inside is the SD card slot Ref Component Description Power Connector Connects to the AC adapter USBOTG Host Client Connector Connects to the USB cable Serial Connector Provides D sub 9 pins RS232...

Page 8: ...slot 3 To install the battery attach the bottom side of the battery to the compartment at an angle and then lower the upper side to engage the connector 4 Attach the bottom side of the battery cover t...

Page 9: ...of the following Use the included AC adapter only There is no need to fully discharge the battery before charging You can charge the battery before it is discharged Do not charge the battery where the...

Page 10: ...ter the PIN Enter the PIN and tap Enter If a SIM card has not been inserted yet a message of an invalid or missing SIM card will appear on the screen You can tap Cancel to continue the startup procedu...

Page 11: ...on make sure that you have Microsoft Outlook installed on your computer Connect your device to the computer AFTER Windows Mobile Device Center or ActiveSync is installed ActiveSync connection problems...

Page 12: ...t the card into the slot with the connector pointing to the slot and its label facing the back of the device 3 Replace the cap and secure with the two screws The cap is required for the waterproof cap...

Reviews: