background image

HAMPTONBAY.COM

Please contact 1-855-HD-HAMPTON for further assistance.

Operation

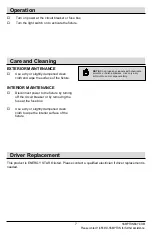
Turn on power at the circuit breaker or fuse box.  

Turn the light switch on to activate the fixture.

Care and Cleaning

EXTERIOR MAINTENANCE

Use a dry or slightly dampened clean 
cloth and wipe the surface of the fixture.

INTERIOR MAINTENANCE

Disconnect power to the fixture by turning 
off the circuit breaker or by removing the 
fuse at the fuse box. 

Use a dry or slightly dampened clean 
cloth to wipe the interior surface of the 
fixture.

Driver Replacement

This product is ENERGY STAR ® listed. Please contact a qualified electrician if driver replacement is 
needed.

7

NOTE: 

Do not use any cleaners with chemicals, 

solvents, or harsh abrasives.  Use only a dry 
soft cloth to dust or wipe carefully.

Summary of Contents for HB1517L4-151

Page 1: ..._____________________ LED CEILING FLUSH MOUNT THANK YOU We appreciate the trust and confidence you have placed in Hampton Bay through the purchase of this LED ceiling flush mount We strive to continua...

Page 2: ...mproperly installed set up or used in any way not in accordance with the instructions supplied with the product This warranty shall not apply to a failure of the product as a result of an accident mis...

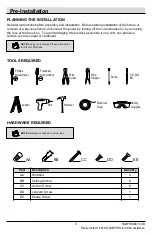
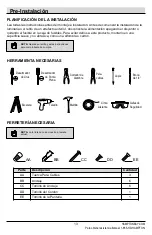
Page 3: ...abrasive surface such as carpet or cardboard NOTE Keep your receipt and these instructions for Proof of Purchase TOOLS REQUIRED HARDWARE REQUIRED NOTE Hardware not shown to actual size HAMPTONBAY COM...

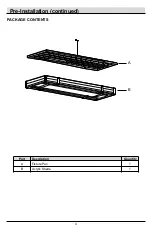
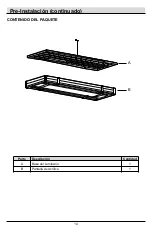
Page 4: ...Pre Installation continued PACKAGE CONTENTS 4 Part Description Quantity A Fixture Pan 1 B Acrylic Shade 1 A B...

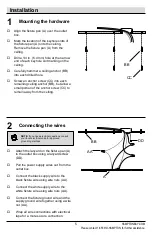
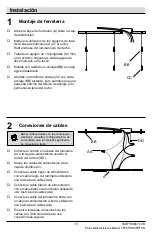
Page 5: ...a small portion of the anchor screw CC to remain away from the ceiling 2 Connecting the wires Attach the lanyard on the fixture pan A to the outlet box using a lanyard screw DD Pull the power supply w...

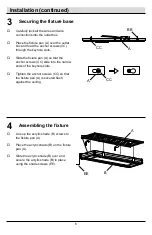
Page 6: ...the anchor screws CC slide into the narrow ends of the keyhole slots Tighten the anchor screws CC so that the fixture pan A is secured flush against the ceiling 4 Assembling the fixture Line up the ac...

Page 7: ...of the fixture INTERIOR MAINTENANCE Disconnect power to the fixture by turning off the circuit breaker or by removing the fuse at the fuse box Use a dry or slightly dampened clean cloth to wipe the in...

Page 8: ...ation This equipment generates uses and can radiate radio frequency energy and if not installed and used in accordance with the instruction manual may cause harmful interference to radio communication...

Page 9: ...HAMPTONBAY COM Please contact 1 855 HD HAMPTON for further assistance This page is intentionally left blank 9...

Page 10: ...problems missing parts Before returning to the store call Hampton Bay Customer Service 8 a m 7 p m EST Monday Friday 9 a m 6 p m EST Saturday 1 855 HD HAMPTON HAMPTONBAY COM Retain this manual for fu...

Page 11: ...__________________________ LUMINARIO DE TECHO CON LUZ LED GRACIAS Le agradecemos la confianza que han depositado en Hampton Bay a trav s de la compra de este luminario de techo con luz LED Nos esforza...

Page 12: ...ado de manera que no conforme con las instrucciones suministradas con el producto Esta garant a no se aplicar a una falla del producto como resultado de un accidente mal uso abuso negligencia alteraci...

Page 13: ...mo una alfombra o cart n NOTA Guarde su recibo y estas instrucciones para comprobante de compra HERRAMIENTA NECESARIAS FERRETER A NECESARIA NOTA La ferreter a no se muestra a tama o actual HAMPTONBAY...

Page 14: ...Pre Instalaci n continuado CONTENIDO DEL PAQUETE 14 Parte Descripci n Cantidad A Base del Luminario 1 B Pantalla de Acr lico 1 A B...

Page 15: ...echo 2 Conexiones de cables Conecte el cord n en la base del luminario A a la caja de alimentacion usando el tornillo del cord n DD Saque los cables de alimentaci n de la caja de distribuci n Conecte...

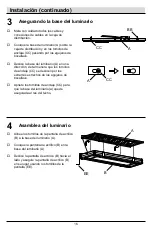
Page 16: ...os de anclaje CC se deslicen por los extremos estrechos de los agujeros de bocallave Apriete los tornillos de anclaje CC para que la base del luminario a quede asegurada al ras del techo 4 Asamblea de...

Page 17: ...MIENTO DEL INTERIOR Apague la potencia a la linterna de manera de desconectando el disyuntor o quitando el fusible en la caja de fusibles Use un pa o limpio y seco o ligeramente humedecido y limpie la...

Page 18: ...laci n residencial Este aparato genera utiliza y puede irradiar energ a de radiofrecuencia y si no se instala y utiliza de acuerdo con las instrucciones puede causar interferencias perjudiciales en la...

Page 19: ...HAMPTONBAY COM Para obtener asistencia llama al 1 855 HD HAMPTON Esta p gina ha sido dejada en blanco intencionalmente 19...

Page 20: ...ltantes Antes de regresar a la tienda llama al Servicio al Cliente de Hampton Bay 8 a m 7 p m Hora del Este Lunes Viernes 9 a m 6 p m Hora del Este S bado 1 855 HD HAMPTON HAMPTONBAY COM Conserve este...

Page 21: ...__________________ PLAFONNIER DEL MERCI Nous appr cions la confiance que vous avez plac e dans Hampton Bay gr ce l achat de cette plafonnier DEL Nous nous effor ons de cr er continuellement la qualit...

Page 22: ...orrectement install configur ou utilis de quelque fa on pas conform ment aux instructions fournies avec le produit Cette garantie ne s applique pas une d faillance du produit la suite d un accident un...

Page 23: ...sif surface tels que tapis ou un morceau de carton NOTE Conservez votre re u et ces instructions la preuve d achat OUTILS REQUIS MAT RIEL REQUIS NOTE Mat riel non illustr taille r elle HAMPTONBAY COM...

Page 24: ...Pr Installation continue CONTENU DU PAQUET A B 24 Partie Description Quantit A Plaque du Luminaire 1 B Abat jour en Acrylique 1...

Page 25: ...de ancrage CC de rester loin du plafond 2 La connexion des fils Fixer la lani re sur le plaque du luminaire A la bo te de sortie l aide d un vis de lani re DD Tirez les fils d alimentation hors de la...

Page 26: ...les vis de ancrage CC glissent jusqu l extr mit la plus troite des encoches en trou de serrure Serrez les vis de ancrage CC jusqu ce que le plaque du luminaire A soit fix solidement contre le plafond...

Page 27: ...T RIEUR Coupez tout le courant au niveau du disjoncteur ou retirez le fusible de la bo te de fusible Utilisez un linge sec ou l g rement humide et essuyez le luminaire Remplacement de Contr leur 27 NO...

Page 28: ...tilise et peut mettre des hyperfr quences qui si l appareil n est pas install et utilis selon les consignes donn es peuvent causer des interf rences nuisibles aux communications radio Cependant rien n...

Page 29: ...HAMPTONBAY COM Veuillez contacter le 1 855 HD HAMPTON pour obtenir plus aide Cette page est intentionnellement laiss e en blanc 29...

Page 30: ...ces manquantes Avant de retourner au magasin appeler Hampton Bay Service la client le 8 00 19 00 HNE Lundi Vendredi 9 00 18 00 HNE Samedi 1 855 HD HAMPTON HAMPTONBAY COM Conserver ce manuel pour un u...

Reviews: