background image


WWW.HAMPTONBAY.COM   


  Please contact 1-855-HD-HAMPTON for further assistance. 

Assembly (continued)   


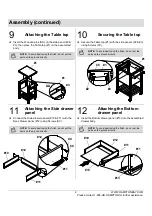
Attaching the Table top 

10 

Securing the Table top 

  Insert the Wooden pins (DD) on the side panel (#2 & 

#3), then place the Table top (#1) on the assembled 
body. 


NOTE: 

To avoid destroying the finish, do not put the 

parts on the ground directly.


  Secure the Table top (#1) with the side panels (#2 & #3) 

using Screws (CC). 


NOTE: 

To avoid destroying the finish, do not put the 

parts on the ground directly.


11 

Attaching the Side drawer 
panel 

12 

Attaching the Bottom 
drawer panel 

  Connect the Side drawer panels (#10 & #11) with the 

Back drawer panel (#12) using Screws (CC). 


NOTE: 

To avoid destroying the finish, do not put the 

parts on the ground directly.


  Insert the Bottom drawer panel (#13) into the assembled 

drawer body. 


NOTE: 

To avoid destroying the finish, do not put the 

parts on the ground directly.


#11

#11

#12 

#10

#13

#13 

#1 

DD 

#1

#3

CC

#1

#1

#3 

#2

#11

#12 

#12 

CC

CC

#10 

#11 

Summary of Contents for BEDFORD DS05QRH

Page 1: ...your home Visit us online to see our full line of products available for your home improvement needs Thank you for choosing Hampton Bay Item 1203060005 G Model DS05QRH USE AND CARE GUIDE BEDFORD KITCH...

Page 2: ...r personal residential purposes The item is warranted to be free from defects in material or workmanship for a period of 1 year WHAT IS NOT COVERED We do not reimburse for transportation of delivery c...

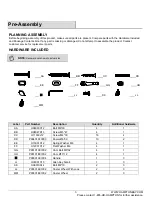
Page 3: ...HARDWARE INCLUDED NOTE Hardware not shown to actual size AA BB CC DD EE FF GG HH II JJ KK LL MM Label Part Number Description Quantity Additional hardware AA H06030C12 Bolt M6 30 4 1 BB H08047K13 Scre...

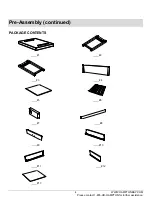
Page 4: ...4 WWW HAMPTONBAY COM Please contact 1 855 HD HAMPTON for further assistance Pre Assembly continued PACKAGE CONTENTS 1 2 3 4 5 6 7 8 9 10 11 12 13...

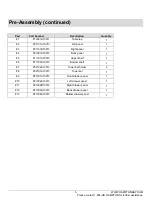
Page 5: ...13 Left panel 1 3 P21101B10013 Right panel 1 4 P21201A10013 Back panel 1 5 P11701A10013 Upper shelf 1 6 P11702A10013 Bottom shelf 1 7 P02102A10013 Towel bar holder 2 8 P02101A10013 Towel bar 1 9 P2130...

Page 6: ...he Towel bar 8 NOTE To avoid destroying the finish do not put the parts on the ground directly 3 Connecting the Towel bar 4 Inserting the Cam bolts Connect the assembled Towel bar holder 7 with the ri...

Page 7: ...e Left panel 2 then connect the Bottom shelf 6 with the Left panel 2 using Flat washers FF Spring washers EE and Bolts AA Tighten with Hex key JJ NOTE To avoid destroying the finish do not put the par...

Page 8: ...he side panels 2 3 using Screws CC NOTE To avoid destroying the finish do not put the parts on the ground directly 11 Attaching the Side drawer panel 12 Attaching the Bottom drawer panel Connect the S...

Page 9: ...ont drawer panel 9 to the Side drawer panels 10 11 using Screws CC Then attach the Handle II on the Front drawer panel 9 using Bolts KK NOTE To avoid destroying the finish do not put the parts on the...

Page 10: ...ontact 1 855 HD HAMPTON for further assistance Care and Cleaning Before using clean the cart completely with a soft dry towel Clean the surface of the cart after use with a hot soapy sponge When not i...

Page 11: ...PTON for further assistance Questions problems missing parts Before returning to the store call Hampton Bay Customer Service 8 a m 7 p m EST Monday Friday 9 a m 6 p m EST Saturday 1 855 HD HAMPTON WWW...

Reviews: