background image


ASSEMBLY / INSTALLATION INSTRUCTIONS:


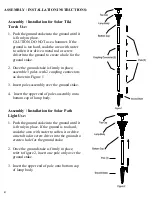
Assembly / Installation for Solar Tiki 
Torch Use: 


1.


Push the ground stake into the ground until it 
is firmly in place.  
CAUTION: DO NOT use a hammer. If the 
ground is too hard, soak the area with water 
to soften it or drive a metal rod or screw 
driver into the ground to create a hole for the 
ground stake. 
 

2.


Once the ground stake is firmly in place, 
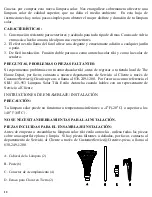
assemble 3 poles with 2 coupling connectors 
as shown in Figure 1. 


3.


Insert poles assembly over the ground stake. 

 
4.


 Insert the upper end of poles assembly onto 
bottom cap of lamp body. 


Assembly / Installation for Solar Path 
Light Use: 


1.


Push the ground stake into the ground until it 
is firmly in place. If the ground is too hard, 
soak the area with water to soften it or drive 
a metal rod or screw driver into the ground to 
create a hole for the ground stake. 
 

2.


Once the ground stake is firmly in place, 
refer to figure 2, insert one pole only over the 
ground stake. 

 
3.


Insert the upper end of pole onto bottom cap 
of lamp body. 


Summary of Contents for 413-953

Page 1: ...1 INSTRUCTION MANUAL Solar Mosaic Tiki Torch Light Home Depot SKU 413 953 UPC 609839462333 Fran ais P 6 Espa ol P 11...

Page 2: ...you experience problems with your solar tiki torch light before returning to your local Home Depot please contact a Customer Service representative at CustomerService Creative prc us or 830 249 1200 P...

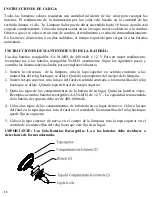
Page 3: ...h Ni MH rechargeable battery s annually Refer to the following steps and the illustration provided to replace battery 1 Hold lamp body rotate top cap counter clockwise until loose Remove top cap from...

Page 4: ...ith 2 coupling connectors as shown in Figure 1 3 Insert poles assembly over the ground stake 4 Insert the upper end of poles assembly onto bottom cap of lamp body Assembly Installation for Solar Path...

Page 5: ...turns the unit ON at dusk For units without an AUTO OFF switch remove battery isolator tag and allowed to charge a full sunny day c Your solar light is equipped with a photosensor that shuts the ligh...

Page 6: ...6 MANUEL D INSTRUCTIONS Torche Tiki solaire mosa que Home Depot UGS 413 953 CUP 609839462333...

Page 7: ...vous rencontrez des probl mes avec votre torche Tiki solaire avant de retourner votre magasin Home Depot veuillez communiquer avec le service la client le Service Creative prc us ou au 830 249 1200 V...

Page 8: ...ions fournies pour changer la pile 1 En tenant le corps du luminaire tournez le couvercle sup rieur dans le sens antihoraire jusqu le desserrer Retirez le couvercle sup rieur du corps du luminaire 2 E...

Page 9: ...r la Figure 1 3 Ins rez les montants assembl s par dessus le pieu 4 Ins rez l extr mit sup rieure des montants assembl s par dessus le couvercle inf rieur du corps du luminaire Assemblage Installation...

Page 10: ...Pour les luminaires sans interrupteur AUTO ARR T retirez l tiquette isolante de la pile et laissez le luminaire se charger pendant une journ e ensoleill e compl te c Le luminaire solaire est quip d un...

Page 11: ...11 MANUAL DE INSTRUCCIONES L mpara Solar Tiki Estilo Antorcha de Mosaicos Home Depot SKU 413 953 UPC 609839462333...

Page 12: ...ar a tu tienda local de The Home Depot por favor contacta a nuestro departamento de Servicio al Cliente a trav s de CustomerService Creative prc us o llama al 830 249 1200 Por favor usa como referenci...

Page 13: ...ar la bater a 1 Sost n la estructura de la l mpara rota la tapa superior en sentido contrario a las manecillas del reloj hasta que se afloje Quita la tapa superior del cuerpo de la l mpara 2 Sost n la...

Page 14: ...ra 1 3 Coloca el ensamblaje del poste encima de la estaca 4 Coloca el extremo superior del ensamblaje de los postes en la tapa inferior de la estructura de la l mpara Ensamblaje Instalaci n para Uso c...

Page 15: ...unidades sin un interruptor de AUTO APAGADO quita la etiqueta aislante de la bater a y deja que se cargue durante todo un d a soleado c Tu l mpara solar est equipada con un fotosensor que apaga la luz...

Reviews: