background image

HAMPTONBAY.COM

Assembly

Attaching the

Please contact 1-855-HD-HAMPTON for further assistance.


LL

HH

EE

NN

JJ

FF

BB

KK

I

G

H

J

N

AA

KK

FF

1

2

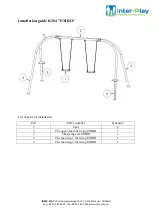
Attach the side panel (K  ) to the right back   leg (H) and the front leg (G)

S

w

Figure 1

Figure 2

Figure 3

Attaching the

ing 

S

F

rame

ide

Panel


(  ) using M8 washers (HH), hex   bolts (EE) and nuts (   ). Repeat to 

assemble the front leg (G) and the left back   leg (I) to the top beam

Ensure all bolts are aligned correctly and tighten with the

(TT). Cover the bolts with bolt caps (LL) and thenuts with nut caps

Attach the back   leg connector (N) to the right back   leg (H) and the 

See Figure 2.

Ensure all bolts are aligned correctly and tighten with the hex   

using washers (FF) and bolts (AA). Repeat to attach the side panel (K  )

(G). See Figure 3.

Ensure all bolts are aligned correctly and tighten with the hex   wrench  

K

H

G

G

I

5

Attach the front leg (G) and the right back   leg (H) to the   

 to the left back   leg (I) and front leg

(SS). Cover the bolts with bolt caps (KK).

top beam

(  ). See Figure 1. 

wrench

(NN).

left back leg (I) using washers (FF) and bolts (BB). 

wrench (SS). Cover the bolts with bolt caps (KK).

J

J

JJ

Summary of Contents for 1002 556 667

Page 1: ...Friday a m 6 p m EST Saturday 9 THANK YOU We appreciate the trust and confidence you have placed in Hampton Bay through the purc We strive to continually create quality products designed to enhance yo...

Page 2: ...y Information The user of this swing should always inspect it before each use It is essential to place this swing on level ground and not less than 6 ft from any obstruction such as fences Check the t...

Page 3: ...required to assemble the product HARDWARE INCLUDED NOTE 15 QQ 2 2 25 2 2 4 4 2 4 4 4 2 4 AA CC DD EE FF GG HH II JJ KK LL MM NN OO RR SS BB BB JJ TT PP 2 2 4 4 M6x30mm Bolt AA M6x4 Bolt M6x4 M6x52mm...

Page 4: ...O Seat Frame Back Frame Right Arm Left Arm ing Bar Sw Canopy Cloth Front Leg Left Back Leg Top Beam Side Panel Top Beam Bent Pipe Top Beam Straight Pipe Back Leg Connector Spring Hook Seat Cushion T D...

Page 5: ...ghten with the TT Cover the bolts with bolt caps LL and thenuts with nut caps Attach the back leg connector N to the right back leg H and the See Figure 2 Ensure all bolts are aligned correctly and ti...

Page 6: ...e aligned correctly and tighten with the wrench SS Cover the bolts with bolt caps KK the washers FF plastic washers II and nuts G G See figure 7 Attach the swing bar E to the back of the right arm C u...

Page 7: ...t the assembly into the four corners as shown Attach the canopy to the top beam using bolts AA washers FF plastic washers OO plastic washers PP wing nuts RR and adj ustment knob QQ See Figure 11 Ensur...

Page 8: ...oap and water for normal cleaning Do not use janitorial or alcohol based cleaners Some cleaners may be Rinse with clean water and dry with a soft absorbent cloth towel Treat the frame with a liquidwax...

Page 9: ...is manual for future use Questions problems missing parts Before returning to the store call Hampton Bay Customer Service 8 a m 7 p m EST Monday Friday 9 a m 6 p m EST Saturday HAMPTONBAY COM 1 855 HD...

Reviews: