background image

HG2200/HG2200AT Operator’s Manual

Check Supplies and Prepare Equipment

62 - Prepare

Fluid Levels

fuel

hydraulic fluid

engine coolant

engine oil

Condition and Function

all controls

filters

couplers

tracks or tires

hoses and valves

Assemble Accessories

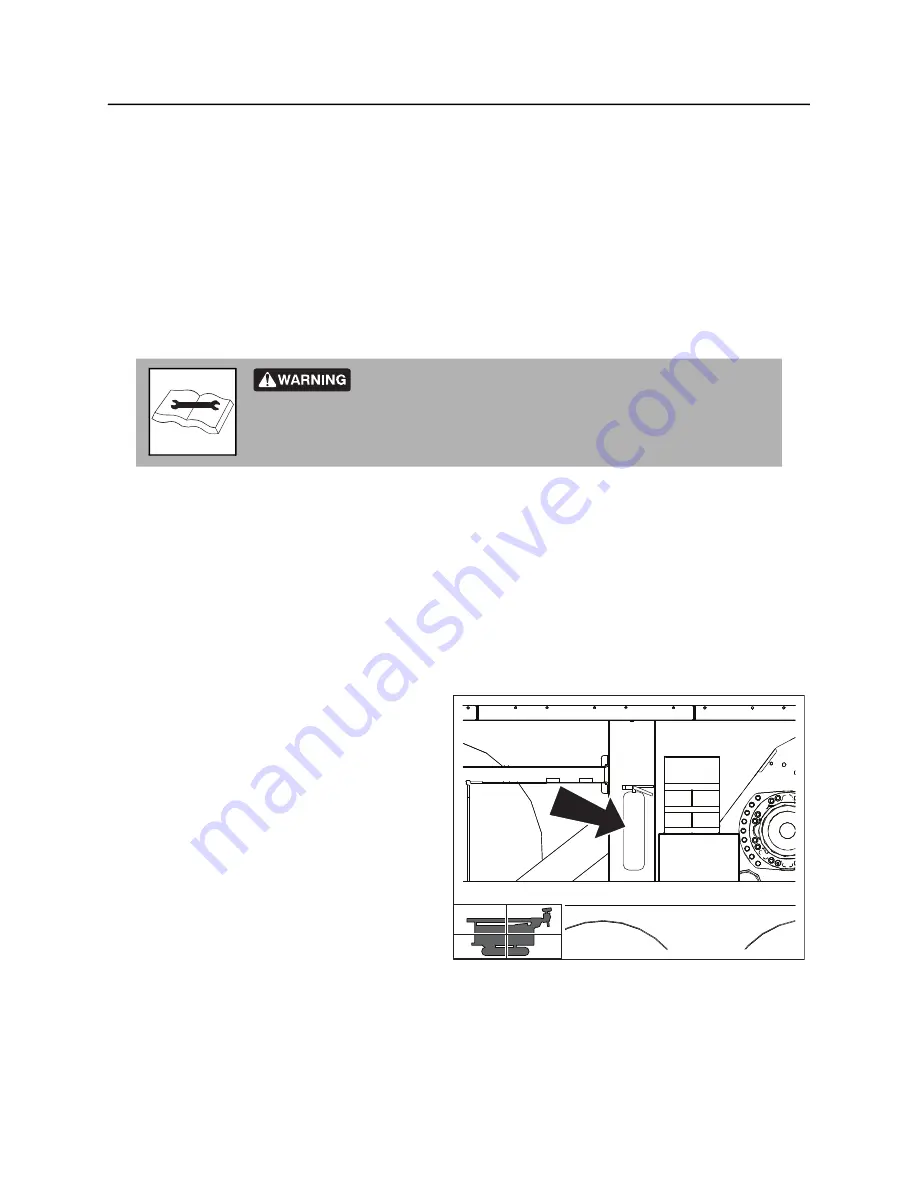
Fire Extinguisher

If required, mount a fire extinguisher near the 

power unit but away from possible points of 

ignition where shown. The fire extinguisher should 

always be classified for both oil and electric fires. 

It should meet legal and regulatory requirements. 

Improper control function could cause death or serious injury. If 

control does not work as described in instructions, stop machine and have it 

serviced.

j64om067w.eps

Summary of Contents for HG2200

Page 1: ...TECHNICAL PUBLICATIONS Operator s Manual HG2200 HG2200AT Issue 2 1 960 1119 Original Instruction ...

Page 2: ...Contents Serial Number Location 2 Intended Use 3 Equipment Modification 3 Unit Components 4 Tracked Unit 4 Wheeled Unit 5 Operator Orientation 6 Tracked Unit 66 Wheeled Unit 6 Operating Area 7 Winch 7 Tracks 7 About This Manual 8 Bulleted Lists 8 Numbered Lists 8 ...

Page 3: ...anual Serial Number Location 2 Overview Serial Number Location Record serial numbers and date of purchase in spaces provided date of manufacture date of purchase winch unit serial number 1 engine serial number 2 j64om002w eps 1 2 ...

Page 4: ...ovisions required for operating in extreme temperatures Use in any other way is considered contrary to the intended use HammerHead pipe bursters and power units should be operated serviced and repaired only by persons familiar with their particular characteristics and acquainted with the relevant safety procedures Equipment Modification This equipment was designed and built in accordance with appl...

Page 5: ...0AT Operator s Manual Unit Components 4 Overview Unit Components Tracked Unit 1 Winch 2 Mast 3 Tracks 4 ESID strobe 5 Wireless remote control lights 6 Stabilizer 7 Downhole unit Optional j64om003w eps 1 2 3 4 5 7 6 ...

Page 6: ...2200AT Operator s Manual Unit Components Overview 5 Wheeled Unit 1 Winch 2 Mast 3 Tires 4 ESID strobe 5 Wireless remote control lights 6 Stabilizer 7 Downhole unit 8 Hitch Optional j64om004w eps 1 2 3 4 6 5 7 8 ...

Page 7: ...ion Tracked 1 Front of unit 2 Right side of unit 3 Rear of unit 4 Left side of unit Wheeled Unit 1 Front of unit 2 Right side of unit 3 Rear of unit 4 Left side of unit IMPORTANT Top view of unit is shown IMPORTANT Top view of unit is shown j64om001w eps 1 3 2 4 j64om005w eps 1 3 2 4 ...

Page 8: ... 7 Operating Area Winch Operator should stand only in the location marked by number 1 Tracks Operator should stand only in the location marked by number 1 IMPORTANT Top view of unit is shown IMPORTANT Top view of unit is shown j64om006w eps 1 j64om007w eps 1 ...

Page 9: ...verview for basic operating procedures Cross references such as See page 50 will direct you to detailed procedures Bulleted Lists Bulleted lists provide helpful or important information or contain procedures that do not have to be performed in a specific order Numbered Lists Numbered lists contain illustration callouts or list steps that must be performed in order ...

Page 10: ...en place after this manual was published For the latest information on HammerHead equipment see your HammerHead dealer Thank you for buying and using HammerHead equipment Reporting Safety Defects If you believe that your vehicle has a defect which could cause a crash or could cause injury or death you should immediately inform the National Highway Traffic Safety Administration NHTSA in addition to...

Page 11: ...al Issue number 2 1 OM 09 11 Part number 960 1119 Copyright 2017 2018 2019 by Earth Tool Company LLC HammerHead and HydroBurst are registered trademarks of Earth Tool Company LLC This product and its use may be covered by one or more patents at http patents charlesmachine works ...

Page 12: ...and classifying the jobsite planning the installation and preparing the jobsite for work 51 Drive procedures for startup cold start driving and shutdown 63 Transport procedures for lifting and hauling 67 Burst Pipe procedures for setting up equipment and performing the pipe replacement 75 Systems and Equipment bursting string accessory kit tooling 87 Complete the Job procedures for restoring the j...

Page 13: ... Support the warranty policy for this machine and procedures for obtaining warranty consideration and training 133 Service Record a record of major service performed on the machine 135 Appendix additional information about HammerHead equipment 137 ...

Page 14: ...14 California Proposition 65 Warning 14 Emergency Procedures 15 Electric Strike Description 15 If an Electric Line is Damaged 16 If a Gas Line is Damaged 17 If a Fiber Optic Cable is Damaged 18 If Machine Catches on Fire 22 Safety Alert Classifications 17 Machine Safety Alerts 18 ...

Page 15: ...obsite Mark jobsite clearly and keep spectators away Wear personal protective equipment Review jobsite hazards safety and emergency procedures and individual responsibilities with all personnel before work begins Safety Data Sheets SDS are available at www hammerheadshop com resources technical sheets Fully inspect equipment before operating Repair or replace any worn or damaged parts Replace miss...

Page 16: ...t can injure or kill Many work related electrocutions result from contact with less than 440 volts Most electric strikes are not noticeable but indications of a strike include power outage smoke explosion popping noises arcing electricity If any of these occur assume an electric strike has occurred Jobsite hazards could cause death or serious injury Use correct equipment and work methods Use and m...

Page 17: ...ing actions The order and degree of action will depend upon the situation LEAVE AREA The ground surface may be electrified so take small steps with feet close together to reduce the hazard of being shocked from one foot to the other Contact utility company to shut off power Do not return to jobsite or allow anyone into area until given permission by utility company If you suspect an electric line ...

Page 18: ...ely and quickly Warn others that a gas line has been cut and that they should leave the area Leave jobsite as quickly as possible Immediately call your local emergency phone number and utility company If jobsite is along street stop traffic from driving near jobsite Do not return to jobsite until given permission by emergency personnel and utility company Fire or explosion possible Fumes could ign...

Page 19: ...l safety precautions have been taken Electric Strike Description When working near electric cables remember the following Electricity follows all paths to ground not just path of least resistance Pipes hoses and cables will conduct electricity back to all equipment Low voltage current can injure or kill Many work related electrocutions result from contact with less than 440 volts Most electric str...

Page 20: ...HG2200 HG2200AT Operator s Manual Emergency Procedures Safety 19 power outage smoke explosion popping noises arcing electricity If any of these occur assume an electric strike has occurred ...

Page 21: ...ing actions The order and degree of action will depend upon the situation LEAVE AREA The ground surface may be electrified so take small steps with feet close together to reduce the hazard of being shocked from one foot to the other Contact utility company to shut off power Do not return to jobsite or allow anyone into area until given permission by utility company If you suspect an electric line ...

Page 22: ...ely and quickly Warn others that a gas line has been cut and that they should leave the area Leave jobsite as quickly as possible Immediately call your local emergency phone number and utility company If jobsite is along street stop traffic from driving near jobsite Do not return to jobsite until given permission by emergency personnel and utility company Fire or explosion possible Fumes could ign...

Page 23: ...ne Catches on Fire Perform emergency shutdown procedure and then take the following actions The order and degree of action will depend on the situation Immediately move battery disconnect switch if equipped and accessible to disconnect position If fire is small and fire extinguisher is available attempt to extinguish fire If fire cannot be extinguished leave area as quickly as possible and contact...

Page 24: ...rt levels DANGER WARNING and CAUTION Learn what each level means indicates a hazardous situation that if not avoided will result in death or serious injury This signal word is to be limited to the most extreme situations indicates a hazardous situation that if not avoided could result in death or serious injury indicates a hazardous situation that if not avoided could result in minor or moderate i...

Page 25: ...al Machine Safety Alerts 24 Safety Machine Safety Alerts 1 Moving parts can crush and cut hand or foot Stay away 2 Lift point See Transport chapter for more information 3 Crushing weight could cause death or serious injury Stay away ...

Page 26: ...d ignite and cause burns No smoking no flame no spark 8 Do not get boom near power lines Death or serious injury will occur Keep required distance between boom and power lines Use a spotter 9 Jobsite hazards could cause death or serious injury Use correct equipment and work methods Use and maintain proper safety equipment 10 Misuse of machine can cause death or serious injury Read and understand o...

Page 27: ...anual Machine Safety Alerts 26 Safety 12 Equipment can be operated by remote control Stay away 13 Fire or explosion possible Do not use starter fluid 14 Exposure to high noise levels may cause hearing loss Wear hearing protection ...

Page 28: ... Winch Controls 28 Wireless Remote Controller 34 Wireless Remote Controller Secondary Functions 37 Track Tethered Remote Control 40 Gauges and Indicators 41 Optional Electric Strike System ESID 44 Manual Stabilizer Controls 47 Auxiliary Work Light 48 Battery Disconnect 48 ...

Page 29: ...ressure adjustment switch 6 Winch control lever 7 Remote engine stop button 8 Ignition switch 9 Auxiliary light switch 10 Wireless remote controller enable switch 11 Stabilizer control switch 12 Mode selection switch 13 Mast control 14 Remote hardwire connection 15 Auxiliary outlet 16 Pull force control 17 Cable speed control Optional j64om008w eps 1 2 3 4 5 6 7 8 9 10 11 12 13 14 16 15 17 ...

Page 30: ... counterclockwise IMPORTANT Pushing throttle adjustment control all the way in does not stop the engine 2 Electronic throttle switch To run engine at full throttle press top To run engine at low throttle press bottom IMPORTANT Throttle is to be run at maximum speed during operation of winch Cable pullback speed is adjusted with the cable speed adjustment control See Cable speed control on page 33 ...

Page 31: ...sition To pull cable in move lever to the right NOTICE Lever will remain engaged until moved to other position IMPORTANT Cable will push out or pull in at any engine speed Must be in neutral to start engine Must be in neutral for remote control option to function 7 Remote engine stop button To shut engine down press IMPORTANT Engine does have an electronic fuel shut off Pushing the throttle in wil...

Page 32: ...right stabilizer move 2 up and hold To lower right stabilizer move 2 down and hold See Manual Stabilizer Controls on page 47 12 Mode selection switch To enable winch controls press left To put controls in neutral position move switch to neutral position To enable auxiliary mode press right If using remote control see Wireless Remote Controller on page 34 IMPORTANT Winch controls include paying in ...

Page 33: ...ecting the wireless remote controller to winch via cable harness instead of radio signals eliminates interference from nearby sources 15 Auxiliary outlet Provides power for other equipment Power output is 12VDC 5A 16 Pull force control To increase pull force turn knob to the right To decrease pull force turn knob to the left IMPORTANT There is a minimum setting that needs to be achieved before cab...

Page 34: ...speed control To increase speed while pulling cable in turn knob to the right To decrease speed while pulling cable in turn knob to the left IMPORTANT There is a minimum setting that needs to be achieved before cable will start to move Item Description Notes c00ic175w eps ...

Page 35: ...tatus indicator 9 Power Start Horn switch 10 Right multifunction joystick 11 Operator presence switches 12 Remote hardwire connection IMPORTANT Throttle is automatically set to high when any machine functions are being used If no functions are being used throttle will return to low after 15 seconds Item Description Notes 1 LCD display Indicates the selected mode of operation battery status radio l...

Page 36: ...ge 36 for more information 3 Speed selection switch To select High speed range move up To select Medium speed range move down To select Low speed range move down again 4 Left multifunction joystick Move joystick to control selected system See Wireless Remote Controller Secondary Functions on page 37 5 Capstan cruise control To change speed move left joystick to desired speed and move switch up IMP...

Page 37: ...tart Horn switch To turn power on hold switch up until yellow LED indicator comes on and then blinks green Release switch Wireless remote control light page 4 will shine To start operation hold switch up with joystick controls in neutral position until horn sounds Release switch To use horn move switch up Release switch to stop horn To turn power off hold switch down until LED indicators go off Wi...

Page 38: ...Connecting the wireless remote controller to winch via cable harness instead of radio signals eliminates interference from nearby sources IMPORTANT To switch between secondary functions see Menu select switch on page 35 Item Description Notes 1 Engine start To start engine move the right joystick up Ignition switch must be in first position for engine to start IMPORTANT If engine does not start pr...

Page 39: ...izer move left joystick up To lower left stabilizer move left joystick down IMPORTANT Lower left and right stabilizers to the ground together then adjust individually 5 Mast Winch set up To raise the mast move the left joystick up To lower the mast move the left joystick down To rotate the mast clockwise move the left joystick to the right To rotate the mast counterclockwise move the left joystick...

Page 40: ...ove the right joystick up To pull cable in move the right joystick down To select speed see Speed selection switch on page 35 7 Mode Selection To enable auxiliary mode move the right joystick up To disengage auxiliary mode move the right joystick down Item Description Notes c00ic771h eps c00ic772h eps ...

Page 41: ...ol To move left track forward move lever forward To move left track backward move lever back 2 Right track control To move right track forward move lever forward To move right track backward move lever back IMPORTANT Track tethered remote control should only be used if wireless remote controller is damaged For more information see Track Tethered Remote Control on page 90 j64om009w eps 1 2 ...

Page 42: ...dicator 6 Hydraulic fluid temperature indicator 7 Hydraulic fluid filter restriction indicator 8 Cold start wait indicator Item Description Notes 1 Hydraulic pressure gauge Displays hydraulic pressure for unit In neutral the gauge readings should be approximately 0 300 psi 0 20 bar When operating the gauge readings can be up to approximately 3500 psi 241 bar j64om011w eps 1 2 3 4 5 6 7 8 c00ic262w...

Page 43: ...start up and when engine oil pressure is low NOTICE If engine pressure is too low the unit will shut down in 15 seconds Check engine oil level 4 High temperature indicator Flashes red on start up and when engine is overheating NOTICE If engine temperature is too high the unit will shut down in 15 seconds 5 Voltage indicator Lights red when alternator is not charging Item Description Notes c00ic008...

Page 44: ...If indicator lights stop engine and service unit 7 Hydraulic fluid filter restriction indicator Lights yellow when hydraulic fluid filter flow is restricted NOTICE If indicator lights stop engine and service unit 8 Cold start wait indicator Lights yellow when engine preheater glow plug is on Wait until light goes off before starting engine Item Description Notes ...

Page 45: ...cator 6 Current detection problem indicator 7 ESID Alarm interrupt button 8 ESID Self test button Item Description Notes 1 LCD display Displays the amount of current and voltage being detected as a percentage of a strike condition Displays status icons during certain error conditions The line with the V shows voltage reading and the line with the A shows current reading 1 1 2 2 3 3 4 4 6 6 5 5 7 7...

Page 46: ...dings increase A filled indicator bubble in the triangle represents a strike warning condition and will trigger the alarm s and strobe s NOTICE The ESID does not indicate proximity to electric lines System will activate only when voltage and or amperage detected at the unit are above threshold minimum limits Remember that the system can go from one or two indicator bubbles to an electric strike im...

Page 47: ...ensing circuit See Troubleshoot Strike System on page 97 7 ESID alarm interrupt button To turn off strike alarm at unit press 8 ESID self test button To start a manual self test press To reset the system after a strike has been detected press and hold IMPORTANT Self test checks all systems and circuits except voltage limiter See If an Electric Line Is Damaged on page 14 Item Description Notes ...

Page 48: ...heeled unit only Item Description Notes 1 Rear stabilizers Pull down and secure with pins 2 Manual stabilizer handle skid unit only Turn handle clockwise to lower stabilizer Turn handle counterclockwise to raise stabilizer 3 Manual trailer jack handle wheeled unit only Turn handle clockwise to lower front of trailer Turn handle counterclockwise to raise front of trailer j64om055w eps 1 2 3 ...

Page 49: ...y Work Light Item Description Notes 1 Auxiliary work light switch To turn auxiliary work light on press top To turn auxiliary work light off press bottom 2 Auxiliary work light outlet Provides power for auxiliary work light See Auxiliary Work Light on page 90 j64om068w eps 1 2 ...

Page 50: ...nnect Item Description Notes Battery disconnect switch To connect move right To disconnect move left NOTICE Do not operate battery disconnect switch with engine running To avoid equipment damage wait two minutes after turning engine off before disconnecting battery j64om013w eps ...

Page 51: ...HG2200 HG2200AT Operator s Manual Battery Disconnect 50 Controls ...

Page 52: ...Traffic Control 52 Plan for Emergency Services 52 Inspect Site 53 Identify Hazards 62 Select Installation and Bursting Pit Locations 54 Classify Jobsite 55 Select a Classification 55 Apply Precautions 56 Plan Pull Path 55 Prepare Jobsite 58 Mark Pull Path 58 Dig Bursting Pit 59 Check Supplies and Prepare Equipment 60 Check Supplies 60 Prepare Equipment 61 Assemble Accessories 62 ...

Page 53: ...n the US or Canada call 811 US or 888 258 0808 US and Canada Also contact any local utilities that do not participate in the One Call service In countries that do not have a One Call service contact all local utility companies to have underground utilities located Examine Pullback Material Ask for a sample of the new product material you will be pulling back Check its weight and stiffness Contact ...

Page 54: ...oad crossings or streams signs of utilities buried utility notices utility facilities without overhead lines gas or water meters junction boxes drop boxes light poles manhole covers sunken ground traffic access soil type and condition depths of existing pipes Have an experienced locating equipment operator sweep area within 20 6 m to each side of burst path to verify previously marked line and cab...

Page 55: ...actors affecting risks create an unsafe condition for pipe bursting Traffic Vehicle and pedestrian traffic must be a safe distance from pulling equipment Allow at least 10 3 m buffer zone around equipment Space Check that starting and ending points allow enough space for installation and bursting pits See Dig Bursting Pit on page 59 Check that installation area has enough space for product to be i...

Page 56: ...re working Comply with all utility notification regulations before digging or winching Verify location of previously marked underground hazards Mark jobsite clearly and keep spectators away Remember jobsite is classified by hazards in place not by line being installed If working then classify jobsite as within 10 3 m of a buried electric line electric within 10 3 m of a natural gas line natural ga...

Page 57: ...oft excavation Have service shut down while work is in progress Have electric company test lines before returning them to service Natural Gas Jobsite Precautions Position equipment upwind from gas lines and use one or both of these methods Expose lines by careful hand digging or soft excavation Have gas shut off while work is in progress Have gas company test lines before returning them to service...

Page 58: ... Other Jobsite Precautions You may need to use different methods to safely avoid other underground hazards Talk with those knowledgeable about hazards present at each site to determine which precautions should be taken or if job should be attempted Breathing crystalline silica dust may cause lung disease Cutting drilling or working materials such as concrete sand or rock containing quartz may resu...

Page 59: ...e flags or paint Jobsite hazards could cause death or serious injury Use correct equipment and work methods Use and maintain proper safety equipment 274 050 274 724 2P 700 133 To help avoid injury If jobsite classification is in question or the possibility of unmarked electric utilities exists classify jobsite as electric Cutting high voltage cable can cause electrocution Expose lines by hand befo...

Page 60: ...rator s Manual Prepare Jobsite Prepare 59 Dig Bursting Pit Minimum Bursting Pit Length A Width B U S metric U S metric 37 1 94 2 cm 40 0 101 6 cm Centerline of cable is 0 44 11 2 mm above the bottom plate C j64om014w eps ...

Page 61: ...radius Bursting Pit 2 Must accommodate the length and angle of the downhole unit Check Supplies and Prepare Equipment Check Supplies marking flags or paint fuel hydraulic oil keys cutting heads clevis barrier cones and tape Wire cable See Wire Cable on page 92 personal protective equipment such as hard hat and safety glasses notepad and pencil NOTICE Follow U S Department of Labor regulations on e...

Page 62: ...ete wrap of cable onto the drum 10 Set the start position of the second wrap on drum between 12 00 6 and 1 00 7 11 Install drive chain from drum assembly to level wind assembly with tension set to the bottom side of the sprockets 12 Hammer over the first wrap to close the gap between the first cable wrap and the drum plate 13 Wrap the next two to three consecutive wraps of cable and hammer over to...

Page 63: ... Accessories Fire Extinguisher If required mount a fire extinguisher near the power unit but away from possible points of ignition where shown The fire extinguisher should always be classified for both oil and electric fires It should meet legal and regulatory requirements Improper control function could cause death or serious injury If control does not work as described in instructions stop machi...

Page 64: ...HG2200 HG2200AT Operator s Manual Drive 63 Drive Chapter Contents Start Unit 64 Steer Unit 65 Tips to Reduce Track Wear 65 Safe Slope Operation 66 Shut Down Unit 66 ...

Page 65: ...ise to start machine 6 Run engine at half throttle or less for five minutes before operating machine Ensure all controls function properly Misuse of machine can cause death or serious injury Read and understand operator s manual and all other safety instructions before use To help avoid injury Wear hard hat safety glasses and other protective equipment required by job Do not wear jewelry or loose ...

Page 66: ... shards and broken concrete will damage rubber tracks and undercarriage components Excessive operation on concrete or asphalt will shorten track life When storing your machine keep tracks away from rain and direct sunlight Wash tracks daily to remove foreign objects and abrasive soil from sprockets and idler rollers Drive slowly and make wide turns when possible Regularly check undercarriage compo...

Page 67: ...l 2 Reduce engine speed to idle 3 Lower rear stabilizers to the ground 4 Turn ignition key to off position 5 Lower manual stabilizer manual trailer jack if equipped 6 For maintenance or long term storage turn battery disconnect switch to the OFF position Tipover possible Machine can tip over and crush you To help avoid injury Always operate from the uphill side of the unit Drive cautiously at all ...

Page 68: ...HG2200 HG2200AT Operator s Manual Transport 67 Transport Chapter Contents Lift 68 Points 68 Procedure 68 Haul 70 Wheeled Unit 69 Tracked Unit 72 Retrieve Tracked Unit 73 ...

Page 69: ...cedure Tracked Unit Use equipment capable of supporting the unit s size and weight See Specifications on page 129 or measure and weigh equipment before lifting Crushing weight could cause death or serious injury Stay away To help avoid injury Use only appropriate lifting devices and lifting equipment Use only approved lifting points Stay away from lifted load j64om015w eps ...

Page 70: ...G2200AT Operator s Manual Lift Transport 69 Wheeled Unit Use equipment capable of supporting the unit s size and weight See Specifications on page 129 or measure and weigh equipment before lifting j64om016w eps ...

Page 71: ...ed Unit Prepare Unit 1 Remove legs from downhole unit Using pins secure in storage location as shown T 2 Turn downhole unit to the upright position and secure with pin shown Crushing weight could cause death or serious injury Stay away j64om072w eps j64om071w eps ...

Page 72: ...breakaway switch cable to tow vehicle Do not connect to hitch or hitch ball 5 Attach breakaway cable to the towing vehicle bumper or frame 6 Plug trailer electrical connector into tow vehicle connector 7 Use jack crank to raise jack base and stow 8 Remove wheel blocks Unhitch Unit 1 Stop tow vehicle and trailer on level ground 2 Put manual transmission into first or reverse gear or automatic trans...

Page 73: ...s 5 Ensure engine is at full throttle and slowly drive unit onto trailer 6 Lower stabilizers to trailer floor 7 Stop engine when unit is safely positioned on trailer bed 8 Attach tiedowns to winch where indicated on Procedure on page 72 Tie Down Unit Points Tiedown points are identified by tiedown decals Securing to trailer at other points can damage machinery Procedure To tie down unit use D ring...

Page 74: ...e maximum towing force of 1 5 times unit weight use towing chains appropriately rated for maximum towing force attach chains to indicated tow points facing towing vehicle To attach chains to tow points determine which points are facing towing vehicle Loop chains around crossmember either front or back on winch frame Crushing weight could cause death or serious injury Use proper procedures and equi...

Page 75: ...HG2200 HG2200AT Operator s Manual Retrieve Tracked Unit 74 Transport ...

Page 76: ...or s Manual Burst Pipe 75 Burst Pipe Chapter Contents Setup and Configure 76 Setup Mast 77 Push Cable 80 Connect Tooling Head 81 Same Path Pipe Slitting Technology 81 Burst Head 82 Pull New Product 83 Finish Installation 85 ...

Page 77: ...g vehicle 3 Lower rear stabilizers in the desired location 1 Tooling head 2 Wire cable 3 Winch NOTICE Follow U S Department of Labor regulations on excavating and trenching Part 1926 Subpart P and other similar regulations NOTICE If stabilizers are lowered on unstable ground place steel road plate under stabilizers Crushing weight could cause death or serious injury Use proper procedures and equip...

Page 78: ...Ensure cable has eye shown 3 If cable does not have eye use a mast stop shown Moving parts can crush and cut hand or foot Stay away To help avoid injury Keep hands and fingers clear of the mast Ensure no personnel are in the pit as equipment is lowered Keep winch doors closed during operation j64om019w eps j64om024w eps ...

Page 79: ... down to open latch 2 10 Use winch control lever to lower the mast to the desired depth Cable speed control may be used to control how quickly the mast is lowered 11 When mast reaches desired depth lock latch into the mast and secure with pin 1 12 Indicator shown will align with green side of decal if mast position is acceptable IMPORTANT Warning will sound to alert personnel that the mast hydraul...

Page 80: ...unit up or down from the centerline of the existing utility 3 Remove pin shown to pivot downhole assembly to desired position Reinsert pin to secure in place 4 Pivot legs to desired position and secure with pins 1 2 5 Remove pins 3 to extend legs to face wall 6 Reinsert pins to lock legs into the extended position 7 Move the mode selection switch to the neutral position j64om064w eps 1 2 3 4 j64om...

Page 81: ...se To help avoid injury Maintain 2 way communication between bursting pit and all other personnel Make sure all personnel are clear of moving parts Do not attempt to use any part of body to assist wire cable entering exiting bursting unit Keep winch doors closed during operation IMPORTANT It is necessary to apply tension to winch cable to push cable It is not necessary to stop winch when the cable...

Page 82: ...e 6 Tighten swivel in the expander 7 Attach swivel to pipe puller 6 Misuse of machine can cause death or serious injury Read and understand operator s manual and all other safety instructions before use To help avoid injury Maintain 2 way communication between bursting pit and all other personnel Make sure all personnel are clear of moving parts Do not attempt to use any part of body to assist wir...

Page 83: ...t the installation pit 2 Connect the burst head 3 to the product 4 using burst head bolts 5 3 Insert pneumatic tool 6 into product pipe and burst head assembly 4 Connect cable 1 to shackle 2 that has been inserted through nose of pneumatic tool NOTICE Ensure the length of the new pipe is long enough to replace the length of pipe being replaced j57om074w eps 1 2 3 4 5 6 ...

Page 84: ...nd all other personnel Make sure all personnel are clear of moving parts Keep personnel at the proper operating area See Operating Area on page 7 Keep hands and feet away Do not attempt to use any part of body to assist wire cable entering exiting bursting unit Use winch for pipe bursting only Keep winch doors closed during operation Cable may break while pulling and strike you Serious injury or d...

Page 85: ... Set pressure to approximately 1000 psi 69 bar and start to winch the tooling and pipe assembly into the installation pit aligning the tooling string with the mount of the exiting pipe 8 While winching the new pipe into the entrance pit inspect the legs feet and position of the mast 9 When the tooling string is in the old line start the winch 10 Once winch is started pressure can be increased to t...

Page 86: ... Slitting Technology 1 Shut down unit See Shut Down Unit on page 66 2 Remove pipe puller from swivel 3 Remove wire cable from jaws and pull out of the blade set and expander Burst Head 1 Shut down unit See Shut Down Unit on page 66 2 Remove the burst head and disconnect the bursting head from the pipe 3 Remove wire cable from shackle j57om058w eps 1 2 3 4 5 6 ...

Page 87: ...HG2200 HG2200AT Operator s Manual Finish Installation 86 Burst Pipe ...

Page 88: ...ooting 89 Track Tethered Remote Control 88 Auxiliary Work Light 90 Same Path Pipe Slitting Technology 88 Burst Head 91 Wire Cable 92 Maintaining Wire Cable 92 Electric Strike System Optional 93 FCC Statement 93 Assemble Voltage Detector 94 Assemble Grid Mat 94 Test Strike System 95 ESID Diagnostic Codes 95 Troubleshoot Strike System 97 Use Electric Strike Simulator 99 ...

Page 89: ...ct with machine 2 Ensure wireless remote control enable switch is on See page 31 3 Move power start horn switch up again with controls in neutral until horn sounds Equipment can be operated by remote control Stay away 270 6037 To help avoid injury Keep unit in sight at all times when using wireless remote controller Keep a safe distance away from unit when operating wireless remote controller Ensu...

Page 90: ... a safe distance If in an area with interference try changing the channel see below If communication link indicator is red communication has been lost Shut down wireless remote and restart to try to enable communication If that doesn t work contact your HammerHead dealer If battery and communication link indicators both display red for several seconds and then the wireless controller shuts off USB...

Page 91: ...ositive battery terminal 5 Connect black ground clamp to machine frame away from battery 6 Operate tracks using track tethered remote control See Track Tethered Remote Control on page 40 Auxiliary Work Light The auxiliary work light can be used if additional light is needed at the jobsite The base is magnetic and enables the light to be moved as needed 1 Remove light from storage position shown IM...

Page 92: ...t and turn auxiliary work light switch to the on position See Auxiliary Work Light on page 90 Same Path Pipe Slitting Technology The tooling is used when installing polyethylene and high density polyethylene pipe Burst Head The bursting head is used when installing polyethylene and high density polyethylene pipe j64om070w eps j57om064w eps ...

Page 93: ...over stress wire cable Only use wire cable for the specified job Wire Cable Length cable 7 8 2590 feet 789 m 2500 feet 762 m usable Misuse of machine can cause death or serious injury Read and understand operator s manual and all other safety instructions before use To help avoid injury Replace damaged wire cable immediately Obvious damage includes permanent bends flat spots worn spots broken wire...

Page 94: ...cal HammerHead dealer to have the electric strike system tested FCC Statement The Electric Strike System has been tested and found to comply with the limits for a Class A digital device pursuant to Part 15 of the FCC rules These limits are designed to provide reasonable protection against harmful interference when the equipment is operated in a commercial environment This equipment generates uses ...

Page 95: ...t 6 2 m away from any part of system 2 Clip voltage limiter to voltage stake Assemble Grid Mat 1 Remove mat from storage 2 Place mat next to operator s station 3 Connect bonding cables to grid mats 4 Remove ground rod from storage 5 Drive ground rod into soil near grid mat 6 Move cords and cables under grid mat 7 Connect ground cable clamp to ground rod ...

Page 96: ...lem an error code will be displayed Anytime this happens press self test button to retest If error code is still displayed and does not appear in this chart have control module checked or replaced Code Display Condition Result 502 2 5V REF 2 5V reference error in ESID Internal reference failure ESID may not give valid readings 503 5V REF 5V reference error in ESID internal reference failure ESID m...

Page 97: ... ac current coil failed 519 POST CD V self test dc voltage input error self test of dc voltage input amplifier failed 520 POST DC I self test dc current input error self test of dc current input amplifier failed 521 V NOT GND strike voltage input stake not grounded self test of voltage stake failed 588 EEP WRITE EEProm write error ESID may not be able to record strike history 5895 MISC CODE invali...

Page 98: ...nit Check unit electric system Check that harness from unit to control module is connected Defective control module Have control module checked or replaced OK indicator is on but electrical power supply indicator is off Strike system is not getting adequate power from unit Check unit electric system Check that harness from unit to control module is connected Check that harness from unit carries mo...

Page 99: ...ontrol module and current transformer Defective current transformer 1 Disconnect current transformer 2 Check for 20 40 ohms from pin 1 to pin 4 20 40 ohms from pin 1 to pin 2 and less than 1 ohm from pin 2 to pin 4 Defective current transformer cable 1 Disconnect cable from transformer and control module 2 Check continuity of cable 3 If continuity is zero or cable is damaged replace Defective cont...

Page 100: ... through current transformer 2 Clip ends of lead wires together to make one loop 3 Move simulator switch to current and press test button 4 Watch screen and lights above display on strike system Three or four lights should turn on Current A should show 30 or higher in display To test for current at strike levels 1 Put two or three loops through current transformer 2 Follow steps above to test 3 Di...

Page 101: ...ard or tire but near frame of unit 2 Clip one lead to frame 3 Clip other lead to one voltage limiter mount 4 Move simulator switch to voltage and press test button 5 Watch screen and lights above display on strike system All lights should turn on Alarm and strobe should turn on Voltage V should show 90 or higher IMPORTANT IT is normal for simulator voltage levels to drift below 100 ...

Page 102: ...HG2200 HG2200AT Operator s Manual Complete the Job 101 Complete the Job Chapter Contents Stow Components 102 Restore Jobsite 102 Stow Tools 102 ...

Page 103: ...ete the Job Stow Components Load unit as specified See Transport on page 67 for more information Restore Jobsite Fill in installation bursting and service connection pits Stow Tools Make sure all accessories and tools are loaded and properly secured on trailer ...

Page 104: ...Service Precautions 104 Welding Precaution 104 Washing Precaution 104 Recommended Lubricants Service Key 105 Engine Oil Temperature Chart 106 Approved Coolant 106 Approved Fuel 107 Each Use 108 50 Hour 114 100 Hour 118 200 Hour 120 500 Hour 122 1000 Hour 124 As Needed 126 ...

Page 105: ...ng can damage electronics Welding currents can damage electronic components Always disconnect the ECU ground connection from the frame harness connections to the ECU and other electronic components prior to welding on machine or attachments Connect welder ground close to welding point and make sure no electronic components are in the ground path Disconnect battery at battery disconnect switch befo...

Page 106: ...mation on engine lubrication and maintenance see your engine manual Item Description DEO Diesel engine oil meeting or exceeding API CF SAE 10W 30 DEAC Low silicate fully formulated diesel engine antifreeze coolant meeting ASTM D6210 HF Hydraulic fluid Grade Tetra 46 or equivalent meeting or exceeding ISO 45 EPG Extreme Pressure Grease Use lithium based NLGI GC LB Grade 2 with extreme pressure addi...

Page 107: ...is specification NOTICE Do not use water or high silicate automotive type coolant This will lead to engine damage or premature engine failure Do not mix heavy duty diesel engine coolant and automotive type coolant This will lead to coolant breakdown and engine damage Use only distilled water for mixing coolants Do not use tap water Temperature range anticipated before next oil change j60om070w eps...

Page 108: ...o 5 B5 are approved for use in this unit The fuel used must meet the specifications for diesel fuel shown above In certain markets higher blends may be used if certain steps are taken Extra attention is needed when using biodiesel especially when operating in cold weather or storing fuel Contact your HammerHead dealer or the engine manufacturer for more information Avoid static electricity when fu...

Page 109: ...ck Tasks Notes Check engine oil level DEO Check engine coolant level DEAC Check hydraulic fluid level HF Check tire pressure and lug nut torque Wheeled unit 90 ft lb 122 N m Check fuel level and refuel Grease level wind follower and level wind shaft bearings EPG Grease level wind shaft EPG Grease bull wheel bearings EPG Check track tension and condition Tracked unit EPG Grease take up drum bearing...

Page 110: ... level before startup and every 10 hours of operation Add HF at fill 1 to maintain fluid level at halfway point on sight glass 2 Contents under pressure Relieve pressure before opening Death or injury could occur To help avoid injury Do not remove the pressure cap from a hot engine Wait until the coolant temperature is below 122 F 50 C before removing pressure cap Do not stand near or over the exp...

Page 111: ... every 10 hours of operation Fill fuel tank at fill 1 with approved fuel to fill line on fill pipe 2 at the end of each day to prevent condensation Pressure Stage Torque 105 psi 7 2 bar First 50 60 ft lb 68 81 N m Second 90 200 ft lb 122 271 N m Final 275 325 ft lb 373 441 N m Fuel and its vapors are extremely flammable Fire or explosion can cause death or serious injury To help avoid injury Keep ...

Page 112: ...level wind shaft bearings shown before startup and every 10 hours of operation with EPG Grease Level Wind Shaft Grease level wind shafts before startup and every 10 hours of operation with EPG Grease Bull Wheel Bearings Grease bull wheel bearings before startup and every 10 hours of operation with EPG j64om031w eps j64om032w eps j64om033w eps ...

Page 113: ...from idler to sprocket as shown 4 Pump EPG into fitting 2 until distance between top edge of bottom of track and straightedge A is 1 1 2 to 2 37 5 50 mm 5 Lower stabilizer 6 Drive straight forward one machine length and check tension again 7 Repeat the process for the left track Grease Take Up Drum Bearings Grease take up drum bearings before startup and every 10 hours of operation with EPG IMPORT...

Page 114: ... 10 hours of operation Ensure that valve is not inverted damaged plugged or cracked Inspect Wire Cable Inspect wire cable before each use Replace damaged wire cable immediately Obvious damage includes permanent bends flat spots worn spots broken wires frays rust and corrosion For more information see Wire Cable on page 92 j64om036w eps ...

Page 115: ...s To change 1 Remove wing nut 1 to remove cover 2 2 Remove and clean filter element 3 Replace if needed See Change Air Filter on page 126 3 Wipe inside of housing 4 and wash cover 4 Replace filter element and ensure it is seated correctly 5 Clean dust ejector valve 5 6 Replace cover If cover does not fit filter element is not properly locked into housing Remove cover and element and repeat step 4 ...

Page 116: ...r Service 115 Check Fuel Lines Check fuel lines after 50 hours for wear or cracks Check fuel line for loose or broken clamp bands Grease Bull Wheel Sprockets Grease the bull wheel sprockets every 50 hours with MOB j64om039w eps j64om040w eps ...

Page 117: ...eaks Wear protective clothing including gloves and eye protection Before disconnecting a hydraulic line turn engine off and operate all controls to relieve pressure Lower block or support any raised component with a hoist Cover connection with heavy cloth and loosen connector nut slightly to relieve residual pressure Catch all fluid in a container Before using system check that all connections are...

Page 118: ...r s Manual 50 Hour Service 117 Grease Mast Pivots Grease mast pivots shown every 50 hours with EPG Grease Mast Cable Sheave Bearings Grease mast cable sheave bearings shown every 50 hours with EPG j64om041w eps j64om042w eps ...

Page 119: ...ged 3 Add DEO at fill 2 until oil level is at highest capacity on dipstick Check Fan Belt Check alternator fan belt tension every 100 hours 1 Apply pressure to fan belt 2 between pulleys Belt should move between 0 28 0 35 7 9 mm when pressed 2 If the belt is outside of normal tension adjust alternator arm 1 until belt is within normal limits 3 Replace fan belt if damaged Task Notes Change engine o...

Page 120: ...onnections 10 Ensure that battery tiedowns are secure 11 Turn battery disconnect to the ON position Explosion possible Serious injury or equipment damage could occur Follow directions carefully To help avoid injury Wear safety glasses and face shield and rubber gloves Use flashlight to check electrolyte level Work in a well ventilated area Avoid breathing fumes from battery and avoid contact with ...

Page 121: ...film of oil to gasket of new filter 4 Install filter turning clockwise by hand until filter head contacts the filter head surface 5 Start engine and cycle control levers to pressurize system 6 Stop engine check hydraulic fluid level and check for leaks around filter Change Fuel Filter Change fuel filter every 200 hours 1 Close fuel shutoff valve 1 2 Replace fuel filter 2 3 Open fuel shutoff valve ...

Page 122: ...HG2200 HG2200AT Operator s Manual 200 Hour Service 121 Add Cooling System Additive Add cooling system additive to radiator at fill 1 every 200 hours Capacity is 0 8 oz 24 cc j64om027w eps 2 1 ...

Page 123: ... turn by hand 4 Rotate starwheel the other direction until drum turns with slight drag 5 Replace adjusting slot cover and replace wheel 6 Repeat procedure for all remaining brakes 7 Remove jack stands and lower wheels to ground Change Fan Belt Change alternator fan belt every 500 hours 1 Loosen alternator arm 1 to remove fan belt 2 2 Install new fan belt 1 Adjust alternator arm until movement betw...

Page 124: ...ter at fill 2 3 Check for signs of rust and add cooling system cleaner to the water if necessary 4 Run engine long enough to ensure thermostat has opened 5 Let system cool drain water 6 Add coolant at fill Do not fill to the top 7 Run engine until mixture has circulated in the system 8 Add 3 25 oz 97 cc of Fleetguard DCA4 9 Finish filling radiator with DEAC NOTICE See Approved Coolant on page 106 ...

Page 125: ...3 fluid is warm and drain 2 Clean inspect and install drain plug 3 Change hydraulic filter See Change Hydraulic Fluid Filter on page 120 4 Add HF at fill 1 until level is at halfway point on sight glass 2 5 Operate hydraulic system 6 Follow shutdown procedure and recheck oil level Task Notes Change hydraulic fluid HF Check wheel bearings Wheeled units EPG j64om051w eps 1 2 3 ...

Page 126: ...re and hub bore using suitable solvent Dry components with lint free cloth 9 Inspect bearing cups and bearings for pitting spalling and corrosion Replace if damaged 10 Pack all bearings with EPG Apply light coating of grease to bearings 11 Reinstall seal on hub and replace inner bearing 12 Ensure the bearings and bearing cups are seated correctly into the hub 13 Replace hub 14 Replace spindle wash...

Page 127: ...element and ensure it is seated correctly 5 Clean dust ejector valve 5 6 Replace cover If cover does not fit filter element is not properly locked into housing Remove cover and element and repeat step 4 Change Wireless Remote Controller Batteries Replace batteries when low battery indicator is displayed Install 6 AA batteries as shown Task Notes Change air filter Change wireless remote controller ...

Page 128: ...or charging Do not connect to rapid chargers or dual batteries Use caution and wear personal protective equipment such as safety eyewear when charging or cleaning battery Keep sparks flames and any ignition source away from batteries at all times Internal contents are extremely hazardous Leaking fluid is corrosive Battery may be explosive at higher temperatures NEVER lean over battery when making ...

Page 129: ...HG2200 HG2200AT Operator s Manual As Needed 128 Service ...

Page 130: ...U S Metric L length with trailer tongue 17 ft 5 2 m L length without trailer tongue 14 1 ft 4 3 m W width 7 ft 2 1 m H1 height 6 5 ft 2 m H2 boom height Tracked unit 15 5 ft 4 73 m Wheeled unit 15 75 ft 4 80 m H3 boom length in ground 23 ft 7 m Weight with cable j64om054w eps L L H2 H2 H1 H1 W W H3 H3 ...

Page 131: ...mum 100 ft min 30 5 m min Pullback cable speed maximum 60 ft min 18 m min Power U S Metric Engine Kubota D1105 EPA Tier 4 EU Stage IV Fuel Diesel Cooling medium liquid Manufacturer s gross power rating per SAE J1955 24 8 hp 18 5 kW Trailer Unit U S Metric Tire 235 75R17 5 H 16 143 141L 105 psi 7 2 bar Load rating Should not exceed 16 000 lbs 7257 kg Load ratings for speeds up to 75 mph 121 km h No...

Page 132: ...ead XXXX Type machine type Engine Power xxx kW Serial Number model XXXXX Conforms to the requirements of 2006 42 EC Machinery Directive 2014 30 EU Electromagnetic Compatibility Directive 2000 14 EC Noise Emission Directive Measured sound power level Annex V xxx dBA Guaranteed sound power level Annex V xxx dBA The Technical Construction File is maintained at the manufacturer s location The manufact...

Page 133: ...HG2200 HG2200AT Operator s Manual Declaration of Conformity Information 132 Specifications ...

Page 134: ... of purchase Return damaged parts to dealer for inspection and warranty consideration if in warranty time frame Order genuine HammerHead replacement or repair parts from your authorized HammerHead dealer Use of another manufacturer s parts may void warranty consideration Resources Publications Contact your HammerHead dealer for publications and videos covering safety operation service and repair o...

Page 135: ...n Lake Mills Wisconsin No part shall be returned without prior written authorization from ETC and this warranty does not obligate ETC to bear any transpiration charges in connection with the repair or replacement of defective parts Earth Tool Company LLC will not accept any charges for labor and or parts incidental to the removal or remounting of parts repaired or replaced under this Warranty This...

Page 136: ...HG2200 HG2200AT Operator s Manual Service Record 135 Service Record Service Performed Date Hours ...

Page 137: ...HG2200 HG2200AT Operator s Manual 136 Service Record Service Performed Date Hours ...

Page 138: ...HG2200 HG2200AT Operator s Manual Appendix 137 Appendix Chapter Contents Tire Safety Information ...

Page 139: ...enly to prevent overloading front to back and side to side Heavy items should be placed low and as close to the axle positions as reasonable Too many items on one side may overload a tire The best way to know the actual weight of the trailer is to weigh it at a public scale Talk to your dealer to discuss the weighing methods needed to capture the various weights related to the trailer This would i...

Page 140: ... s manual to determine how this weight transfer reduces the available cargo and luggage capacity of your vehicle 1 3 GLOSSARY OF TIRE TERMINOLOGY Bead the part of the tire that is made of steel wires wrapped or reinforced by ply cords and that is shaped to fit the rim Bead separation the breakdown of the bond between components in the bead Bias ply tire a pneumatic tire in which the ply cords that...

Page 141: ...o the beads are laid at substantially 90 degrees to the centerline of the tread Recommended inflation pressure the inflation pressure provided by the vehicle manufacturer on the Tire Information label and on the Certification VIN tag Rim a metal support for a tire or a tire and tube assembly upon which the tire beads are seated Rim diameter the nominal diameter of the bead seat Rim size designatio...

Page 142: ...ormation on the following topics Basic tire maintenance Uniform Tire Quality Grading System Fundamental characteristics of tires Tire safety tips Use this information to make tire safety a regular part of your trailer maintenance routine Recognize that the time you spend is minimal compared with the inconvenience and safety consequences of a flat tire or other tire failure 1 5 SAFETY FIRST BASIC T...

Page 143: ...a tire is cold The term cold does not relate to the outside temperature Rather a cold tire is one that has not been driven on for at least three hours When you drive your tires get warmer causing the air pressure within them to increase Therefore to get an accurate tire pressure reading you must measure tire pressure when the tires are cold or compensate for the extra pressure in warm tires 1 5 4 ...

Page 144: ...frame This adjustment maximizes the life of your tires These adjustments require special equipment and should be performed by a qualified technician 1 5 8 TIRE REPAIR The proper repair of a punctured tire requires a plug for the hole and a patch for the area inside the tire that surrounds the puncture hole Punctures through the tread can be repaired if they are not too large but punctures to the s...

Page 145: ...s load carrying capabilities and its inflation limits 1 6 TIRE SAFETY TIPS Preventing Tire Damage Slow down if you have to go over a pothole or other object in the road Do not run over curbs or other foreign objects in the roadway and try not to strike the curb when parking Tire Safety Checklist Check tire pressure regularly at least once a month including the spare if equipped Inspect tires for u...

Page 146: ......

Reviews: