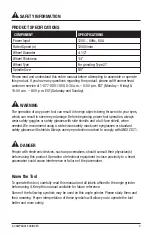
Hammerhead HAAG060 Manual Download Page 16

16 

6.0 AMP ANGLE GRINDER

CARE AND MAINTENANCE
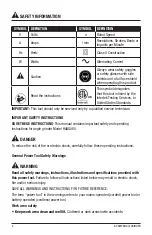
 WARNING:

•  Always disconnect the device before performing any adjustment or maintenance 

operation. 

if the replacement of the supply cord is necessary, this has to be done by the 

manufacturer or his agent in order to avoid a safety hazard.

•  Disconnect from the power supply immediately if the supply cord is damaged. 

Take care not to expose this tool to the rain. 

•  If the carbon brushes need to be replaced, have this done by a qualified repair 

person (always replace the two brushes at the same time)

1. Cleaning

•  Avoid using solvents when cleaning plastic parts. Most plastic parts are susceptible to 

damage from various types of commercial solvents and may be damaged by their use. 
Use clean cloths to remove dirt, carbon dust, etc.

2. Lubrication

•  All the bearings in this tool are lubricated with a sufficient amount of high grade lubricant 

for the life of the unit under normal operating conditions, therefore no further lubrication 
is required.

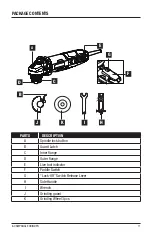
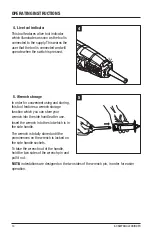
3. Tightening the disc safety guard

Disconnect the plug from the electrical outlet.
  a)  Remove the flanges and the wheel; refer to the section 

“Grinding Wheel 

Assembly”

.

  b)  Open the guard latch and rotate the guard to a proper position.
  c)  Close the guard latch and tighten the screw on the guard with the wrench supplied.

NOTE:

 After the wheel guard is tightened, the guard should be fixed firmly when the latch is 

closed and rotated normally when the latch is opened.

Summary of Contents for HAAG060

Page 1: ...Number______________________ Purchase Date_______________________ Questions problems missing parts Before returning to your retailer call our customer service department at 1 877 888 1880 8 30 a m 8...

Page 2: ...ints Crystalline silica from bricks cement and other masonry products Arsenic and chromium from chemically treated lumber Your risk from these exposures varies depending upon how often you do this typ...

Page 3: ...l operation always wear safety goggles or safety glasses with side shields and a full face shield when needed We recommend using a wide vision safety mask over eyeglasses or standard safety glasses wi...

Page 4: ...T SAFETY INSTRUCTIONS SAVE THESE INSTRUCTIONS This manual contains important safety and operating instructions for angle grinder Model HAAG060 DANGER To reduce the risk of fire or electric shock caref...

Page 5: ...rating a power tool outdoors use an extension cord suitable for outdoor use Use of a cord suitable for outdoor use reduces the risk of electric shock If operating a power tool in a damp location is un...

Page 6: ...and or remove the battery pack if detachable from the power tool before making any adjustments changing accessories or storing power tools Such preventive safety measures reduce the risk of starting...

Page 7: ...tool Incorrectly sized accessories cannot be adequately guarded or controlled Threaded mounting of accessories must match the grinder spindle thread For accessories mounted by flanges the arbor hole o...

Page 8: ...tool near flammable materials Sparks could ignite these materials Do not use accessories that require liquid coolants Using water or other liquid coolants may result in electrocution or shock Further...

Page 9: ...to the power tool and positioned for maximum safety so the least amount of wheel is exposed towards the operator The guard helps to protect the operator from broken wheel fragments accidental contact...

Page 10: ...for your tool When cleaning a tool be careful not to disassemble any portion of the tool since internal wires may be misplaced or pinched or safety guard return springs may be improperly mounted Certa...

Page 11: ...S A G C E F D B H I K J PARTS DESCRIPTION A Spindle lock button B Guard Latch C Inner flange D Outer flange E Live tool indicator F Paddle Switch G Lock Off Switch Release Lever H Side Handle I Wrench...

Page 12: ...versatility in confined spaces a Open the guard latch and position the wheel guard on the spindle neck so that the two lugs on the guard line up with the two notches on the spindle neck b Rotate whee...

Page 13: ...he spindle from moving While pressing the spindle lock button tighten the outer flange by turning it clockwise with the wrench supplied Lock Nut Backing Flange Spindle Grinding Wheel 2a 2b 3 Side hand...

Page 14: ...for convenient using and storing this tool features a wrench storage function which you can store your wrench into the side handle after use Insert the wrench into the slot which is in the side handle...

Page 15: ...ent grinding is achieved by controlling the pressure and keeping the angle between wheel and workpiece at 10 to 15 If the wheel is flat the tool is difficult to control If the angle is too steep the p...

Page 16: ...re susceptible to damage from various types of commercial solvents and may be damaged by their use Use clean cloths to remove dirt carbon dust etc 2 Lubrication All the bearings in this tool are lubri...

Page 17: ...tools must use 3 wire extension cords that have 3 prong plugs and receptacles NOTICE The smaller the gauge number the heavier the cord RECOMMENDED SIZES OF EXTENSION CORDS 120 VOLT ALTERNATING CURRENT...

Page 18: ...ON Product does not start Not connected to power supply Connect to power supply Power cord or plug is defective Have the tool serviced by an Authorized Service Center Other electrical defect to the pr...

Page 19: ...fects in material and workmanship If you believe that the Angle grinder is defective at any time during the specified warranty period call HAMMERHEAD support at 1 877 888 1880 to speak with a customer...

Page 20: ......

Reviews: