background image

52

#

"

!

!

!

"

Panel Saw

K3 basic/K3 winner/K3 e-classic

Making adjustments and preparations

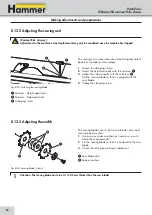
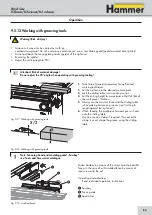
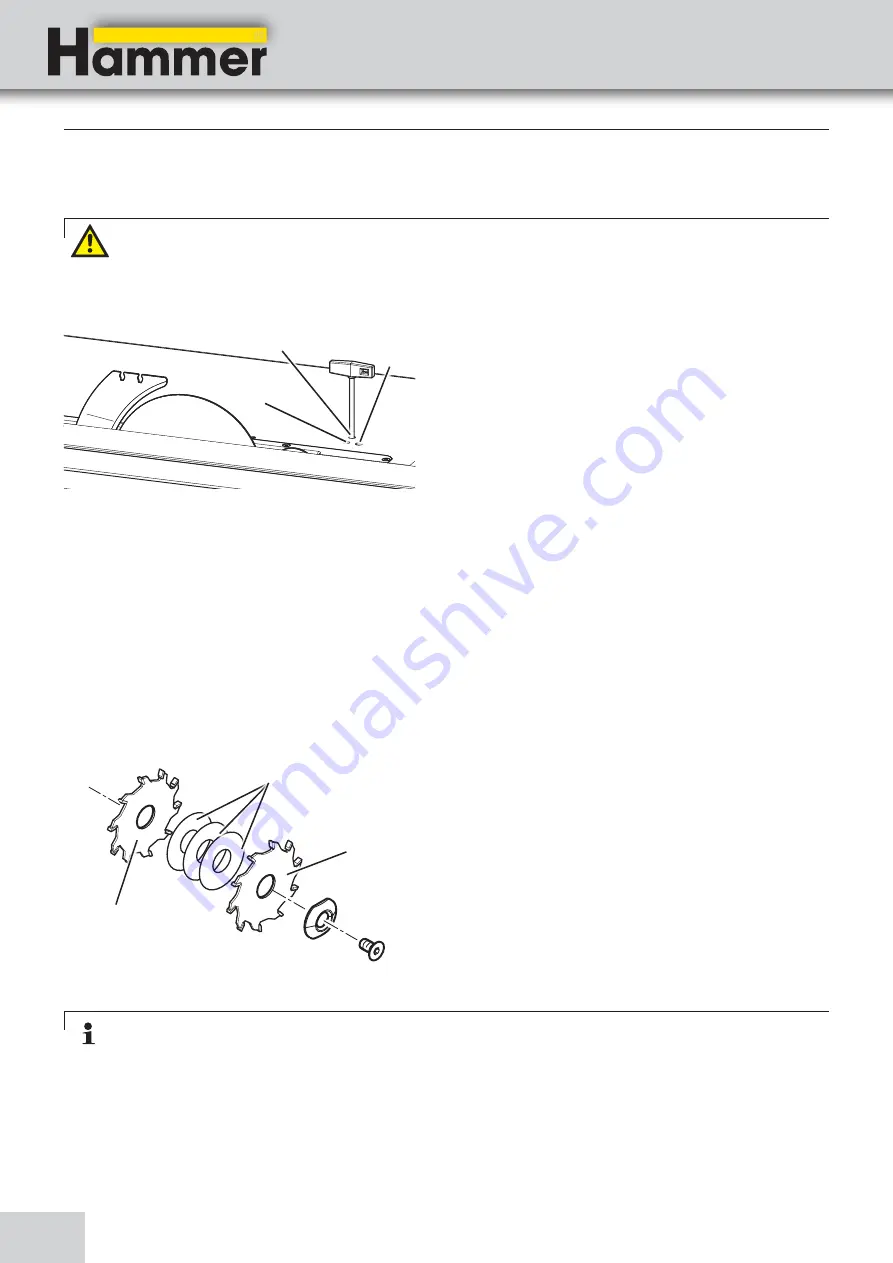
8.12.2 Adjusting the scoring unit

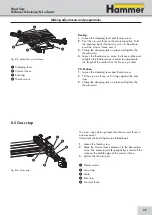
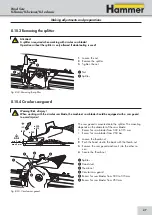
Fig. 8-33: Adjusting the scoring blade

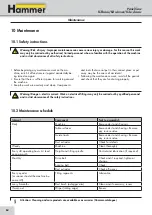
8.12.3 Adjusting the width

The scoring blade consists of two saw blades discs and 

several spacer washers.

1.

  Use as many spacer washers as necessary so as to 

attain the required width.

2.

  Set the scoring blade so that it is centered to the saw 

blade.

3.

  Check the setting by making a sample cut.

!

Saw blade discs

"

Spacer washers

Attention: The scoring blade has to be 0.1 to 0.2 mm thicker than the saw blade!

Fig. 8-34: Scoring blade „Classic“

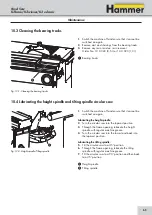
The scoring unit is necessary when machining laminated 

panels as it produces clean edges.

1.

  Loosen the clamping screws

2.

  Adjust the height manually with the setscrew. 

!

3.

  Adjust the side manually with the setscrew. 

Set the scoring blade so that it is aligned with the 

saw blade.

4.

  Clamp the clamping screw.

!

Setscrew - Height adjustment

"

Setscrew - Side adjustment

Clamping screw

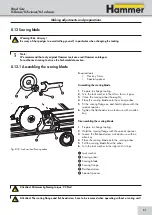
Warning! Risk of injury!

Adjustments to the machine or tool replacement may only be conducted once the machine has stopped.

Summary of Contents for K3 e-classic

Page 1: ...User Manual Panel Saw K3 basic K3 winner K3 e classic Keep this manual handy and in good condition for continual reference Dok ID 503010 902_02 Englisch 2017 09 15 Translation...

Page 2: ...ual to hand and in the vicinity of the machine so that it is accessible to personnel when they are using maintaining or repairing the machine FELDER KG KR FELDER STR 1 A 6060 Hall in Tirol Tel 43 0 52...

Page 3: ...s arising from the machine 11 2 9 Other risks 12 3 Declaration of Conformity 13 4 Specifications 14 4 1 Dimensions and weight 14 4 1 1 K3 basic K3 e classic 14 4 1 2 K3 winner 15 4 2 Operation and sto...

Page 4: ...Safety instructions 37 8 2 Sliding table catch 37 8 3 Crosscut fence on the sliding table 38 8 4 Crosscut fence on the outrigger 38 8 5 Cross stop 39 8 6 Crosscut fence extension 40 8 7 Parallel cutt...

Page 5: ...ating the height spindle and tilting spindle circular saw 65 10 5 Tightening replacing the drive belt 66 10 5 1 Tensioning the drive belt 66 10 5 2 Replacing the drive belt 66 10 6 Checking the scorin...

Page 6: ...age Warning Danger electric current This symbol warns of potentially dangerous situations related to electric current Not observing the safety instructions increases the risk of serious injury or deat...

Page 7: ...ersons who work on or with the machine All descriptions texts drawings photos and other depictions are protected by copyright and other commercial laws Illegal use of the materials is punish able by l...

Page 8: ...l and can therefore be dismantled without problem This material is also easy to dispose of and does not pollute the environment or Attention Used electrical materials electronic components lubricants...

Page 9: ...laims regarding damage resulting from improper use that are made against the manufacturer and its authorized representatives shall be rejected The operator shall be solely liable for any damage that r...

Page 10: ...ed tasks and recognise potential risks If the personnel lack the necessary knowledge for work ing on or with the machine they must first be trained Responsibility for working with the machine installa...

Page 11: ...tection To protect against loss of hearing 2 8 Hazards arising from the machine The machine has undergone a hazards analysis The design and construction of the machine are based on the results of this...

Page 12: ...specially when changing the tooling Contact with the rotating saw blade and or the scor ing unit can cause an injury Risk of injury due to ejected workpieces Risk of injury from workpiece kickback Hea...

Page 13: ...ficate No HO 151043 This EC Declaration of Conformity is valid only if the CE label has been affixed to the machine Modifying or altering the machine without the express written agreement of the manuf...

Page 14: ...Overall width Option C2 892 mm 1743 mm Total height Working height approx 1070 888 mm Rip capacity D 700 mm Width of sliding table E 290 mm Net weight 240 kg Machine including packaging Length x Widt...

Page 15: ...ble bar B 1032 mm 1032 mm Overall width C1 1034 mm 1474 mm 1034 mm 1474 mm Overall width C2 892 mm 1743 mm 892 1743 mm Overall width Option C3 1364 2140 mm 1364 mm 2140 mm Overall width C4 1066 mm 106...

Page 16: ...3 kW Antriebsmotor Vorritzeinheit Option Motor power S6 40 0 65 kW 0 65 kW S6 operation under load and intermittent service 40 relative operating factor Max cutting height 2 mm Specifications 4 3 Elec...

Page 17: ...ry Neverthe less this information is provided to help the operator bet ter assess hazards and risks Depending on the location of the machine and other specific conditions the actual noise emission val...

Page 18: ...fications Max diameter 180 mm Width 5 to 20 mm 4 8 Tools Specifications Note We recommend that only original HAMMER tools are used HAMMER catalogue Only use saw blades Which have an authorised speed h...

Page 19: ...verview Fig 5 1 Overview Dust extraction Connection D 120 mm Machine frame Sliding table Machine table Splitter Saw blade Saw guard with dust extraction Connection D 50 mm Parallel cutting fence Cross...

Page 20: ...ner Fig 5 2 Overview Dust extraction Connection D 120 mm Outrigger table Crosscut fence Outrigger table Machine table Splitter Saw blade Saw guard with dust extraction Connection D 50 mm Parallel cutt...

Page 21: ...sion To correctly place the piece to be cut for long cuts As sembly instructions Table extension Table extension Fig 5 4 Table extension with foot support To correctly place the piece to be cut for lo...

Page 22: ...cuts As sembly instructions Extensible support Table Extension 400 mm Fig 5 7 Table Extension 400 mm Extension with workpiece roller for the outrigger Order No 503 132 Fig 5 8 Extension with workpiece...

Page 23: ...ate displays the following specifications Model designation Machine number Voltage Phases Frequency Power Electricity Year of construction Manufacturer info Fig 5 12 Data plate Rolling carriage with 4...

Page 24: ...Off Position l Mains voltage On Main switch Attention A main switch with a 4kW motor power is only installed on the K3 winner circular saw 5 5 Safety devices 5 5 1 Safety break switches Fig 5 14 Safet...

Page 25: ...the machine s saw blade should be equipped with a saw guard to avoid injuries Fig 5 16 Saw guard The saw guard has to be installed and set correctly Clean the saw guard with the dust extractor Diamete...

Page 26: ...he machine s centre of gravity when trans porting it minimise the risk of it tipping over Take measures to prevent the machine from slipping sideways Ropes belts or other hoisting devices must be equi...

Page 27: ...machine to the installation location Transport brackets 6 2 2 Transport devices for the circular saw K3 basic Warning Risk of injury Remove the transportation device immediately after moving the mach...

Page 28: ...he work table sliding table or base Fig 6 4 Transport with a crane Thread the belts or chains through the cut out holes in the machine frame Machine frame 6 2 4 Transport with a fork lift truck Fig 6...

Page 29: ...sh the pallet jack forks into the machine frame cut out holes and under the transport device 3 Unload the machine from the pallet with a pallet jack K3 winner 1 Push the pallet jack forks into the hol...

Page 30: ...the scope of the damage on the transport documents delivery note Initiate the complaint process For all defects that are not discovered upon delivery be sure to report them as soon as they are recogn...

Page 31: ...rom direct sunlight Avoid subjecting the machine to shocks Storage temperature 10 to 50 C Maximum humidity 60 Avoid extreme temperature fluctuations condensation build up Apply a coat of oil to all ba...

Page 32: ...nly operate the machine in ambient temperatures from 10 to 40 C If the instructions are not followed damage may occur during storage Ensure that there is sufficient space for working around the machin...

Page 33: ...sely and oper ates smoothly Compensate for uneven floors with the adjusting screws Spirit level Adjusting screws Fig 7 2 Positioning the machine Fig 7 3 Floor mounting 3 If necessary the machine can b...

Page 34: ...nitial machine start up Individual installation instructions are found with the machine or the sliding table 7 3 2 Assembling disassembling the outrigger table Fig 7 5 Assembling the outrigger table A...

Page 35: ...ard Remove the saw guard and insert it into the other recess 4 Tighten the thumb nut Note As a rule all units must be vacuumed during use A time delayed socket is available as an acces sory In additio...

Page 36: ...g over it Note Do not open the machine s switch box unless you have the express consent of the Hammer service de partment Violating this stipulation shall render the right to make claims under the war...

Page 37: ...on the ma chine switch it off and secure it against accidentally being turned on again Before commencing any work with the machine in spect it to ensure that it is complete and in technically good con...

Page 38: ...ping part Single hand clamp levers End stop Groove Stop Fig 8 3 Adjust end stop Adjusting 1 Fold the end stop back 2 Loosen the setscrew 3 Turn the cam lever until a 90 angle is attained the fence rea...

Page 39: ...gth of the scale when the fence is pivoted 90 Position 1 Loosen the clamping lever and thumb screws 2 Tilt the crosscut fence until it stops against the end stop 3 Clamp the clamping lever in place an...

Page 40: ...lamp the clamping lever Scale Track Indicator Nuts Clamping lever Attention When using a table extension the distance between the upper edge of the track and the upper edge of the table has to measure...

Page 41: ...handle Scale Knurled handle Indicator Locking plate 8 7 2 Fine adjustment Option K3 e classic 1 Loosen the clamping lever 2 Clamp the clamping lever 3 Adjust finely with the thumb nut Clamping lever C...

Page 42: ...Fig 8 14 Parallel cutting fence K3 winner K3 e classic It may be necessary to remove the parallel cutting fence when machining large panels 1 Loosen the clamping lever 2 If present Loosen the fine ad...

Page 43: ...end of the bar 6 Swing out the parallel cutting fence Guide Thumb screw Knurled handle Bar Parallel cutting fence 8 8 Setting the height angle of cut Fig 8 16 Setting the height angle of cut The cutti...

Page 44: ...Tool change Making adjustments and preparations 8 9 1 Preparing to change tooling Fig 8 17 Preparing to change tooling 8 9 2 Preparing the machine to operate Fig 8 18 Prepare the machine to operate N...

Page 45: ...ket head cap screw with the hex key 9 Adjust the splitter if a larger or smaller saw blade has been fitted in 10 Prepare the machine to operate 11 Adjust the saw guard according to the saw blade Makin...

Page 46: ...re is at any given point a distance of 3 to 8 mm betweeen the saw blade and the splitter 4 The marking on the splitter must match the top edge of the sliding table at the max cutting height inde pende...

Page 47: ...o the splitter The mounting depends on the diameter of the saw blade Recess for saw blades from 300 to 315 mm Recess for saw blades from 250 mm 1 Loosen the thumb nut 2 Push the hood stud to the back...

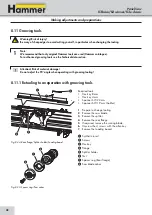
Page 48: ...der Nut Spacer ring Rear flange Saw blade arbor 8 11 1 Retooling to an operation with grooving tools 8 11 Grooving tools Note We recommend that only original Hammer tools are used Hammer catalogue For...

Page 49: ...t goes 8 Mount the wooden insert supplied 9 Screw in the 4 screws with the Allen key 10 Prepare the machine to operate 11 Switch machine on 12 Slowly move the grooving tool right to the top and the wo...

Page 50: ...move the socket head cap screw and flange 8 Remove the grooving tool 9 Remove the spacer ring from the saw blade arbor if present Wooden insert Screws Hex key 4 mm Hex key 8 mm Grooving tool Spanner 1...

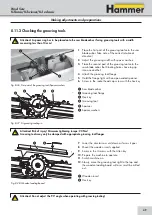
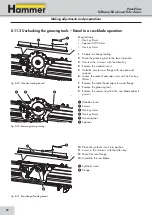
Page 51: ...to the left as far as it goes 3 Clean the scoring arbor thoroughly 4 Place the scoring blade onto the scoring arbor 5 Fit the scoring flange on and hold in place with the special spanner 6 Tighten th...

Page 52: ...e cut Saw blade discs Spacer washers Attention The scoring blade has to be 0 1 to 0 2 mm thicker than the saw blade Fig 8 34 Scoring blade Classic The scoring unit is necessary when machining laminate...

Page 53: ...ection Before switching on the machine always check to make sure that there are no other persons in the immediate vicinity of the machine During operation Never place your hands on the workpiece by le...

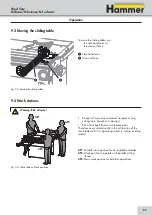
Page 54: ...or Press the EMERGENCY STOP button The machine is stopped automatically Release the EMERGENCY STOP button by turning it EMERGENCY STOP button Operation 9 2 Switching on the machine Switching off the m...

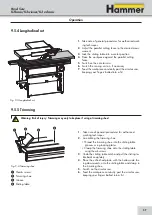
Page 55: ...anger of injury due to ejected workpieces e g cutting tools branches trimmings Risk of kickback from cut workpiece parts Therefore never stand directly in the cutting line of the saw blade whilst it i...

Page 56: ...valid for the scope of the wood in dustry s employer liability and insurance in the Federal Republic of Germany insert cuts and groove cuts are allowed if the appropriate operat ing regulations of the...

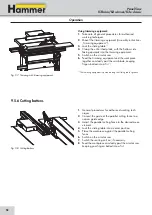
Page 57: ...circular saw 6 Feed the workpiece constantly past the circular saw keeping your fingers balled into a fist Fig 9 6 Trimming shoe Thumb screws Trimming shoe Groove Sliding table Warning Risk of injury...

Page 58: ...ce together constantly past the saw blade keeping fingers balled into a fist The trimming equipment is pushed along the sliding table s groove 9 5 6 Cutting battens 1 General procedures for authorised...

Page 59: ...the work piece hard onto the crosscut fence 8 Switch on the circular saw 9 Switch the scoring unit on if necessary 10 Feed the work piece constantly past the circular saw keeping your fingers balled i...

Page 60: ...r saw keeping your fingers balled into a fist Line Saw blade Guide Fig 9 11 Cross cutting at the parallel cutting fence 1 Take note of general procedures for authorised work ing techniques 2 Move the...

Page 61: ...Undo the sliding table catch 5 Place the work piece against the crosscut fence 6 Lift the end stop up and place it onto the workpiece Fig 7 Place the work piece against the crosscut fence 8 Switch on...

Page 62: ...a load feeding accessory Fig 9 15 Groove cuts 1 Take note of general procedures for authorised work ing techniques 2 Adjust the parallel cutting fence to the desired posi tion 3 Lock the sliding tabl...

Page 63: ...imum of half of that of the workpiece s thickness 5 Always use the crosscut fence and the sliding table when making transverse grooves see Cutting to length against the rip fence 6 When feeding the wo...

Page 64: ...ctions Warning Risk of injury Improper maintenance can cause serious injury or damage For this reason this work may only be carried out by authorised trained personnel who are familiar with the operat...

Page 65: ...Fig 10 2 Height spindle Tilting spindle 1 Switch the machine off and ensure that it cannot be switched on again Lubricating the height spindle 2 Turn the circular saw into the topmost position 3 Thro...

Page 66: ...ension the drive belt Turn the belt tightening screw only until the drive belt is sufficiently tensioned to transmit power effectively 10 5 2 Replacing the drive belt Fig 10 4 Replacing the drive belt...

Page 67: ...ide tears appear during the monthly check Assembly instructions Scoring unit Scoring belt 10 7 Cleaning changing the dust brush of the outrigger arm Fig 10 6 Dust brush outrigger arm 1 Clean the dust...

Page 68: ...ch the sliding table should be pushed from the base 1 Remove fillister head screws and the base cover 2 Remove socket head cap screws and washers 3 Remove flat head screws Base Discs Socket head cap s...

Page 69: ...he ball cage are complete 3 Move the cage plate with the ball cages in the middle on the guides of the base 4 Thread the sliding table onto the ball cages 5 Slide the sliding table a few centimeters o...

Page 70: ...screws Washers Socket head cap screws Fillister head screws Base cover BLSunken screws On the opposite side on the sliding table 11 Screw the bearing shaft on with flat head screw and hexagon nut 12 S...

Page 71: ...if a fault develops Stricktly speaking In the event of a breakdown which creates danger for either personnel or equipment the machine should be stopped immediately by activating the emergency stop Als...

Page 72: ...switches activated Prepare the machine to operate Error in the electrical contact Check the electrical connection connecting lead fuses The main switch is off 0 position Switch on the main switch I po...

Page 73: ...st the parallel cutting fence guide angle only possible with K3 winner 1 Switch the machine off and ensure that it cannot be switched on again 2 Check the guide angle and readjust if required 3 Remove...

Page 74: ...Switch the machine off and ensure that it cannot be switched on again 2 Hold the inner nut tight with a spanner 3 Loosen the counter nut with a spanner 4 Turn the inner nut half a turn anti clockwise...

Page 75: ...ting the rip fence fine adjustment Required tools 2 x Hex key 3 mm 4 mm 1 Switch the machine off and ensure that it cannot be switched on again 2 Release the clamping lever 3 Loosen the clamping screw...

Page 76: ...76 Panel Saw K3 basic K3 winner K3 e classic...

Page 77: ...77 Panel Saw K3 basic K3 winner K3 e classic...

Page 78: ...78 Panel Saw K3 basic K3 winner K3 e classic...

Page 79: ...79 Panel Saw K3 basic K3 winner K3 e classic...

Page 80: ...KR FELDER STR 1 A 6060 Hall in Tirol Tel 43 0 52 23 45 0 90 Fax 43 0 52 23 45 0 99 E mail info hammer at Internet www hammer at...

Reviews: