background image

20 

8  Connecting to a Computer 

 
You can use the USB cable provided to connect the tablet to a computer and 
transfer files. To connect the tablet to your computer, proceed as follows. 
1.  Connect the micro USB cable to your tablet then plug it into a free USB 

port on your computer. 

2.  The tablet is automatically recognized by the computer and connected as 

a multimedia device. 

 
By sliding down the status bar to expand the notification area, you can access 
the USB connection options to disable the debugging function or change the 
connection mode to the computer. 
 
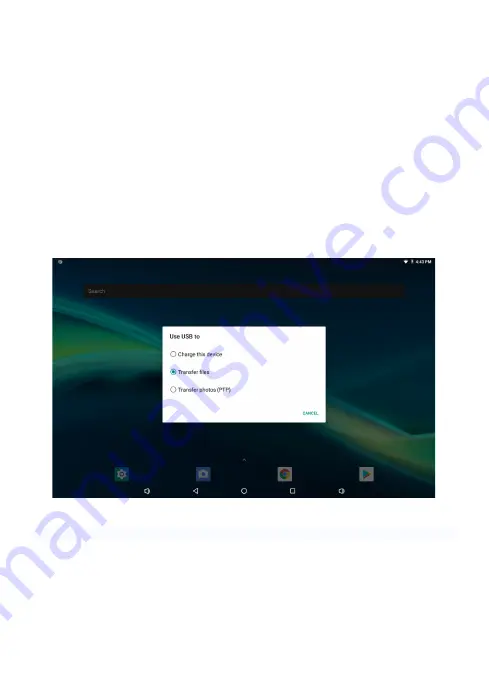
The different options of connecting to computer are available in the "Use USB 
for" window shown below. 


Summary of Contents for ZELIG PAD 412LTE

Page 1: ...ZELIG PAD 412LTE 10 1 MULTI TOUCH QUAD CORE 4G TABLET PC USER MANUAL XZPAD412LTE www hamletcom com...

Page 2: ...13 AC 2014 EN 62209 1 2006 EN 62209 2 2010 EN 62479 2010 EN 301 489 1 V2 2 0 Draft EN 301 489 17 V3 2 0 Draft EN 301 489 19 V2 1 0 Draft EN 301 489 52 V1 1 0 Draft EN 55032 2012 AC 2013 EN 61000 3 2 2...

Page 3: ...fications and appearance are subject to change without prior notice Product Registration Register now your product on the home page of Hamlet website at www hamletcom com Warranty information The lega...

Page 4: ...level close to zero or tablet connected to the power supply electrical interference may make the tablet touch screen inaccurate Full functionality is restored charging the batteries or disconnecting...

Page 5: ...o your device Photos Q What type of photo files can I view on my device A JPEG BMP GIF PNG Q How do I add photo files to my device A Copy the photos from your PC Micro SD card or USB storage device Vi...

Page 6: ...charging The tablet is equipped with a built in rechargeable Lithium battery It is suggested to fully charge the battery before use To charge the proceed as follows 1 Connect the micro USB cable to t...

Page 7: ...7 2 Appearance and buttons 1 Touch screen 2 Front camera 3 Power button Turn on off tablet 4 Reset button 5 Volume controls...

Page 8: ...andard earphone jack 7 Micro USB port Use this port to recharge the tablet Connect to PC for file transfer or connection with external USB devices The USB cable must be OTG compliant 8 Back camera 9 F...

Page 9: ...IM or Micro SD card follow these steps 1 Carefully remove the cover that protect the back camera 2 Insert the SIM micro SD card into the corresponding slot following the indicated orientation 3 Replac...

Page 10: ...n the tablet Off When the tablet is ON press and hold the power button for around 3 seconds and the system will popup out power off option tap on Power off to turn the tablet off Remarks When battery...

Page 11: ...p Wizard will guide you through the setup process Select your language and follow the onscreen instructions to configure SIM card setup Wi Fi network sync accounts etc If you have another Android devi...

Page 12: ...this way the tablet is locked and the display is turned off Wake up your tablet and unlock the screen To wake up the tablet from stand by and turn on display do as follows 1 Press and release the pow...

Page 13: ...oftware applications You can customize the main screen by changing the arrangement of app icons adding new apps or deleting the unused one Status bar The status bar is located on the top of the screen...

Page 14: ...change a setting just tap on its icon From this screen you can also access the full settings window by tapping the gear icon in the bottom right of quick settings menu Navigation and volume control bu...

Page 15: ...f the screen just over the navigation buttons is the Favorites tray in which you can find icons of the favorite apps These icons appear in all Home screens of the device At the center of the screen im...

Page 16: ...widgets the small dynamic applications that allow you to quickly view information such as weather forecast calendar events or the latest news To add an app icon to Home screen 1 Open the All Apps scr...

Page 17: ...Touch hold the app you want to remove then slide it over the X symbol on the top left of the screen and lift your finger Add a widget to the Home screen 1 Touch hold the background of the screen for...

Page 18: ...18 2 Touch the Widget icon to view the list of available widgets 3 Touch hold the thumbnail of the desired widget then drag it into an available area of the Home screen...

Page 19: ...f the screen for a few seconds until the below screen appears 2 Touch Wallpapers icon to view the available background images 3 Touch the thumbnail of the desired image and then touch Set wallpaper it...

Page 20: ...n plug it into a free USB port on your computer 2 The tablet is automatically recognized by the computer and connected as a multimedia device By sliding down the status bar to expand the notification...

Page 21: ...a list of all available Wi Fi networks To connect to a wireless network tap on the name of an available Wi Fi network in the list If the Wi Fi network does not require a password tap Connect to start...

Page 22: ...nd Ethernet networks The screen displays a graph with total data traffic and data usage for each individual app l Mobile network Open Network Internet screen and tap Mobile network item Use this scree...

Page 23: ...on will appear to indicate the signal strength 6 Enter the Settings Network Internet screen and tap on Data usage item 7 In the Data usage screen switch Mobile data on to enable the mobile data connec...

Page 24: ...etooth devices already connected l Apps notifications This section allows you to manage the applications installed on the device Tap on the app icon to view detailed information of the application suc...

Page 25: ...25 l Battery Open this screen to view battery usage information l Display Manage display settings such as brightness background wallpaper sleep time font size and content auto rotation...

Page 26: ...f device such as media alarm and notification volume vibrate touch and screen lock sounds l Screenshot This screen allows you to change settings for the screen capture function as well as display the...

Page 27: ...s connected to the tablet If you want to safely remove the Micro SD card or USB flash drive please tap on the eject icon after this you can safely remove SD card USB host The actual storage space avai...

Page 28: ...ock location encryption passwords visibility and so on l Users accounts It allows you to configure and manage users and accounts Tap the name of the account to view account details or tap Add account...

Page 29: ...aring and low vision Accessibility options allow you to increase the size and contrast of the text the pronunciation of the password manage the options of text to speech output and much more l Google...

Page 30: ...eral settings related to the device software including language preferences date and time backup functions reset options etc l Language input Change settings for system languages virtual and physical...

Page 31: ...e network provided date and time or you can manually setup date time select time zone and also select 24 hour time format l Backup This screen allows you to activate and configure the tablet to back u...

Page 32: ...in the screen that appears tap the RESET TABLET button WARNING the Factory data reset operation will erase all personal data in the tablet make sure to back up your personal data before performing th...

Page 33: ...es may differ from those shown here and change without notice l Browser After connecting your tablet to Wi Fi network tap the Browser icon in the favorites tray on the screen to open the web browser a...

Page 34: ...built in calculator tap on the Calculator icon to carry out your calculations l Calendar Users can use the Calendar app to check date time and memorandum or add memorandum etc But before doing this y...

Page 35: ...reen appear several icons that allow you to access different shooting settings the gear icon that appears in the lower right corner allows you to access camera main settings Photos and videos will be...

Page 36: ...k application you can setup alarm use it as a timer or also as stopwatch l Email Tap on Email icon in the All Apps screen to setup your email account according to the procedures You can enter one or m...

Page 37: ...ory devices Internal MICROSD or USB to see the folders and files inside Tap hold a file for few seconds to select it the item become highlighted then use the menu on the top right of the screen for Co...

Page 38: ...Sound Recorder icon Rec button Tap red circle icon to start sound recording Stop button Tap white square icon to stop recording Play button Tap Play icon to start playback of recorded audio Once you...

Page 39: ...y for at least 6 hours before you start to use the device The rechargeable battery is designed and manufactured to be used and recharged frequently As same with all of lithium batteries the capacity o...

Page 40: ...nd damage the LCD screen Do not use any sharp objects to touch the LCD screen as this will scratch the screen Only use the AC adapter included with the device Using any other power adapter may damage...

Reviews: