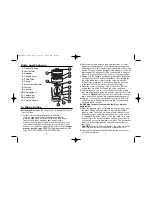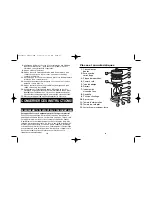
Parts and Features
1.
Cover with Knob
2.
Locking Tabs
3.
Spreader
4.
Coffee Basket
5.
Pump Tube
6.
Spring
7.
Water Level Indicator
8.
Washer
9.
Heat Well
10.
Serving Spout
11.
Power Light
12.
Ready Light
13.
Cup Trip Handle
5
4
2.
Wet the basket (this helps to keep small particles of coffee
grinds from sifting through). Use a standard dry measure cup
and tablespoon to add regular or percolator grind coffee to the
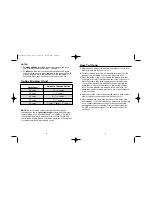
basket. The chart on page 6 suggests the amount of coffee for
regular brew. The amount of coffee can be varied to suit your
taste; use less for weaker coffee or more for stronger coffee.
3.
Making sure the spring is on the pump tube, place the basket
on the pump tube and cover with spreader. Then, holding the
top of the pump tube, lower it into the coffee urn until the
bottom of the pump tube is properly seated in the heat well
in the center (if not, the coffee urn may not percolate).
4.
Place the cover on the body of the coffee urn so that the
locking tabs are at the front and back of the coffee urn.
5.
Holding the knob, turn the cover clockwise until the locking
tabs are fully engaged inside the handles on both sides of the
coffee urn.
Never
plug in the coffee urn without the cover in
place and the locking tabs fully engaged inside the handles.
6.
Plug the coffee urn into a grounded 3-prong 120 V AC wall
outlet. The red (ON) light will illuminate and coffee brewing
will begin within seconds.
Do NOT plug in the coffee urn when there is no water or
liquid inside.
7.
When the brewing cycle is complete, percolation stops and
the green READY light illuminates to indicate the coffee is
ready to serve. The coffee urn automatically switches to the
Keep Warm cycle, and will maintain fresh, hot coffee until it
is unplugged. If brewed coffee is to be kept warm for a long
period of time, the basket, spreader, and pump tube should
be removed as soon as brewing is complete. This will prevent
bitter oils in the coffee grounds from affecting the flavor of
the coffee.
CAUTION:
The knob and other parts of the coffee urn will be
HOT. Use a pot holder or oven mitt to remove the cover.
8.
Disconnect plug from wall outlet and allow the coffee urn to
cool before washing.
Before First Use:
Clean the coffee urn by following the steps in
“How To Clean.”
1.
To remove the cover, grasp the knob and turn
counterclockwise until the locking tabs completely
clear the handles on each side of the body, then lift up.
Take out the basket, spreader, and tube assembly.
For best results, always fill with cold, fresh tap water to the
level indicator mark inside the body for the number of cups
desired. Your coffee urn makes 20–60 cups of coffee.
Always
make at least 20 cups.
NOTE: The maximum capacity is 60
cups. DO NOT OVERFILL THE COFFEE URN.
To Make Coffee
840154300 Ev01.qxd 7/14/06 10:24 AM Page 4


