background image

14

15

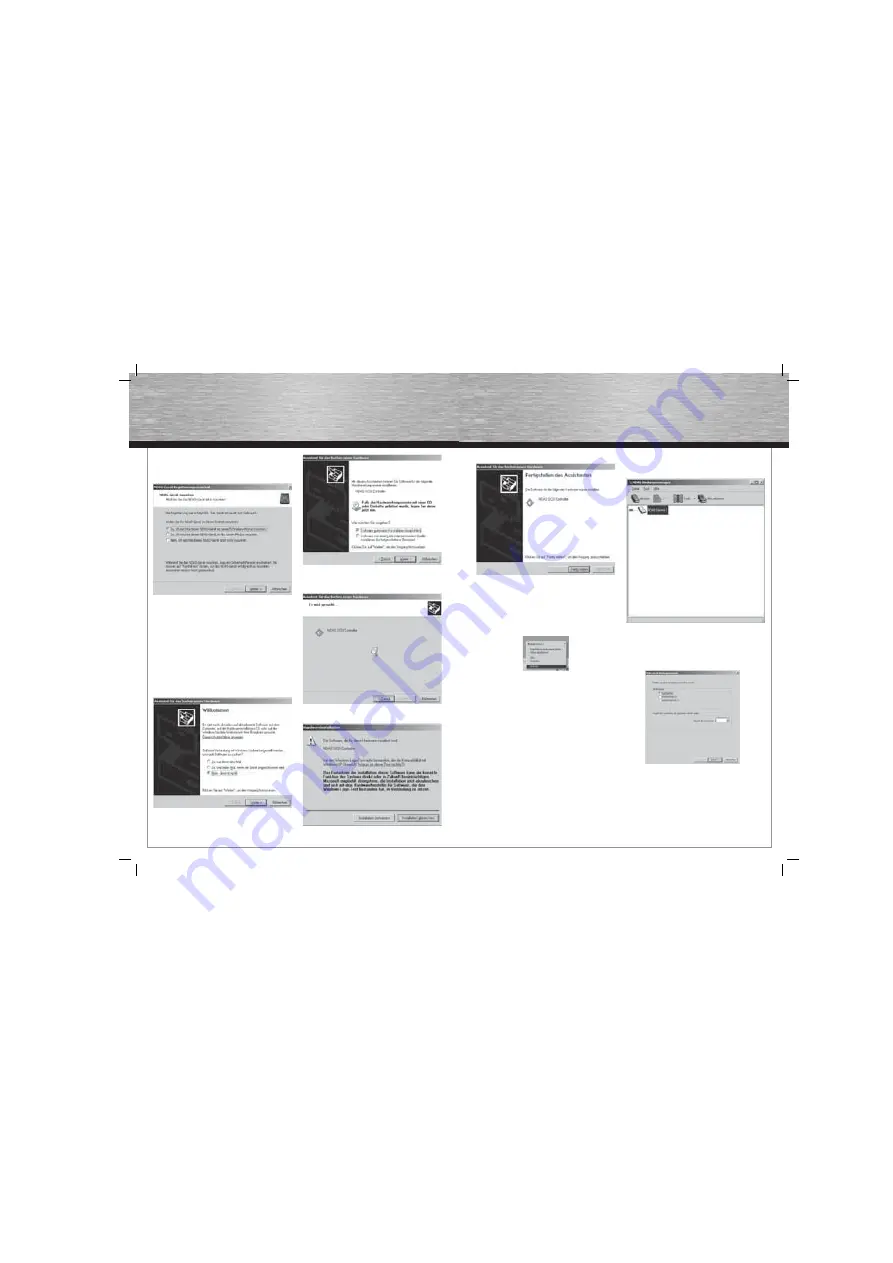
6. Select whether the PC has write or only read 
   access for the NDAS.

Read permission: Data can only be read, i.e. data 
can not be changed, deleted or added. The user can 
only work with the data provided, e.g. play a saved 
song.

Write permission: The user can also change, delete 
and add new data.

7. Select „No, not this time” and then click „Next”.

8. Select „Install the software automatically” and 
   then click „Next”.

9. The NDAS system is now installed in the system.

10.   Click „Continue installation”.

11.  To complete the installation, click „Finish”.

The NDAS system is now displayed as a hard drive 
in My Computer and can be treated as a normal hard 
drive. Caution: Basic modifi cations to the hard disk 
(formatting, partitioning, chkdsk, combining or 
mirroring) can only be performed when only one 
user / PC is connected to the NDAS device.

3.3 Features

The name of the device is displayed in the software 
after the NDAS device has been correctly installed 
in the system. Additionally, the state of the NDAS 
device is identifi ed by the colour.

Blue:  

User has read/write permission

Green:  

User has read permission

White:  

NDAS device is connected but not 


mounted

Black:  

NDAS device is registered but not 


connected

Red:  

NDAS device is not available

Yellow:  

NDAS device is available but connected 


together with one or more NDAS devices. 

4. RAID function

Several NDAS devices can be combined using the 
RAID function

4.1 Connecting hard drives together

1. Open the NDAS connection manager 
   (Start / Programs / NDAS software)

2. Click on „Connect” to start the combination 
   of several hard drives.

3. You can now choose from the following 
   options:

Aggregation:   

All NDAS hard drives in the network are combined to 
form one large storage unit.
Advantageous when a large amount of storage 
space is required. However, there is no fail-safe 
mechanism. If one of these hard disks fails, the data 
can no longer be accessed.

All manuals and user guides at all-guides.com

Summary of Contents for Lan-Storage

Page 1: ...rks of the corresponding companies Errors and omissions excepted and subject to technical changes Our general terms of delivery and payment are applied PO Box 80 86651 Monheim Germany Phone 49 9091 50...

Page 2: ...wer LED 3 HDD LED 4 Lan LED 5 Frontabdeckung 6 R ckseite 7 Aluminium Geh use 8 Standfu 9 R ckabdeckung 10 L fter An Aus 11 Stromversorgung 12 RJ 45 Anschluss 13 USB Anschluss d Bedienungsanleitung 1 4...

Page 3: ...Netzwerk verbunden und eingeschaltet ist Klicken Sie nun auf das Icon f r das NDAS Ger te Management dass sich im Systemtray am rechten unteren Bildschirmrand befindet 1 Klicken Sie auf Registrierung...

Page 4: ...rden Achtung Grundlegende nderungen an der Festplat te formatieren partitionieren chkdsk zusammen schlie en oder spiegeln k nnen nur vorgenommen werden wenn nur ein Benutzer PC mit dem NDAS Ger t verb...

Page 5: ...n der Software muss wei sein Die zusammengeschlossenen Ger te m ssen nach der Bindung formatiert werden Klicken Sie auf Weiter und w hlen Sie die NDAS Ger te aus die zusammengeschlossen werden sollen...

Page 6: ...rews 1 3 Description 1 On off switch 2 Power LED 3 HDD LED 4 LAN LED 5 Front cover 6 Rear 7 Aluminium enclosure 8 Stand base 9 Rear cover 10 Fan on off 11 Power supply 12 RJ 45 connection 13 USB conne...

Page 7: ...ed to the network and is switched on Click on the icon for the NDAS device management that is located in the system tray at the lower right of the screen 1 Click on Registering a new device 2 Click Co...

Page 8: ...displayed in the software after the NDAS device has been correctly installed in the system Additionally the state of the NDAS device is identified by the colour Blue User has read write permission Gr...

Page 9: ...act ristiques 1 2 Contenu de l emballage 1 3 Description 1 4 Possibilit s de connexion 2 Installation du disque dur 3 Logiciel 3 1 Installation du logiciel 3 2 Ajouter le bo tier NDAS 3 3 Logiciel Pro...

Page 10: ...u d part 6 Reliez ensuite le bo tier NDAS votre r seau comme il est d crit au paragraphe 1 4 3 Logiciel 3 1 Installation du logiciel Utilisateur Mac Le disque dur int gr doit tre format comme FAT32 po...

Page 11: ...t pr sent recherch dans votre r seau 6 S lectionnez pr sent si le PC doit seulement avoir l acc s la lecture du bo tier NDAS ou si le PC concern doit galement avoir les droits d criture dans le NDAS D...

Page 12: ...2 ou 4 ou 8 RAID_1 2 4 6 ou 8 appareils NDAS peuvent tre refl t s Cela signifie que les donn es sauvegard es sur NDAS 1 sont automatiquement stock es sur NDAS 2 Avantage S ret extr me int gr e les app...

Reviews: