background image

4

This DIN A3-Laminator was specially designed for lami-
nating foils with a thickness between 75 µm and 150 µm. 
It can be used for hot and cold lamination  of certifi cates, 
menus, pictures, etc.

Safety notes:

1.  Read all instructions thoroughly before using the 
 machine.
2.  Place the cable in such a way that no one will trip 
 over 

it.

3.  Never open the housing of the laminator.
4.  Do not operate the device if it is wet.
5.  Switch the device off after use and remove the plug 
 

from the power supply when the device is not in use.

6.  Do not cover the heat openings during use.
7.  Do not touch the heat openings during or directly after 
 

operation -> Danger of burns!

8.  Do not insert any objects into the device (including into 
 

the heat openings) except the designated fi lm.

9.  If the cable, housing, or socket is damaged, do not use 
 the 

machine.

10. Wait approx. 3-5 seconds for the fi lm to cool down 
 

before touching it -> Film may be hot!

11. Do not laminate any liquids, gelatins, or other moist 
 

substances that could leak.

Installation/notes:

1.  Remove all packaging materials from the device.
2.  Place the laminator on a stable, even surface.
3.  Connect the power cable to a 220 - 240 V~ outlet.

4.  To switch the device on, press the On/Off button on the 
 

right-hand side. The red „Power“ light will go on to 


show that power supply is functioning.

5.  Then turn the dial and select the thickness of the foil 
 

you want to use for laminating. If you want to use a 


cold laminate foil, turn the switch to „Cold“.

6.  The laminator takes approx. 4-6 minutes to warm up. 
 

The „Ready“ light turns green when the laminator is 


ready to be used.

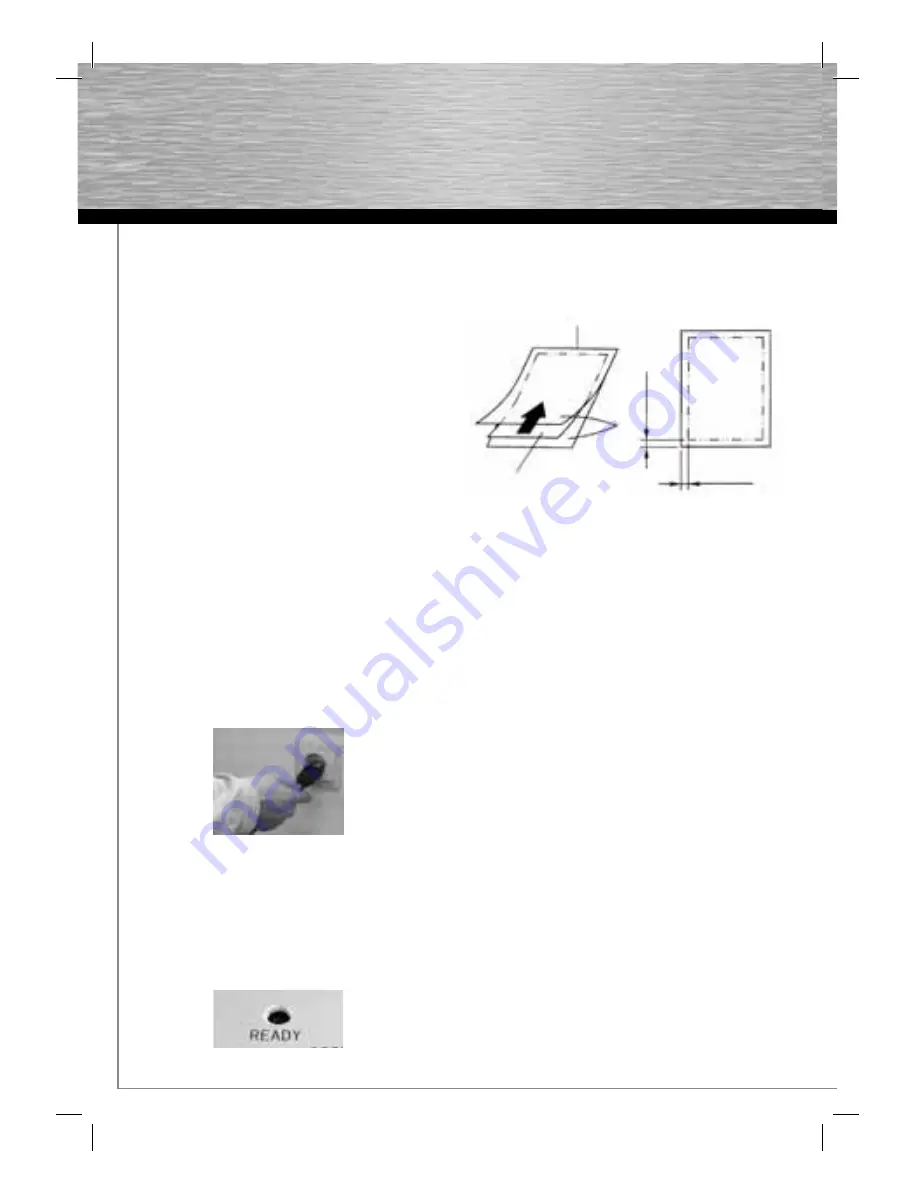
7.  Place the document to be laminated in the appropriate 
 

laminate sleeve, as shown in Fig.1. Leave approx. 


3-5 mm of free space at the corners of the sleeve.  


Ensure that there is no dust or dirt in the laminate 

 sleeve.

8.  Begin the lamination process. Push the foil into the 
 

opening of the device with the template.    Make sure 


that the closed sides of the case go into the device 


fi rst. The foil automatically passes through the device. 


Do not remove the foil until the lamination is complete 


(when the foil has completely passed through the 

 machine).
9.  When the lamination process is complete and the 
 

device is no longer needed, switch the device off by 


turning the switch to „Off“. 

Additional notes on use:

1.  Always switch the device off and disconnect it from 
 

the power supply when not in use.

2.  Do not let the machine run for more than one hour at a 
 

time and allow approx. 15 seconds between two 

 laminations.
3.  Before you store the device in the box, let it cool for at 
 

least 30 minutes.

4.  For the best results, use the laminator at normal room 
 

temperature (10-35 °C).

Cold lamination:

Please make sure that the device has completely cooled 
down (a temperature below 35 °C) for a cold lamination. 
You may only use special cold lamination foils for this.
It is recommended to always do a cold lamination before 
doing any hot lamination, when necessary.

g

User manual

Fig.2

Fig.1

Summary of Contents for KHL 32

Page 1: ...ed brands are trademarks of the corresponding companies Errors and omissions excepted and subject to technical changes Our general terms of delivery and payment are applied Hama GmbH Co KG D 86651 Monheim Germany www hama com ...

Page 2: ...Laminator KHL 32 Laminateur O F F I C E 00050045 ...

Page 3: ... die On Off Taste auf der rechten Seite Zur Kontrolle der Stromversorgung leuchtet die rote Power Leuchte 5 Danach wählen Sie an dem Drehrad die Folienstärke aus die Sie für die Laminierung benutzen wollen Wenn Sie eine Kaltlaminierfolie benutzen wollen stellen Sie den Schalter entsprechend auf Cold ein 6 Nach ca 4 6 Minuten ist der Laminator aufgeheizt Dies erkennen Sie an der grünen Ready Leucht...

Page 4: ...mit das Laminat entfernt und neu eingelegt werden Gerätepflege Walzenreinigung 1 Schalten Sie den Laminierer wie zuvor beschrieben ein 2 Falten Sie ein DIN A3 großes Blatt Papier und schieben Sie es mit der gefalteten Seite zuerst in das Gerät 3 Wiederholen Sie dies gegebenenfalls öfters bis keine Kleberspuren mehr auf der Papier zu sehen sind Maschinenreinigung 1 Schalten Sie das Gerät aus und tr...

Page 5: ...want to use for laminating If you want to use a cold laminate foil turn the switch to Cold 6 The laminator takes approx 4 6 minutes to warm up The Ready light turns green when the laminator is ready to be used 7 Place the document to be laminated in the appropriate laminate sleeve as shown in Fig 1 Leave approx 3 5 mm of free space at the corners of the sleeve Ensure that there is no dust or dirt ...

Page 6: ... and push it into the device with the folded side first 3 Repeat this again until there are no more traces of glue on the paper Machine cleaning 1 Switch off the device and unplug it from the power supply 2 When the laminator has cooled down clean the outside with a soft cloth Technical data Number of rollers Four Mains supply 220 240 V Power consumption 450 W Max sleeve thickness 150 µm Max lamin...

Page 7: ...ctionnement de l alimentation en courant la touche Power s allume en rouge 5 Sélectionnez ensuite l épaisseur du film que vous souhaitez utiliser pour la plastification Si vous utilisez un film de lamination à froid mettez l interrupteur sur la position Cold 6 Au bout de 4 6 minutes le laminateur est chaud Vous le reconnaîtrez à la touche Ready qui s allumera en vert 7 Comme l illustration 1 le mo...

Page 8: ... des appareils Nettoyage des rouleaux 1 Eteignez le laminateur comme il est décrit ci dessus 2 Pliez une grande feuille de papier DIN A3 et introduisez la dans l appareil d abord avec le côté plié 3 Réitérez ce procédé plusieurs fois jusqu à ce qu il n y ait plus de trace de colle sur le papier Nettoyage de l appareil 1 Eteignez l appareil et débranchez le de la prise secteur 2 Lorsque le laminate...

Page 9: ...8 ...

Page 10: ...9 ...

Reviews: