background image

17

Windows Vista

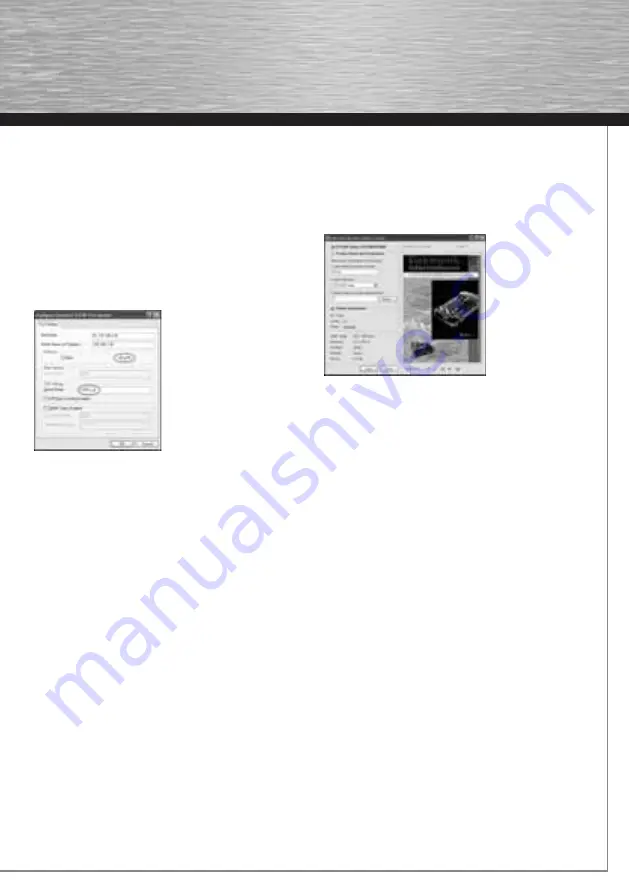
Choose Start => Control Panel => Printer => Add a 

printer. On the following screen, select Add a local 

printer. On the next screen, choose Create a new 

port and then Standard TCP/IP Port under Type of 

port. Then click Next. In the following window, enter 

the IP address of the MFS under Hostname or IP 

address. (To fi nd this, switch to the Control Center. 

The IP address (such as 192.168.1.100) is displayed in 

the main window after the MFS name.) 

Then click Next.

Under Device Type, select Custom and then click 

Settings. In the new window, choose LPR. Under LPR 

Settings, enter USB1_LQ in the fi eld Queue Name. 

Click OK and then click Next. Installation of the  

printer port is now complete. You must then select 

the printer driver. Select the driver (which has 

already been installed) for the connected printer 

from the list and follow the instructions provided by 

the wizard.
Once the installation has been completed 

successfully, you will fi nd the printer installed in the 

Printers and Faxes window. This installation of the 

printer is complete.

6. Network scanners

If you have already used the scanner on your 

computer, the driver is already installed and you can 

continue with the next point. Otherwise, fi rst install 

the scanner driver on each computer that is to use 

this scanner. Use the instructions and driver CD 

from the scanner manufacturer. Depending on the 

manufacturer, you may need to connect the scanner 

to the computer directly. After you have completed 

the installation of the driver, reconnect the scanner 

to the MFS.

Select the scanner or multifunction device in the 

Control Center and then click Network scanner. 

Select the driver from the list and click OK. If you 

are informed that no driver is installed, you must fi rst 

install the scanner driver from the manufacturer.

The integrated tool now opens. You can select the 

File name, File format and Save location here. After 

you have made the selection, click Scan. Depending 

on the driver used, the manufacturer’s scanner 

tool will open and guide you through the scanning 

process. A preview is shown and the fi le is saved to 

the specifi ed folder.

7. Addition of USB storage media to the network

This device allows you to make data such as videos, 

music, or pictures that are saved to a USB storage 

medium available to the entire network.

First, connect the USB data medium to the USB port 

on the MFS and turn it on. There are two options for 

accessing the data medium.

A) 

Direct connection:

 NetUSB mode must be  

  activated

B) 

Network access:

 Server mode must be activated

Please make the appropriate setting under Confi gure 

server/Supported protocols.

7.1 Direct connection

In this mode, Windows will act the same as it would 

if the hard disk were connected via USB to your 

computer directly. The disadvantage is that only 

one computer can access the connected device at 

a time.

Summary of Contents for 62713

Page 1: ...ed brands are trademarks of the corresponding companies Errors and omissions excepted and subject to technical changes Our general terms of delivery and payment are applied Hama GmbH Co KG D 86651 Monheim Germany www hama com ...

Page 2: ...N E T W O R K 00062713 USB Multifunktions Server USB Multifunction Server Serveur USB multifonction ...

Page 3: ...chützen Sie das Gerät vor Druck und Stoßeinwirkung Das Gerät darf während des Betriebes nicht geöffnet oder bewegt werden Achtung Betreiben Sie das Gerät nur mit dem mitgelie ferten Netzteil Die Verwendung anderer Netzteile kann zur Zerstörung des Gerätes führen Einleitung Der USB Multifunktions Server ermöglicht es USB Geräte wie Drucker Scanner oder Festplatten in ein Netzwerk einzubinden Das he...

Page 4: ...gewünschte Sprache Diese Installationsroutine ist für die Betriebssysteme Windows 2000 XP Vista geeignet Um die Installation jetzt fortzusetzen klicken Sie auf Installieren Möchten Sie sich die Bedienungsanleitung anzeigen lassen klicken Sie auf Anleitung anzeigen Zum Anzeigen der PDF Dateien ist der Adobe Reader erforderlich Sollten Sie bisher noch keine Version des Adobe Reader installiert haben...

Page 5: ...dem Sie Eigenschaften wählen Markieren Sie in der Liste den Eintrag Internetprotokoll TCP IP und klicken Sie anschließend auf Eigenschaften Wählen Sie Folgende IP Adresse verwenden und geben Sie diese Adresse ein Erster PC 192 168 2 101 Subnetzmaske 255 255 255 0 Zweiter PC 192 168 2 102 Subnetzmaske 255 255 255 0 und so weiter Bestätigen Sie mit OK und Schließen Windows Vista Start Netzwerk Netzw...

Page 6: ...enden die Konfiguration indem Sie auf Schließen oder falls Sie Änderungen vorgenommen haben auf Übernehmen klicken Nach Änderung der Einstellungen muss der MFS neu gestartet werden Bestätigen Sie in diesem Fall die Abfrage 4 1 1 Allgemeine Konfiguration Servername Unter diesem Namen erscheint der Server in der Übersicht Arbeitsgruppe Tragen Sie hier den Namen Ihrer Arbeits gruppe ein Erlaubte Zeiche...

Page 7: ...fen Server Mode In diesem Modus ist es möglich dass mehrere Benutzer gleichzeitig das angeschlossene Gerät nutzen zum Beispiel Zugriff auf eine angeschlossene Festplatte Wechseln Sie zur Registerkarte Benutzerkonten 4 1 4 Benutzerkonten Der Zugriff auf angeschlossen USB Speicher kann über Benutzerkonten geregelt werden Eine Abfrage von Benutzername und Passwort erfolgt wenn auf der Registerkarte U...

Page 8: ...omputer verwendet sind die Treiber schon installiert und Sie können mit dem nächsten Punkt fortfahren Ansonsten installieren Sie als Erstes den Druckertreiber auf jedem Computer der diesen Drucker nutzen soll Verwenden Sie hierzu die Anleitung und Treiber CD des Druckerher stellers Es kann je nach Hersteller nötig sein dass Sie dazu den Drucker direkt an den Computer anschließen müssen Nach Abschl...

Page 9: ...es MFS ein Um diese heraus zu finden wechseln Sie zum Control Center Im Hauptfenster wird hinter dem MFS Namen die IP Adresse angezeigt z B 192 168 1 100 Klicken Sie anschließend auf Weiter Wählen Sie unter Gerätetyp Benutzerdefiniert und klicken danach auf Einstellungen Im neuen Fenster wählen Sie LPR aus Unter LPR Einstellungen geben Sie im Feld Warteschlangenname USB1_LQ an Klicken Sie anschlie ß...

Page 10: ...rkzugriff Bitte beachten Sie dass für einen Netzwerkzugriff Kom munikation über verschiedene Ports notwendig ist und diese eventuell von einer Firewall geblockt werden kön nen Diese Ports müssen Sie freigeben Außerdem sind derzeit einige Funktionen im Betriebssystem Windows Vista nicht möglich Formatieren des Datenträgers Um den angeschlossenen Massenspeicher verwenden zu können muss dieser im FAT...

Page 11: ...rdner Öffnen Sie den Browser und geben Sie in die Addresszei le ftp IP Adresse_des_ Routers ein Beispiel standardmäßig ftp 192 168 2 30 Es öffnet sich anschließend ein Fenster zur Eingabe der Benutzerdaten Anschließend werden alle vorhandenen Freigaben nach folgendem Prinzip angezeigt Ordner d1p1 hierbei steht d1 für Datenträger 1 und P1 für Partition 1 Sie können je nach Befugnis Dateien hinzufüg...

Page 12: ...utdoors Protect the device from pressure and impact The device may not be opened or moved during operation Caution Use the device with the enclosed power supply unit only The use of other power supply units can cause damage to the device Introduction The USB Multifunction Server allows you to make USB devices such as printers scanners or hard disks accessible on a network In other words every user...

Page 13: ... you will find a free version on the enclosed driver CD Click Download driver to download the latest driver from the Hama website This allows you to check whether drivers have now been developed for previously unsupported systems Click Back to return to language selection When you select Install the InstallShield Wizard is loaded This can take a few seconds Please wait until the InstallShield Wizar...

Page 14: ...to the device e g LAN connection When you right click the appropriate connection a menu is displayed select Properties Select the entry Internet Protocol Version 4 TCP IPv4 from the list and click Properties Select Use the following IP address and enter these addresses First PC 192 168 2 101 subnet mask 255 255 255 0 Second PC 192 168 2 102 subnet mask 255 255 255 0 and so on Confirm with OK and Cl...

Page 15: ... Computer and select Properties from the menu The System Properties will now be displayed Switch to the Computer Name tab You can see the workgroup name here Description The description is optional File server codepage This setting is required for the use of Microsoft codepages and is matched to regions Switch to the TCP IP tab 4 1 2 TCP IP You must now set up your network to be able to use connec...

Page 16: ...aracters letters and numbers are allowed Password Enter a password of your choosing with a maximum of 15 characters letters numbers and punctuation marks are allowed Repeat password Confirm the password by repeating it After this click the button Apply This sets the new values for the administrator account Creating user accounts You can create up to 25 user accounts To do so proceed as follows Fill...

Page 17: ... be used After installation is complete you can add the printer to the list of automatic printers This means that the connection to the printer must no longer be made manually To do this click Automatic printer in the Control Center and then Set auto connect printer Select the printer from the list and click Apply Please remember to disconnect As long as you are connected no other user can access ...

Page 18: ... from the scanner manufacturer Depending on the manufacturer you may need to connect the scanner to the computer directly After you have completed the installation of the driver reconnect the scanner to the MFS Select the scanner or multifunction device in the Control Center and then click Network scanner Select the driver from the list and click OK If you are informed that no driver is installed ...

Page 19: ...orer on your PC From the Tools menu choose Map Network Drive Drive Select a drive letter that the network drive should be mapped to Folder Enter the path to the desired folder such as IP address of the MFS name of the folder Example 192 168 1 100 usb_d1p1 where d1 stands for storage medium 1 and p1 for partition 1 If the connected hard disk only has one partition you can use that as is You can als...

Page 20: ...r dealer or Hama Product Consulting if you have any product claims Internet World Wide Web Product support new drivers or product information can be found at www hama com Support hotline Hama product consulting Tel 49 0 9091 502 115 Fax 49 0 9091 502 272 E mail produktberatung hama de ...

Page 21: ...s conçu pour une utilisation en plein air Protégez l appareil de la pression et des chocs L appareil ne doit être ni ouvert ni transporté pendant son fonctionnement Attention Utilisez exclusivement le bloc secteur fourni avec l appareil L utilisation d un autre bloc secteur est susceptible de détruire l appareil Introduction Le serveur USM multifonctions permet d intégrer des appareils USB imprima...

Page 22: ...électionnez la langue désirée Cette procédure d installation est destinée aux systèmes d exploitation Windows 2000 XP Vista Cliquez sur Installer afin de continuer l installation Cliquez sur Afficher le mode d emploi le cas échéant Le programme Adobe Reader doit être installé sur votre ordinateur afin de lire les fichiers PDF Vous trouverez une version gratuite de Adobe Reader sur le CD pilote fourni ...

Page 23: ...nt avec le bouton droit de votre souris sur la connexion correspondante Sélectionnez l entrée Protocole internet TCP IP dans la liste puis cliquez sur Propriétés Sélectionnez Utiliser l adresse IP suivante puis saisissez cette adresse Premier ordinateur 192 168 2 101 masque de sous réseau 255 255 255 0 Deuxième ordinateur 192 168 2 102 masque de sous réseau 255 255 255 0 et ainsi de suite Confirmez...

Page 24: ...urés par défaut Nom d utilisateur admin Mot de passe admin Quittez le programme de configuration en cliquant sur Terminer ou cliquez sur Appliquer dans le cas où vous avez apporté des modifications à la configuration MFS doit être redémarré après la modification des paramètres Dans ce cas répondez à la question et redémarrez le système 4 1 1 Configuration générale Nom du serveur Le serveur apparaît sou...

Page 25: ...et appareil Mode serveur Ce mode permet à plusieurs utilisateurs d utiliser simultanément un même appareil connecté ils ont par exemple tout accès à un disque dur Commutez vers l onglet Comptes utilisateurs 4 1 4 Comptes utilisateurs L accès à la mémoire USB connectée peut être défini à l aide de comptes utilisateurs Le nom de l utilisateur et le mot de passe seront exigés lorsque l option Activer ...

Page 26: ...primantes USB dans le réseau Une imprimante connectée est affichée comme indiqué dans l illustration au dessous du serveur USB multifonctions Les pilotes sont déjà installés et vous pouvez sauter au point suivant dans le cas où vous avez déjà utilisé l imprimante sur votre ordinateur Dans le cas contraire installez en premier lieu le pilote de l imprimante sur chaque ordinateur censé utiliser cette...

Page 27: ...r le type de connexion Cliquez finalement sur Suivant Dans la fenêtre suivante saisissez l adresse IP de votre MFS sous Nom d hôte ou l adresse IP commutez vers le centre de contrôle afin de trouver ces indications l adresse IP est affichée 192 168 1 100 par exemple Cliquez ensuite sur Suivant Sélectionnez Personnalisé sous le type de l appareil puis cliquez ensuite sur Paramètres Sélectionnez LPR da...

Page 28: ...au réseau et que ces derniers sont éventuellement bloqués par un pare feu Vous devez libérer ces ports L utilisation de certaines fonctions n est en outre pas possible actuellement sous Windows Vista Formatage du support de données Le support de données connecté doit être formaté en FAT afin de pouvoir l utiliser Attention Toutes les données stockées sur votre support de données seront effacées lor...

Page 29: ...Une fenêtre prévue pour saisir les données utilisateur s ouvre Tous les dossiers partagés sont ensuite affichés selon le principe suivant Dossier d1p1 d1 indique le support de données1 et p1 la partition 1 Vous pouvez conformément aux autorisations ajouter des dossiers les copier ou les effacer Vérifiez le chemin d accès le nom d utilisateur et le mot de passe dans le cas où le système vous signale ...

Page 30: ...29 ...

Page 31: ...30 ...

Page 32: ...31 ...

Reviews: