background image

5

8. Integrating devices into the Hama Smart
Home (Solution)

• Have the camera installed by a specialist as

described.

• The LED on the camera starts to flash quickly. If it

does not, press and hold the Reset button (4) on
the camera for around 5 seconds.

• Open the app and sign in.
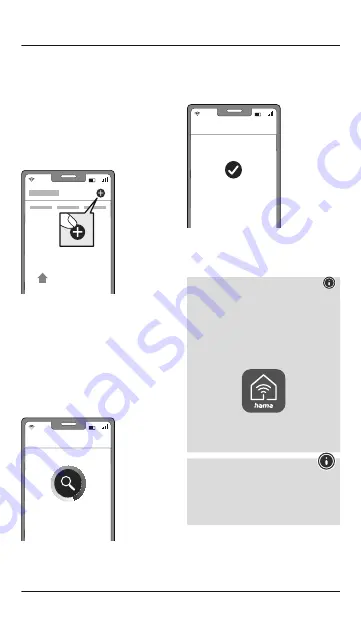
• Press the

+

in the top right-hand corner to add

a new device.

My Home

Choose

Cameras

from the list.

• Now confirm that the camera's LED is flashing

quickly by ticking "Next step" and clicking on
"Next".Ensure that the QR code is at the top right.

• Next enter your WiFi password and

confirm with NEXT.Now scan the QR code with
the camera from a distance of around 15 - 20 cm.

• As soon as you hear a signal sound, click "Signal

sound heard".

• Your camera is now connected.

Connecting Now

• Once the connection is successful, the LED stops

flashing quickly and the app confirms that your
camera is connected. You can now assign it a
different name if you wish.

Added successfully

Done

• Click

Finish

to end the process.

• You can now operate and configure the cam-

era.

Note

A detailed description of the

Hama Smart Home (Solution) App

and its full scope of functions can be found in our

App Guide at:

www.hama.com

ð

Article Number

ð

Downloads

ð

App Operating Instructions

Note: Pairing restart

First remove the rubber protector on one side of
the camera. Now press the Reset button with a
needle or another thin object until a signal sound
is heard. As soon as the LED starts to flash red,
you can start a further pairing attempt.

Summary of Contents for 00176614

Page 1: ...WiFi Outdoor Camera WiFi Outdoor Kamera D GB Operating Instructions Bedienungsanleitung 00176614 ...

Page 2: ...A B 1 2 3 4 6 5 ...

Page 3: ... contact Non interchangeable adapter 2 Explanation of warning symbols and notes Risk of electric shock This symbol indicates a risk of electric shock from touching uninsulated product parts that may carry hazardous voltage Warning This symbol is used to indicate safety instructions or to draw your attention to specific hazards and risks Note This symbol is used to indicate additional information o...

Page 4: ...t is visibly damaged No bare spots must be visible after connection This product is intended for private non commercial use only Do not use the product in areas in which electronic products are not permitted Keep the packaging material out of the reach of children due to the risk of suffocation Pay attention to the applicable data protection regulations before installing and using the product Resp...

Page 5: ...network Work on the 230 V network must only be carried out by an electrician certified in your country The applicable accident prevention regulations must be adhered to To avoid an electric shock from the device please disconnect the mains voltage switch off the automatic circuit breaker Failure to comply with the installation instructions can cause fires or other hazards Risk of electric shock Do...

Page 6: ...cm As soon as you hear a signal sound click Signal sound heard Your camera is now connected Connecting Now Once the connection is successful the LED stops flashing quickly and the app confirms that your camera is connected You can now assign it a different name if you wish Added successfully Done Click Finish to end the process You can now operate and configure the cam era Note A detailed descript...

Page 7: ...y 3 Open the photo album and view all of the images captured 4 Switch between dark and light mode 5 Manage the settings for the motion detector 6 Manage the settings for the floodlight 7 Define a schedule for the floodlight 8 Edit the rapid access 9 Retrieve this device s messages and alarms For extended usage options scenarios can be created in the app See Section 10 and App Guide 1 5 2 6 9 3 7 4...

Page 8: ... app allow various combination options and usage options for these products depending on the SmartHome products in your home Programming is always via the app see Section 4 of the App Guide and will be offered suggested to you on an individual basis Standard usage option Extended usage option REC REC REC ...

Page 9: ...r use of the product or from failure to observe the operating instructions and or safety notes 14 RF exposure information This device complies with the EU requirements for limiting the exposure of the general public to electromagnetic fields by means of health protection The device complies with RF specifications provided it is used 20 cm away from the body 15 Declaration of conformity Hama GmbH C...

Page 10: ...hlages Nicht austauschbares Vorschaltgerät 2 Erklärung von Warnsymbolen und Hinweisen Gefahr eines elektrischen Schlages Dieses Symbol weist auf eine Berührungsgefahr mit nicht isolierten Teilen des Produktes hin die möglicherweise eine gefährliche Spannung von solcher Höhe führen dass die Gefahr eines elektrischen Schlags besteht Warnung Wird verwendet um Sicherheitshinweise zu kennzeichnen oder ...

Page 11: ...sonal Betreiben Sie das Produkt nicht weiter wenn es offensichtliche Beschädigungen aufweist Es dürfen nach dem Anschliessen keine blanken Stellen sichtbar sein Das Produkt ist für den privaten nicht gewerblichen Gebrauch vorgesehen Benutzen Sie das Produkt nicht in Bereichen in denen elektronische Produkte nicht erlaubt sind Halten Sie Kinder unbedingt von dem Verpackungsmaterial fern es besteht ...

Page 12: ... Wechselspannungsnetz zulässig Arbeiten am 230V Netz dürfen nur von einer in Ihrem Land zertifizierten Elektrofachkraft erfolgen Dabei sind die geltenden Unfallverhü tungsvorschriften zu beachten Zur Vermeidung eines elektrischen Schlages am Gerät bitte Netzspannung freischalten Siche rungsautomat abschalten Bei Nichtbeachtung der Installationshinweise können Brände oder andere Gefahren entstehen ...

Page 13: ...r Entfernung von 15 20 cm Sobald Sie einen Signalton hören klicken Sie auf Signalton gehört Ihre Kamera wird nun verbunden Gerät hinzufügen Bei erfolgreicher Verbindung hört die LED auf schnell zu blinken und die App bestätigt dass Ihre Kamera verbunden wurde Nun können Sie ihr noch einen eigenen Namen geben Erfolgreich hinzugefügt Erledigt Mit einem Klick auf Erledigt schließen Sie den Vorgang ab...

Page 14: ... und sehen Sie sich alle getätigten Bildaufnahmen an 4 Wechseln Sie zwischen dem dark und light Mode 5 Verwalten Sie die Einstellungen des Bewegungsmelders 6 Verwalten Sie die Einstellungen des Flutlichts 7 Legen Sie einen Zeitplan für das Flutlicht fest 8 Bearbeiten Sie den Schnellzugriff 9 Rufen Sie die Mitteilungen und Alarme dieses Geräts ab Für erweiterte Nutzungsmöglichkeiten können Szenen i...

Page 15: ...ben sich je nach vorhandenen SmartHome Produkten in Ihrem Zuhause viele Kombinations und Nutzungsmöglichkeiten dieser Produkte Die Programmierung erfolgt immer über die App siehe Kapitel 4 des App Guide und wird Ihnen individuell angeboten vorgeschlagen Standard Nutzungsmöglichkeit Erweiterte Nutzungsmöglichkeit REC REC REC ...

Page 16: ...chgemäßem Gebrauch des Produktes oder einer Nichtbeachtung der Bedienungsanleitung und oder der Sicherheitshinweise resultieren 14 HF Expositionsinformationen Dieses Gerät erfüllt die EU Anforderungen zur Begrenzung der Exposition der Bevölkerung gegenüber elektromagnetischen Feldern mittels Gesundheitsschutz Das Gerät entspricht den HF Spezifikationen sofern es 20 cm vom Körper entfernt genutzt w...

Page 17: ...rrors and omissions excepted and subject to technical changes Our general terms of delivery and payment are applied Hama GmbH Co KG 86652 Monheim Germany Service Support www hama com 49 9091 502 0 DG 00176614 11 22 Google and Google Play are trademarks of Google LLC ...

Reviews: